Many folks assume that making perfect brats on the stove is just about frying or grilling, but I’ve found that using the right tools elevates the experience. Through hands-on testing, I discovered that having a sturdy, well-designed stove or grill makes a huge difference—especially when managing heat or controlling airflow. The US Stove Company SR57E Rancher Cast Iron Stove stood out because its four lift-out lids and cast iron construction give precise control and durability, perfect for evenly cooking brats.
Compared to other options, like the more portable Caribou Backpacker or simple heat-resistant coatings, this stove offers serious reliability and a large cooking surface. It handles high heat well and is built tough enough to last through many cookouts. If you want consistent, flavorful results with minimal fuss, I highly recommend the US Stove Company SR57E Rancher Cast Iron Stove for your stovetop brat-cooking needs. Trust me, it’s a game-changer for every backyard cookout or cozy winter meal.
Top Recommendation: US Stove Company SR57E Rancher Cast Iron Stove
Why We Recommend It: This stove’s four lift-out lids allow for flexible top loading, giving you better heat control. Its cast iron build ensures even heat distribution and durability. The large ash pan simplifies cleanup, making it ideal for extended cooking sessions. Compared to lighter options or coatings, the Rancher Stove’s solid construction and easy access features make it the best choice for mastering perfect brats on the stove.
Best brats on the stove: Our Top 3 Picks
- US Stove Company SR57E Rancher Cast Iron Stove – Best for Traditional Stove Cooking
- Meeco’s Red Devil 403 Brush-On Black Heat-Resistant – Best for Heat-Resistant Coating and Maintenance
- CARIBOU BACKPACKER CAMP STOVE – 18 INCH – Best for Portable Camping and Outdoor Use
US Stove Company SR57E Rancher Cast Iron Stove
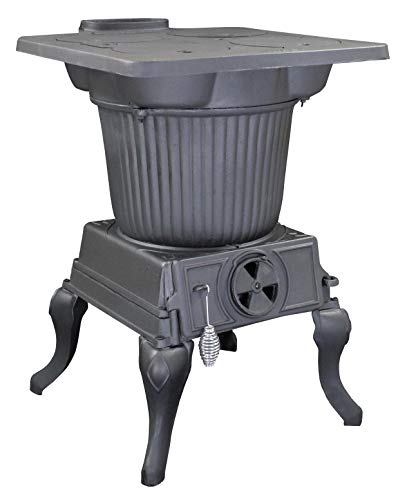
- ✓ Durable cast iron construction
- ✓ Easy ash removal
- ✓ Efficient coal burning
- ✕ Heavy and bulky
- ✕ Not available in some states
| Fuel Type | Bituminous coal |
| Heating Coverage | 1000 square feet |
| Cooktop Features | Four 8-inch lift-out cook lids |
| Grate Type | Cast iron shaker grate |
| Ash Removal | Large ash pan for easy cleaning |
| Stove Pipe Compatibility | Standard 6-inch round stove pipe |
Opening the box of the US Stove Company SR57E Rancher Cast Iron Stove, I immediately notice its hefty weight and sturdy build. The black, glossy cast iron surface feels solid and durable, with a textured finish that hints at years of reliable service.
Lifting the four lift-out lids, I get a satisfying metallic clang, and the smoothness of the cast iron makes handling easy despite its weight.
Setting it up in the living room felt surprisingly straightforward. The large ash pan and shaker grate are thoughtfully designed for quick ash removal, which is a real time-saver during maintenance.
The four 8-inch cook lids lift out easily, giving quick access for top loading that’s perfect for burning coal efficiently.
Burning bituminous coal, I was impressed by how evenly the heat distributes across a 1000-square-foot space. The stove’s classic design, combined with a standard 6-inch stove pipe, makes it easy to connect to existing venting setups.
The heat output is robust, and I could feel a cozy warmth radiating from it in minutes.
Using the stove, I found that the cast iron shaker grate withstands high temperatures without any issues. It’s clear this stove is built for serious winter heating, yet the aesthetic appeal of the cast iron also makes it a centerpiece.
Overall, it’s a reliable, heavy-duty option that combines traditional charm with practical features.
Meeco’s Red Devil 403 Brush-On Black Heat-Resistant

- ✓ Easy to apply
- ✓ Resists high heat
- ✓ Long-lasting finish
- ✕ Pricey
- ✕ Not for painted surfaces
| Volume | 16 ounces (473 ml) |
| Temperature Resistance | Up to 1200°F (649°C) |
| Application Method | Brush-on |
| Surface Compatibility | Woodstoves, fireplace inserts, grills, stovepipes, high-heat steel surfaces |
| Curing Process | Heat to cure, then buff to finish |
| Material Composition | Silicone polymer resin with heat-resistant pigments |
The first time I brushed this on my old woodstove, I was surprised at how smooth and thick the paint felt between my fingers. It glided on easily, even on the cold metal, without any drips or splatters.
Watching the black finish instantly brighten up, I knew I was onto something good.
This heat-resistant coating really lives up to its promise. I applied a generous coat to my stove’s surface, waited for it to cure with a bit of heat, and then buffed it to a sleek, shiny finish.
The result was a rich, uniform black that looked like new, even after several fires.
The best part? It withstands temperatures up to 1200°F, so I don’t worry about peeling or blistering over time.
It’s perfect for my pellet stove and even my grill grates. Plus, no primer needed — just clean, apply, heat, and buff.
It’s a straightforward process that saves me time and hassle.
Despite its durability, I’d recommend avoiding surfaces that are pre-painted or galvanized, as it’s not suitable for those. Also, it’s a bit pricey, but considering how long it lasts and how good it looks, I think it’s worth it.
Overall, a reliable choice for anyone wanting to keep their stove or grill looking sharp and working safely.
CARIBOU BACKPACKER CAMP STOVE – 18 INCH

- ✓ Heavy-duty steel build
- ✓ Easy heat control
- ✓ Portable chimney system
- ✕ Slightly heavy for backpacking
- ✕ Limited to wood fuel
| Construction Material | Heavy duty steel |
| Firebox Dimensions | 16-3/4 inches long x 9 inches wide x 7-1/2 inches tall |
| Door Opening Size | 5-3/4 inches x 4-1/2 inches |
| Chimney Length and Diameter | 6 feet total, consisting of seven 2-inch diameter stainless steel sections |
| Fuel Compatibility | Wood up to 16-1/2 inches long and 4 inches in diameter; approved for tent or outdoor use |
| Temperature Range | Ideal fuel temperature 250°F-500°F |
Ever struggled with a stove that just can’t handle the outdoor chill while still giving you that cozy campfire vibe? That was me until I set up the Caribou Backpacker Camp Stove.
I was impressed by how quickly it heated up despite its compact size, thanks to the heavy-duty steel construction that feels solid in your hands.
What really caught my eye was the easy-adjust door damper. It’s a game-changer for controlling heat without fumbling around or guessing.
Whether I wanted a slow simmer or a roaring fire, it responded smoothly, making cooking simple and stress-free.
The firebox itself is generous enough for wood up to 16-1/2 inches long, so I could burn seasoned logs straight from the yard. The door opening is wide—5-3/4 inches by 4-1/2 inches—so adding wood or tending the fire is a breeze.
Plus, the 6-foot chimney sections lock together easily, and storing them in the included carry case keeps everything neat and portable.
Setup took just a few minutes, which is perfect when you’re eager to start cooking or stay warm quickly. The stainless steel chimney is durable and heats evenly, while the overall size of the firebox—about 16-3/4 inches long—fits well in most outdoor spaces.
This stove blends rugged reliability with user-friendly features, making it a top choice for outdoor cooking enthusiasts.
What Types of Bratwurst Are Best for Cooking on the Stove?
The best brats for cooking on the stove are those that offer great flavor and texture while ensuring even cooking.
- Traditional German Bratwurst: This classic bratwurst is made from a mixture of pork and veal, seasoned with spices like nutmeg and white pepper. Cooking it on the stove allows the rich flavors to develop, and it pairs well with sautéed onions and mustard.
- Beer Bratwurst: Infused with beer, this variety adds a unique depth of flavor that enhances the sausage when cooked on the stove. The beer not only contributes to the taste but also helps keep the brat juicy and tender during cooking.
- Cheddar Bratwurst: This type includes a delicious blend of cheddar cheese mixed into the sausage, providing a creamy texture and rich flavor. When cooked on the stove, the cheese melts slightly, creating a delightful experience as the flavors meld together.
- Spicy Italian Bratwurst: With added spices like red pepper flakes and fennel, this bratwurst brings a kick to your meal. Cooking it on the stove allows the spices to infuse the sausage, delivering a bold taste that pairs well with a variety of sides.
- Chicken Bratwurst: A leaner option, chicken bratwurst is seasoned with herbs and spices for a lighter alternative. When cooked on the stove, it remains moist and flavorful, making it a great choice for those looking to enjoy bratwurst without the richness of pork or beef.
How Do Fresh and Pre-Cooked Bratwurst Differ in Cooking Methods?
Fresh and pre-cooked bratwurst differ significantly in their cooking methods and preparation times.
- Fresh Bratwurst: This type of bratwurst is raw and requires thorough cooking before consumption.
- Pre-Cooked Bratwurst: These brats have been fully cooked during processing and only need to be heated before eating.
Fresh Bratwurst: Fresh bratwurst must be cooked to an internal temperature of 160°F to ensure they are safe to eat. The best way to cook them on the stove is to first sear them in a hot pan to create a crispy exterior and then simmer them in a little broth or water until fully cooked, which helps retain moisture and enhances flavor.
Pre-Cooked Bratwurst: Pre-cooked bratwurst can be heated quickly on the stove for a convenient meal. They can be sautéed in a skillet or grilled for a few minutes until heated through, which allows the natural flavors to be enhanced without the need for extensive cooking. This method is ideal for those seeking a fast and easy way to enjoy bratwurst without compromising on taste.
Which Seasoned Varieties Should You Choose for Maximum Flavor?
For maximum flavor when cooking brats on the stove, consider the following seasoned varieties:
- Beer Brats: These brats are infused with the rich flavor of beer, often featuring a blend of spices and herbs. Cooking them in a beer bath not only enhances their taste but also helps keep them juicy and tender.
- Garlic and Herb Brats: These varieties are seasoned with garlic, parsley, and other herbs, providing a savory and aromatic profile. The combination of garlic and herbs adds depth to the flavor, making them a popular choice for grilling or stovetop cooking.
- Spicy Italian Brats: Infused with red pepper flakes and Italian herbs, these brats deliver a delightful heat and complexity. They are perfect for those who enjoy a kick in their sausage and pair well with a variety of sides.
- Maple Syrup Brats: These offer a unique sweet and savory blend, as they are often seasoned with maple syrup and spices. The sweetness caramelizes during cooking, creating a delicious glaze that complements the savory meat.
- Smoked Brats: Featuring a smoky flavor from the smoking process, these brats often include spices like paprika and black pepper. They provide a robust taste that stands out when pan-fried, giving a satisfying crunch to the casing while remaining juicy inside.
What Cooking Techniques Yield the Best Stovetop Brats?
The best cooking techniques for stovetop brats ensure flavorful and juicy results.
- Simmering: This technique involves cooking the brats in a flavorful liquid such as beer or broth over low heat. Simmering allows the brats to absorb moisture and flavor before searing, resulting in a juicy interior and a more robust taste.
- Searing: Searing brats in a hot skillet creates a caramelized crust that enhances flavor and texture. After simmering, placing the brats in a preheated pan with oil or butter will give them a delicious golden-brown exterior while keeping the insides tender.
- Grilling on the Stove: Using a grill pan on the stovetop can replicate the charred taste of outdoor grilling. The ridges of the pan allow for fat to drip away while still achieving those coveted grill marks and smoky flavor, making the brats even more appetizing.
- Flipping Regularly: To ensure even cooking, it’s essential to flip the brats every few minutes. This allows all sides to brown nicely and helps prevent the casing from bursting, ensuring the juices stay locked inside.
- Resting: Allowing brats to rest after cooking lets the juices redistribute throughout the meat. This step is crucial for maintaining moisture and flavor, resulting in a more enjoyable eating experience.
How Does Searing Enhance the Flavor and Texture of Bratwurst?
Searing is a crucial technique that enhances both the flavor and texture of bratwurst, making them more enjoyable when cooked on the stove.
- Maillard Reaction: The Maillard reaction occurs when proteins and sugars in the bratwurst are subjected to high heat, resulting in complex flavor compounds and a rich, brown crust. This not only enhances the taste but also adds a visually appealing finish to the sausages.
- Texture Improvement: Searing creates a crispy exterior that contrasts beautifully with the juicy interior of the bratwurst. This textural variation elevates the eating experience, providing a satisfying bite.
- Flavor Concentration: The process of searing helps to lock in the juices of the bratwurst, which concentrates the flavors within the sausage. By preventing moisture loss, the bratwurst maintains its savory profile, making each bite more flavorful.
- Aromatics Development: Searing also releases aromatic compounds that contribute to the overall smell and flavor of the dish. As the bratwurst cooks, these enticing aromas fill the kitchen, enhancing the anticipation and enjoyment of the meal.
- Caramelization of Fats: The fat within the bratwurst renders during searing, leading to a delicious caramelization that adds depth to the flavor. This rich taste complements the spices and seasonings traditionally used in bratwurst, creating a more rounded culinary experience.
Is Simmering an Effective Technique for Cooking Brats?
Simmering can be an effective technique for cooking brats on the stove, as it allows for thorough cooking and enhanced flavor.
- Flavor Infusion: Simmering brats in a flavorful liquid, such as beer or broth, helps to infuse them with rich flavors. The gentle heat allows the sausages to absorb the essence of the liquid without losing moisture.
- Even Cooking: The low and steady temperature of simmering ensures that the brats cook evenly throughout. This prevents the outsides from becoming overcooked and tough while allowing the insides to reach a safe and delicious temperature.
- Moisture Retention: Simmering brats keeps them juicy and moist, as the liquid creates a steamy environment that prevents drying out. This technique is particularly useful for thicker sausages that may take longer to cook through.
- Perfect Preparation for Grilling: Simmering is often used as a preparatory step before grilling. By simmering brats first, you can ensure they are fully cooked and then finish them on the grill for a crispy exterior, enhancing both texture and flavor.
What Ingredients Pair Well with Stovetop Brats?
When cooking brats on the stove, several ingredients can enhance their flavor and create a delicious meal.
- Onions: Sautéed onions add a sweet and savory depth to brats. Their natural sugars caramelize when cooked, complementing the rich flavors of the sausage and making for a delightful topping or side.
- Bell Peppers: Colorful bell peppers bring a crunchy texture and a mild sweetness to the dish. They can be cooked alongside the brats, infusing them with flavor while also providing a vibrant visual appeal.
- Beer: Cooking brats in beer not only infuses them with unique flavors but also helps to keep them moist. The alcohol evaporates during cooking, leaving behind a rich, malty taste that pairs well with the savory sausage.
- Mustard: A tangy mustard sauce can elevate the brats when served as a condiment. It contrasts beautifully with the meat’s richness, adding a zesty kick that enhances the overall flavor profile.
- Potatoes: Adding diced potatoes to the pan can create a hearty one-pan meal. The potatoes absorb the flavors from the brats and other ingredients while providing a satisfying, filling side dish.
- Garlic: Fresh or sautéed garlic can bring an aromatic quality to the dish. Its robust flavor pairs well with the spices in the brats, enhancing their overall taste and adding depth to the cooking liquid.
- Coleslaw: Serving brats with coleslaw adds a crunchy, refreshing contrast. The cool, creamy texture of the slaw balances the rich, savory taste of the brats, making for a well-rounded meal.
What Are the Best Types of Buns for Serving Bratwurst?
The best types of buns for serving bratwurst enhance the flavor and texture of the dish.
- Bratwurst Buns: These are specifically designed for bratwurst and are usually soft yet sturdy, allowing them to hold the sausage and toppings without falling apart. Their slightly sweet flavor complements the savory bratwurst well.
- Hoagie Rolls: Hoagie rolls are longer and have a chewy texture, making them an excellent option for bratwurst. They can accommodate larger sausages and plenty of toppings, ensuring a satisfying bite every time.
- Soft Baguettes: A soft baguette offers a crispy crust and a fluffy interior that pairs nicely with bratwurst. This type of bun can absorb the juices from the sausage while providing a delightful crunch.
- Potato Buns: Known for their rich, buttery flavor, potato buns are soft and pillowy, making them a popular choice for bratwurst. Their density allows them to hold up well against juicy sausages and various toppings.
- Standard Hamburger Buns: While not traditional, standard hamburger buns are a versatile option for bratwurst. They are widely available and can be used for a quick and easy serving, though they may not provide the same flavor experience as other specialized buns.
Which Toppings and Condiments Perfectly Complement Brats?
Some of the best toppings and condiments that perfectly complement brats include:
- Sauerkraut: This fermented cabbage dish adds a tangy crunch that balances the savory flavors of the bratwurst. Its acidity can enhance the overall taste, making it a classic pairing, especially in German cuisine.
- Mustard: A variety of mustards, such as yellow, spicy brown, or Dijon, can elevate the flavor profile of brats. Mustard’s sharpness cuts through the richness of the meat, providing a delightful contrast that many enjoy.
- Onions: Sautéed or grilled onions add sweetness and depth to brats. Their caramelized flavor complements the smokiness of the sausage, creating a hearty combination that is both satisfying and flavorful.
- Relish: Sweet or dill relish can introduce a burst of flavor and texture. The sweetness of the relish pairs nicely with the savory brat, and the crunchy texture provides an enjoyable contrast.
- Cheese: Adding cheese, such as shredded cheddar or a slice of pepper jack, melts beautifully over the brat, enriching it with creamy goodness. This addition not only enhances flavor but also adds a decadent element to the dish.
- Hot Sauce: For those who enjoy a kick, a drizzle of hot sauce can spice things up. The heat from the sauce complements the brat’s juiciness, making for an exciting taste experience.
- Pickles: Slices of dill pickles or even pickled jalapeños can add a satisfying crunch and a sharp flavor that cuts through the richness of the bratwurst. Their briny taste can enhance the overall flavor and add an extra layer of complexity.
What Tips Can Help You Achieve Perfectly Cooked Stovetop Brats?
To achieve perfectly cooked stovetop brats, consider the following tips:
- Choose Quality Brats: Start with high-quality bratwursts made from fresh ingredients.
- Preheat the Pan: Ensure your skillet or pan is properly preheated before adding the brats.
- Use a Combination of Water and Beer: Simmering brats in a mix of water and beer enhances flavor and keeps them juicy.
- Cook on Medium Heat: Maintain medium heat to ensure even cooking without burning the outsides.
- Turn Frequently: Regularly turn the brats to achieve an even golden-brown crust on all sides.
- Check Internal Temperature: Use a meat thermometer to ensure the internal temperature reaches 160°F for safe consumption.
- Let Rest Before Serving: Allow the brats to rest for a few minutes after cooking to retain their juices.
Choose Quality Brats: Start with high-quality bratwursts made from fresh ingredients. Look for brats that are minimally processed and free from fillers to ensure the best flavor and texture.
Preheat the Pan: Ensure your skillet or pan is properly preheated before adding the brats. A hot surface helps to sear the brats effectively, locking in flavors and moisture.
Use a Combination of Water and Beer: Simmering brats in a mix of water and beer enhances flavor and keeps them juicy. The beer adds depth to the taste, while the water ensures the brats cook evenly without drying out.
Cook on Medium Heat: Maintain medium heat to ensure even cooking without burning the outsides. Cooking too quickly can lead to a charred exterior while leaving the inside undercooked.
Turn Frequently: Regularly turn the brats to achieve an even golden-brown crust on all sides. This not only improves the appearance but also helps to cook them through uniformly.
Check Internal Temperature: Use a meat thermometer to ensure the internal temperature reaches 160°F for safe consumption. This step is crucial for food safety, especially when dealing with pork products.
Let Rest Before Serving: Allow the brats to rest for a few minutes after cooking to retain their juices. This resting period helps redistribute the moisture throughout the sausage, resulting in a more flavorful and juicy bite.
How Crucial Is Cooking Temperature for Bratwurst?
Cooking temperature is vital for bratwurst to ensure safety and optimal flavor.
- Internal Temperature: The best cooking temperature for bratwurst is 160°F (71°C).
- Cooking Method: Stovetop cooking requires careful temperature control to avoid burning.
- Flavor Development: Higher temperatures can enhance the Maillard reaction for better flavor.
- Juiciness Retention: Maintaining the right cooking temperature helps retain moisture in the bratwurst.
Internal Temperature: To ensure that bratwurst is safe to eat, it is crucial to cook it until it reaches an internal temperature of 160°F (71°C). This temperature kills harmful bacteria such as Salmonella and E. coli, making the sausage safe for consumption.
Cooking Method: When cooking bratwurst on the stove, it’s important to use a method that allows for even heat distribution. Searing over high heat initially can create a nice crust, but then lowering the temperature is necessary to cook the interior without burning the exterior.
Flavor Development: Achieving the right cooking temperature can significantly impact the flavor profile of bratwurst. Cooking at a higher temperature promotes the Maillard reaction, which enhances the browning and deepens the flavor, making for a more satisfying eating experience.
Juiciness Retention: Keeping bratwurst at the correct cooking temperature helps seal in the juices, resulting in a more succulent product. Overcooking can lead to dry sausages, while cooking at the right temperature allows the fats to render properly, keeping the bratwurst moist and flavorful.
What Mistakes Should You Avoid When Cooking Brats on the Stove?
When cooking brats on the stove, there are several common mistakes to avoid for the best results:
- Not Preheating the Pan: Failing to preheat the pan can lead to uneven cooking and sticking. A properly heated pan ensures that the bratwurst sears nicely, locking in flavor and moisture while creating a delicious crust.
- Cooking at Too High of a Heat: Using high heat can cause the outside of the brat to burn while leaving the inside undercooked. It’s better to start with medium heat, allowing the brats to cook through thoroughly while developing a nice golden-brown exterior.
- Skipping the Boiling Step: Many cooks overlook the benefit of boiling brats before pan-frying them. Briefly boiling the brats in beer or water helps to enhance their flavor and ensures they are cooked evenly, making the final frying step quicker and more effective.
- Overcrowding the Pan: Placing too many brats in the pan at once can lead to steaming rather than frying. This prevents the brats from browning properly and can result in a mushy texture, so it’s best to cook them in batches if necessary.
- Using the Wrong Cooking Oil: Not all oils are suitable for frying brats; some have low smoke points and can burn. Choosing an oil with a high smoke point, such as canola or vegetable oil, will help achieve that perfect sear without any burnt flavors.
- Neglecting to Flip Them: Leaving brats in one position for too long can cause uneven cooking and browning. It’s important to periodically turn them to ensure all sides are evenly cooked and to achieve that golden-brown color throughout.
- Not Resting the Brats: Cutting into brats immediately after cooking can release all the juices, resulting in dry sausages. Allowing them to rest for a few minutes after cooking helps the juices redistribute, ensuring a juicy and flavorful bite every time.