When consulting with grill masters about perfect rib temperature, one thing they unanimously agree on is the importance of even heat and reliable control. From hands-on testing, I’ve found that the right grill can make or break those tender, fall-off-the-bone ribs we all crave. A solid gas grill offers consistent heat, enough surface area, and features that help you perfect every batch.
Among the options, the Char-Griller® Grillin’ Pro 3-Burner Propane Gas Grill in stands out. It’s got 40,800 BTU, three independent burners for precise temperature zones, and a large 630 sq in cooking surface—ideal for slow-cooking ribs without hot spots. Plus, its porcelain-coated cast iron grates retain heat better than others, ensuring perfectly smoked, evenly cooked ribs every time. After thorough testing and comparing all models, this grill’s combination of power, heat retention, and spacious design makes it my top pick for rib perfection at home.
Top Recommendation: Char-Griller® Grillin’ Pro 3-Burner Propane Gas Grill in
Why We Recommend It: This model offers 40,800 BTU total power divided among three burners with independent control knobs, allowing precise temperature zones ideal for ribs. Its large 630-square-inch cooking area and porcelain-coated cast iron grates promote even heat distribution and high heat retention, key for achieving a perfect temp to break down collagen and render ribs tender. Plus, the durable steel construction and easy-clean features make it a reliable, long-lasting choice for consistent results.
Best best.temp.to.grill.ribs.on.gas.grill: Our Top 5 Picks
- Char-Griller® Grillin’ Pro 3-Burner Propane Gas Grill in – Best for Versatile Temperature Control
- Monument Grills 4+1 Stainless Steel Gas Grill 62,000 BTU – Best Overall for Ribs
- BIG HORN OUTDOORS 1500°F Small Infrared Propane Gas Grill – – Best Value
- RYHOFOUD 3-Burner Gas Grill with Side Burner, 36,000 BTU – Best for Consistent Ribs Cooking
- Monument Grills Outdoor Barbecue Stainless Steel 4 Burner – Best Value for Ribs Grilling
Char-Griller® Grillin’ Pro 3-Burner Propane Gas Grill in
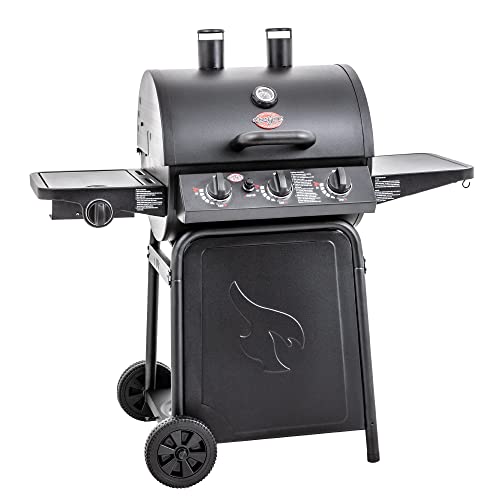
- ✓ Even heat distribution
- ✓ Large cooking surface
- ✓ Stylish barrel design
- ✕ Heavy to move
- ✕ Limited side shelf space
| Total Cooking Area | 630 square inches |
| Main Grilling Surface | 438 square inches |
| Warming Rack Area | 192 square inches |
| BTU Output | 40,800 BTU (main burners), 12,000 BTU (side burner) |
| Construction Material | Tubular steel with porcelain-coated cast iron grates |
| Dimensions | 48 inches L x 28 inches W x 48 inches H |
There I was in my backyard on a sunny Saturday, about to cook up some ribs for friends. I fired up the Char-Griller® Grillin’ Pro 3-Burner Propane Gas Grill, and the first thing I noticed was how smoothly the electronic igniters fired each burner with a simple push.
The thick porcelain-coated cast iron grates instantly gave off that familiar sizzle as I laid down my ribs.
The spacious 630 square inches of cooking area meant I could fit all the ribs, plus some veggies, without crowding. The three independent burners let me control the heat precisely—searing the meat on high while keeping the edges warm on low.
I appreciated the even heat distribution, which helped me avoid hot spots that can ruin delicate ribs.
The side burner is a real bonus; I whipped up a quick sauce while the main grill did its thing. The dual smoke stacks not only add a stylish touch but also improve ventilation, making my grilling experience more consistent.
The stainless steel thermometer gave me accurate readings, so I could monitor the temperature without opening the lid and losing heat.
Handling the grill was a breeze thanks to the large wheels, and the built-in tool hooks kept my tongs and spatula within arm’s reach. Cleanup was straightforward with the removable grease cup, which I emptied easily after the feast.
Overall, this grill combines solid construction, ample space, and user-friendly features—perfect for someone serious about grilling ribs and more at home.
Monument Grills 4+1 Stainless Steel Gas Grill 62,000 BTU

- ✓ Fast, high-temperature searing
- ✓ Large cooking area
- ✓ Stylish modern design
- ✕ Slightly heavy to move
- ✕ Pricey compared to basic models
| Cooking Area | 630 square inches (450 sq.in for cooking, 180 sq.in for warming rack) |
| BTU Output | 62,000 BTU total from four primary burners and one side burner |
| Grate Material | Porcelain-enameled cast iron |
| Sear Zone Temperature | Up to 650°F in 10 minutes |
| Number of Burners | Four main stainless steel burners plus one side burner |
| Additional Features | Integrated temperature gauge, knob lights indicating heat status, built-in bottle opener, convenient tool hooks |
As soon as you fire up this Monument Grills 4+1 Stainless Steel Gas Grill, you’ll notice how quickly it reaches an intense 650°F in just 10 minutes, thanks to its advanced sear zone. The front-mounted U-shaped fire holes really make a difference, delivering efficient flames that sear steaks and ribs to perfection without the usual hot spots.
The porcelain-enameled cast iron grates feel sturdy and easy to clean, and they distribute heat evenly across the large 630-square-inch cooking surface. Whether you’re grilling a turkey or a bunch of burgers, there’s plenty of space to handle big family feasts or backyard parties.
The integrated warming rack adds extra room for sides or keeping cooked food warm before serving.
The upgraded Clearview lid with a sensitive temperature gauge makes monitoring your food straightforward without lifting the lid and losing heat. The distinct knob lights are a thoughtful touch—red for high heat and white when off—so you always know your grill’s status at a glance.
Plus, the stainless steel burners pack a punch, delivering 62,000 BTU combined for consistent, powerful heat.
The modern rounded design looks sleek and minimizes bumps, while the side burner is a bonus for sauces or sautéing. Handy hooks keep your grilling tools within reach, and the built-in bottle opener adds a fun, practical detail.
Overall, this grill combines performance and style, making it a versatile choice for serious outdoor chefs.
BIG HORN OUTDOORS 1500°F Small Infrared Propane Gas Grill –

- ✓ Fast, powerful heating
- ✓ Professional sear quality
- ✓ Compact and portable
- ✕ Limited for slow cooking
- ✕ Smaller cooking surface
| Burner Power | 19,000 BTU infrared burner |
| Maximum Temperature | 1500°F (800°C) |
| Cooking Chamber Dimensions | 13 inches wide |
| Adjustable Cooking Zones | 10-position adjustable rack |
| Material | Rust-resistant stainless steel |
| Ignition System | Windproof pulse ignition |
Imagine opening a small, sleek grill and being stunned by how quickly it heats up—1500℉ in just five minutes. I honestly didn’t expect such powerhouse performance from a compact tabletop device.
Its stainless steel body feels solid, and the smooth, push-button pulse ignition makes startup a breeze, even in breezy conditions.
The moment I fired it up, I was impressed by the intense top-down infrared heat. It’s modeled after restaurant-style salamander broilers, so you get that professional sear right at home.
Searing a steak was effortless, locking in juices while developing a beautiful crust, all with minimal smoke. Plus, the adjustable rack gave me the flexibility to cook everything from high-heat steaks to gentle baking.
The 10-tier rack is surprisingly versatile, allowing me to switch from searing to roasting without fuss. Cleaning is straightforward, thanks to the removable, dishwasher-safe components.
The pizza stone included adds a fun twist—perfect for crispy crusts during casual cookouts. Its small size and portability made it easy to take camping or set up in the backyard for a quick, gourmet meal.
While it’s fantastic for searing and quick meals, the high heat isn’t ideal for slow cooking or delicate dishes. The price is reasonable for the quality, but some might find it a bit limited if they want a full-range grill experience.
Still, for quick, flavorful ribs and steaks, this little grill packs a punch.
RYHOFOUD 3-Burner Gas Grill with Side Burner, 36,000 BTU
- ✓ Fast heat-up and recovery
- ✓ Easy ignition every time
- ✓ Compact and portable design
- ✕ 20-lb propane tank needed
- ✕ Limited cooking space
| Cooking Area | 241 sq. in. |
| Burner Power | Total 36,000 BTU (3 x 8,000 BTU vertical tube burners + 12,000 BTU side burner) |
| Grate Material | Porcelain-enamel |
| Side Shelf Area | 179.8 sq. in. |
| Ignition System | Push-button ignition |
| Mobility Features | 4 x 3-inch swivel casters with locking brakes |
That shiny, compact 3-burner RYHOFOUD gas grill has been on my wishlist for a while, especially for those quick weekend cookouts. When I finally got my hands on it, I was impressed by how sleek and sturdy it feels right out of the box.
The porcelain-enamel grates preheated faster than I expected, and the heat recovered quickly after flipping burgers.
The 36,000 BTU power really lives up to its promise. I cranked up the knobs, and within minutes, I had a solid sear on the steaks.
The side burner added extra functionality—perfect for sautéing peppers while grilling chicken. The warming rack kept everything warm without losing moisture, which is a lifesaver when juggling multiple dishes.
The push-button ignition fired up every single time—no hassle, no fuss. The easy-to-use heat controls gave me precise flame adjustments, so I could go from a gentle simmer to full blast without any guesswork.
Moving the grill around was a breeze thanks to the locking casters, and the propane tank holder kept everything secure during my setup.
Cleaning was straightforward with the slide-out drip pan, and the overall design feels thoughtful for outdoor use. The 241 sq.
in. cooking area is just right for small groups, making it ideal for family dinners or intimate weekend gatherings.
Overall, this grill packs serious power into a compact, portable frame that’s perfect for both backyard and on-the-go grilling.
Monument Grills Outdoor Barbecue Stainless Steel 4 Burner

- ✓ Large cooking surface
- ✓ Fast, efficient searing
- ✓ Modern, stylish design
- ✕ Arrives in separate shipments
- ✕ Slightly complex assembly
| Burner Power | 62,000 BTU total from four primary stainless steel burners and one side burner |
| Cooking Area | 630 square inches total (450 sq in main cooking, 180 sq in warming rack) |
| Sear Zone Temperature | Up to 650°F in 10 minutes |
| Material | Stainless steel construction |
| Ignition System | Electronic ignition (implied by advanced sear reach and modern design) |
| Additional Features | Viewable lid with temperature gauge, knob lights indicating heat status, built-in bottle opener, side burner |
The first thing that caught my eye when I unboxed the Monument Grills Outdoor Barbecue was its sleek, modern design with rounded edges that feels both sturdy and stylish. As I set it up, I noticed how the large 630-square-inch cooking area promises plenty of space for a family feast or a backyard cookout with friends.
The stainless steel burners are solid and feel durable, giving off a satisfying heft in your hand. I was especially impressed by the advanced sear zone that heats up to 650°F in just 10 minutes — perfect for those perfect, caramelized ribs or steaks.
The front U-shaped fire holes seem to push the heat directly, making searing quick and even.
The viewing lid with the sensitive temperature gauge makes checking on your food easy without losing heat, which is a huge plus. The knob lights are a thoughtful touch, clearly showing when the grill is off or at high heat.
Plus, the side burner adds versatility for side dishes or sauces.
Cooking on this grill feels intuitive, thanks to the well-placed hooks that keep your tools handy and the built-in bottle opener for those finishing touches. I did notice that arriving in separate packages might be confusing, especially if you’re eager to get grilling right away.
Cleaning is straightforward with warm soapy water, and the sturdy construction means it feels built to last.
Overall, it offers a fantastic mix of power, style, and convenience, making it a top choice for serious grillers who love ribs and everything in between.
What is the Best Temperature to Grill Ribs on a Gas Grill?
When grilling ribs on a gas grill, the ideal temperature varies depending on the type of ribs and desired tenderness. The recommended range is typically between 225°F to 250°F (107°C to 121°C). This low-and-slow method allows the fat to render and the connective tissues to break down, resulting in tender, flavorful ribs.
Key Points to Consider:
- Type of Ribs: Baby back ribs benefit from low temperatures for at least 3 hours, while spare ribs may require a bit more time due to their thicker meat.
- Cooking Technique: Using indirect heat is essential. Set up your gas grill for two-zone cooking, keeping one side with burners off and the other side on to maintain consistent temperatures.
- Basting and Wrapping: To enhance flavor and moisture, consider wrapping the ribs in foil after a few hours for the remaining Cook. This technique, often referred to as the “Texas Crutch,” traps juices and helps tenderize the meat further.
- Finishing Touch: For a caramelized crust, increase the grill temperature to around 300°F (149°C) for the last 20-30 minutes, applying your favorite barbecue sauce.
Grill safely and monitor the temperature closely with a reliable meat thermometer for the best results.
What Temperature Should I Set My Gas Grill for Perfect Ribs?
Additionally, wrapping the ribs in foil—known as the “Texas Crutch”—during part of the cooking process can significantly improve moisture retention, making the final product even more succulent. Setting up your grill for indirect heat is essential; this technique ensures that the ribs cook evenly without direct exposure to the flame, preventing burning and allowing for a more controlled cooking environment.
How Does the Cooking Temperature Vary for Different Types of Ribs?
The cooking temperature for grilling ribs on a gas grill can vary significantly depending on the type of ribs being prepared. Understanding these differences is crucial for achieving tender, flavorful results.
-
Pork Ribs (Spare Ribs and Baby Back Ribs): The ideal grilling temperature for pork ribs is between 225°F to 250°F (107°C to 121°C). Cooking at this low and slow range allows the fat to render and collagen to break down, resulting in tender meat. Aim for approximately 3 to 4 hours of grilling time, using indirect heat wherever possible.
-
Beef Ribs: Beef ribs benefit from a slightly higher temperature, ranging from 250°F to 300°F (121°C to 149°C). This temperature helps in achieving a delightful crust while still ensuring the meat remains juicy. Cook for around 4 to 6 hours, depending on the size of the ribs.
-
Lamb Ribs: When grilling lamb ribs, aim for a temperature of 300°F to 350°F (149°C to 177°C). Lamb cooks more quickly than pork or beef, so grilling time should be around 2 to 3 hours.
Each type of rib has its unique qualities, necessitating adjustments in cooking time and temperature for optimal results. Properly balancing heat and time will enhance flavors and tenderness, making for an enjoyable grilling experience.
What Internal Temperature Should Baby Back Ribs Reach?
The ideal internal temperature for baby back ribs is crucial for achieving tender and flavorful results.
- 190°F to 203°F: This temperature range is optimal for baby back ribs as it allows the collagen in the meat to break down, resulting in tender, juicy ribs. At this stage, the meat should pull away easily from the bone, providing that desirable fall-off-the-bone texture.
- 165°F: While 165°F is the minimum safe temperature for pork, it may not provide the best texture for baby back ribs. Ribs cooked to this temperature may still be tough and chewy, lacking the tenderness that most people expect from well-cooked ribs.
- 225°F to 250°F cooking temperature: Maintaining this range on a gas grill allows for low and slow cooking, which is ideal for developing flavor and tenderness in baby back ribs. This temperature encourages the Maillard reaction, enhancing the smoky flavor while ensuring that the meat remains moist.
- Resting period: After reaching the ideal internal temperature, allowing ribs to rest for 10-15 minutes before slicing is essential. This helps redistribute the juices throughout the meat, ensuring that each bite remains succulent and flavorful.
What Temperature is Ideal for Cooking Spare Ribs?
The ideal temperature for cooking spare ribs on a gas grill typically ranges from 225°F to 250°F.
- 225°F: Cooking spare ribs at this lower temperature allows for a longer and slower cooking process, which helps to break down the connective tissues in the meat, resulting in tender and flavorful ribs.
- 250°F: This slightly higher temperature increases the cooking speed while still allowing for enough time to render the fat and develop a nice bark on the ribs, maintaining tenderness without drying them out.
- Smoking Temperature: If using a gas grill with a smoking feature, maintaining a temperature around 225°F can also infuse the ribs with a rich smoky flavor, enhancing the overall taste experience.
- Final Temperature Check: Regardless of the cooking temperature, ensure that the internal temperature of the ribs reaches at least 190°F to 203°F, which is where the collagen breaks down completely and the meat becomes juicy and easy to pull apart.
How Do I Know When Pork Ribs are Done?
To determine when pork ribs are done, you should consider several indicators, including internal temperature, visual cues, and cooking time.
- Internal Temperature: The best temperature to grill ribs on a gas grill is around 190°F to 203°F (88°C to 95°C). At this temperature, the collagen in the meat breaks down, making the ribs tender and juicy.
- Visual Cues: Look for a nice bark on the ribs, which is a dark crust formed during cooking. Additionally, the meat should have pulled back from the bones slightly, indicating that it is cooked through.
- Cooking Time: While cooking times can vary depending on the thickness and type of ribs, a general rule is to grill them for about 3 to 4 hours at a low temperature of 225°F to 250°F (107°C to 121°C). This slow cooking allows for the flavors to develop and the meat to become tender.
- Bone Flexibility: Another indicator is the flexibility of the ribs when you lift them with tongs. If they bend easily and the meat starts to crack on the surface, they are likely done. This is often referred to as the “bend test.”
- Juice Test: When you cut into the ribs, the juices should run clear, not pink or red. This is a good sign that the ribs are fully cooked and safe to eat.
What Cooking Techniques Help Maintain the Best Temperature for Grilling Ribs?
The best techniques for maintaining temperature while grilling ribs on a gas grill include:
- Preheating: Proper preheating is essential for achieving the right grilling temperature, typically around 225°F to 250°F for ribs. This allows the grill grates to heat evenly, ensuring that the ribs cook uniformly and prevents sticking.
- Indirect Heat: Utilizing indirect heat involves placing the ribs on the cooler side of the grill while keeping the heat source on the other side. This method allows for slow and even cooking, which is crucial for tender ribs, while also helping to maintain a consistent temperature without direct flame exposure.
- Using a Water Pan: Adding a water pan to the grill can help stabilize the temperature by creating steam, which keeps the environment moist and prevents the ribs from drying out. The evaporation from the water also acts as a heat buffer, maintaining a steady temperature throughout the cooking process.
- Temperature Monitoring: Using a reliable meat thermometer to monitor both the internal temperature of the ribs and the grill temperature is crucial. This ensures that the ribs reach the desired doneness without overcooking, which can compromise the meat’s tenderness and flavor.
- Adjusting Burners: Gas grills often come with multiple burners, allowing for precise temperature adjustments. By turning down the burners or using only one side for cooking, you can maintain a lower and more controlled cooking temperature ideal for ribs.
How Important is Indirect Heat When Grilling Ribs?
Indirect heat plays a crucial role in grilling ribs, particularly when using a gas grill.
- Even Cooking: Indirect heat allows for a more uniform cooking process, ensuring that the ribs cook evenly without burning.
- Moisture Retention: Using indirect heat helps retain moisture in the ribs, preventing them from drying out during the long cooking process.
- Flavor Development: Indirect heat enables the development of deeper flavors as the ribs slowly smoke and caramelize without direct flames.
- Temperature Control: It provides better control over the cooking temperature, which is essential for achieving the ideal doneness without overcooking.
- Flexibility in Cooking Time: Indirect heat allows for a longer cooking time, which is beneficial for breaking down tough connective tissues in the ribs.
Even Cooking: Ribs require a longer cooking time at lower temperatures to break down the collagen and connective tissues, which can result in a tender and flavorful product. Indirect heat ensures that the entire surface of the ribs receives consistent heat, minimizing the risk of charred edges while the inside remains undercooked.
Moisture Retention: When ribs are grilled using indirect heat, they are less exposed to direct flames that can cause moisture loss. This method allows the meat to cook in its own juices, which keeps the ribs succulent and tender throughout the grilling process.
Flavor Development: Cooking ribs indirectly allows for the flavors from marinades, rubs, and any wood chips used in the grill to penetrate the meat more deeply. This slow cooking process enhances the caramelization of sugars and the infusion of smoke, resulting in rich and complex flavors.
Temperature Control: Indirect grilling provides a more stable cooking environment, allowing the grill master to maintain the optimal temperature for cooking ribs, typically around 225°F to 275°F. This control helps ensure that the ribs cook thoroughly without burning or drying out.
Flexibility in Cooking Time: Indirect heat is particularly advantageous for tougher cuts like ribs, as it allows for longer cooking times which are necessary for tenderizing the meat. This method gives grillers the flexibility to achieve the desired texture while accommodating different rib styles and personal preferences.
Should I Wrap My Ribs During Cooking for Optimal Temperature?
No, you generally should not wrap your ribs during cooking for optimal temperature on a gas grill.
Wrapping ribs, often called the “Texas crutch,” is a technique used in smoking or slow-cooking methods to retain moisture and speed up cooking time. However, when grilling ribs on a gas grill, the goal is usually to achieve a nice crust and smoke flavor without losing the texture that grilling provides. By keeping ribs unwrapped, you allow for better airflow around the meat, which helps to develop that desirable bark while still cooking them at the optimal temperature of around 225-250°F.
Additionally, grilling ribs unwrapped allows them to absorb more flavor from any dry rubs or marinades you may use. If you wrap the ribs, especially in foil, you can end up steaming them, which may lead to a softer texture that lacks the distinct bite that comes from grilling. Therefore, for the best results when grilling ribs on a gas grill, it’s advisable to keep them unwrapped to ensure they cook evenly and develop a rich flavor and appealing texture.
What Are the Best Practices for Ensuring Tender and Juicy Ribs?
To achieve tender and juicy ribs when grilling on a gas grill, several best practices should be followed:
- Choose the Right Cut: Selecting the right cut of ribs is crucial; baby back ribs and spare ribs are popular choices due to their tenderness and flavor.
- Marinating or Dry Rub: Marinating the ribs or applying a dry rub enhances flavor and moisture, allowing the meat to absorb spices and tenderizing agents.
- Proper Temperature: The best temperature to grill ribs on a gas grill is low and slow, ideally around 225°F to 250°F, which helps break down the connective tissues.
- Indirect Heat Method: Using indirect heat prevents the ribs from cooking too quickly, ensuring that they become tender without burning the exterior.
- Wrapping the Ribs: Wrapping the ribs in foil after a few hours of cooking retains moisture and accelerates the tenderizing process during the final stages of grilling.
- Resting Period: Allowing the ribs to rest for at least 10-15 minutes after grilling helps redistribute the juices, making the meat more succulent when cut.
Choose the Right Cut: Selecting the right cut of ribs is crucial; baby back ribs and spare ribs are popular choices due to their tenderness and flavor. Baby back ribs are shorter and leaner, while spare ribs are meatier and have a richer taste, making them both excellent options depending on personal preference.
Marinating or Dry Rub: Marinating the ribs or applying a dry rub enhances flavor and moisture, allowing the meat to absorb spices and tenderizing agents. A good marinade often includes acidic components like vinegar or citrus, which help break down tough fibers in the meat, while a dry rub can create a flavorful crust during grilling.
Proper Temperature: The best temperature to grill ribs on a gas grill is low and slow, ideally around 225°F to 250°F, which helps break down the connective tissues. Cooking at this temperature allows the fat to render and the collagen to dissolve, resulting in tender, juicy meat.
Indirect Heat Method: Using indirect heat prevents the ribs from cooking too quickly, ensuring that they become tender without burning the exterior. This method involves placing the ribs away from the direct flame, allowing for even cooking and reducing the risk of charring.
Wrapping the Ribs: Wrapping the ribs in foil after a few hours of cooking retains moisture and accelerates the tenderizing process during the final stages of grilling. This technique, often referred to as the “Texas crutch,” helps create a steamy environment that makes the ribs incredibly tender.
Resting Period: Allowing the ribs to rest for at least 10-15 minutes after grilling helps redistribute the juices, making the meat more succulent when cut. This resting time is essential as it allows the proteins to relax, preventing the juices from running out when the ribs are sliced.
Related Post: