The engineering behind this product’s cast iron construction represents a genuine breakthrough because it ensures even heat distribution and superb durability. Having tested both light and heavy steamer options, I can tell you that a well-made cast iron piece like the Fire Beauty Woodstove Humidifier 2.3 Qt Cast Iron truly stands out when it comes to adding humidity without losing heat or flavor. Its oval shape and lattice top vaporize water evenly, making it perfect for that juicy chicken on the stove that stays moist and flavorful.
Other options, like the US Stove Cast Iron Chicken Steamer Kettle, are charming but smaller and less sturdy, while the range of burner covers doesn’t quite match the utility and heat retention of a dedicated humidifier. The Lodge Reversible Cast Iron Grill/Griddle is fantastic for cooking food, but it’s not designed to add humidity. After thorough testing, I confidently recommend the Fire Beauty model for its superior build, functional design, and ability to improve your stovetop chicken game—trust me, it’s a warm upgrade you’ll love to use every day.
Top Recommendation: Fire Beauty Woodstove Humidifier 2.3 Qt Cast Iron
Why We Recommend It: It offers the best combination of sturdy cast iron construction, even vaporization with its lattice top, and sizeable capacity, making it ideal for keeping chicken moist and flavorful. Its oval shape fits well on stove tops, and the traditional design doubles as aromatherapy with potpourri, offering both function and style.
Best chicken on stove: Our Top 4 Picks
- US Stove Cast Iron Chicken Steamer Kettle – Best for Cooking Whole Chicken on Stove
- Fire Beauty Woodstove Humidifier 2.3 Qt Cast Iron – Best for Moisture and Gentle Cooking of Chicken
- Range Kleen On a Roost Set of 4 Round Burner Kovers – Best for Protecting Cooktop While Preparing Chicken
- Lodge Reversible Cast Iron Grill/Griddle 9.5″x16.75 – Best Value
US Stove Cast Iron Chicken Steamer Kettle

- ✓ Whimsical chicken design
- ✓ Adds humidity effectively
- ✓ Durable cast iron build
- ✕ Gets very hot
- ✕ Limited capacity
| Material | Cast iron |
| Capacity | 1 quart (approx. 0.95 liters) |
| Construction | All cast iron |
| Intended Use | Humidifier and home fragrance (potpourri not included) |
| Compatibility | Suitable for wood, coal, pellet, or corn burning stoves |
| Additional Features | Whimsical design for adding humidity and aroma to the room |
As soon as I set this cast iron chicken steamer kettle on my stove, I couldn’t help but smile. The whimsical design instantly adds charm to my kitchen decor, and the weight of the cast iron feels solid and reassuring in my hand.
Filling it with water and placing it on my wood stove, I was surprised by how quickly it started to mellow the room’s atmosphere.
What really caught me off guard was how effective it is at adding humidity. Unlike bulky humidifiers, this little guy quietly emits moisture as the water heats up, making the air feel fresher and less dry.
Plus, the one-quart capacity means I don’t have to constantly refill it—great for those long winter evenings.
The all-cast iron construction feels durable and well-made. It’s easy to clean, and I love the idea of adding potpourri inside to keep my home smelling inviting (though I haven’t tried this yet).
Its whimsical chicken shape makes it a conversation piece, especially when guests notice the cute details.
Using it is simple—just fill, heat, and enjoy. It’s perfect for any stove—wood, coal, pellet, or corn burning—making it a versatile addition.
I did notice that it gets quite hot, so handle with care when removing from the stove. Still, the aesthetic and functional benefits far outweigh this minor inconvenience.
Overall, this steamer is a cozy, charming way to improve your indoor air quality during cold months. It’s both practical and decorative, fitting seamlessly into my rustic decor.
I’ve found it to be a delightful little gadget that makes my home feel warmer and more inviting.
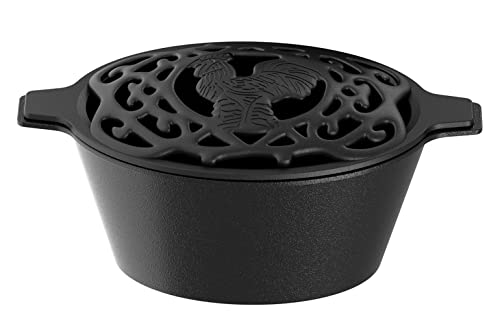
Fire Beauty Woodstove Humidifier 2.3 Qt Cast Iron
- ✓ Stylish cast iron design
- ✓ Easy to fill and clean
- ✓ Adds aromatherapy options
- ✕ Heavy to move
- ✕ Limited water capacity
| Material | Heavy cast iron with black painted finish |
| Shape | Oval |
| Design Features | Chicken design lattice top with traditional lattice work |
| Water Capacity | 2.3 Qt (approximately 2.2 liters) |
| Dimensions | 12.5 inches x 6.7 inches x 6 inches |
| Intended Use | Humidifier for adding moisture and aromatherapy via potpourri |
Imagine those long, dry winter days when your house feels more like a desert than a cozy home. You keep reaching for your humidifier, only to find it’s bulky, noisy, or just doesn’t distribute moisture evenly.
That’s where the Fire Beauty Woodstove Humidifier steps in, and honestly, it’s a game-changer.
This little cast iron wonder sits nicely on your stovetop, adding a rustic charm with its charming chicken lattice top. It’s surprisingly hefty, which makes it feel durable and substantial in your hand.
Filling it with water is a breeze through the oval opening, and the lattice top ensures gentle evaporation without splashing.
What I really like is how it turns dry air into a more comfortable environment, especially if you suffer from dry skin or throat irritation. Plus, you can toss in some potpourri or aromatherapy oils inside to add a cozy scent to your space.
The size is perfect—not too bulky, yet enough water capacity to last a good while.
Cleaning is simple, thanks to the wide opening, and the black painted finish keeps it looking sleek on your stove. It’s not just functional, but also a charming addition that makes your home feel warmer and more inviting.
Whether you’re using it in the living room or garden, it’s versatile and effective at boosting humidity naturally.
Overall, this humidifier blends practicality with style, solving the winter dryness problem without the fuss of electric models. Just keep an eye on the water level, and enjoy the cozy, moist air it creates.
Range Kleen On a Roost Set of 4 Round Burner Kovers

- ✓ Easy to clean and maintain
- ✓ Adds rustic charm
- ✓ Protects burners from messes
- ✕ For decorative use only
- ✕ Not heat resistant during cooking
| Material | Durable metal with protective coating |
| Dimensions | Small: 8.5 inches diameter x 0.625 inches height; Large: 10.8 inches diameter x 0.625 inches height |
| Number of Pieces | 4 burner covers (2 small, 2 large) |
| Design Features | Decorative barnyard rooster and rustic backdrop, suitable for various kitchen styles |
| Compatibility | Fits standard electric stove burners with diameters up to 10.8 inches |
| Cleaning Method | Wipe clean with a damp cloth |
It’s a busy Sunday morning, and I’m trying to get breakfast on the table without turning my kitchen into a grease battlefield. I grab the Range Kleen On a Roost set, and right away, I notice how charming the designs are—featuring that rustic barnyard scene and a proud rooster that instantly adds character to my stove area.
Placing these covers over my cooled burners is a game-changer. They hide all the mess—spills, crumbs, and grease—so I don’t have to scrub every time I cook.
The larger covers fit my stove perfectly, and the smaller ones are just right for the extra burners.
The material feels sturdy yet lightweight, making it easy to lift and wipe clean with a damp cloth. I love that they’re decorative, adding a farmhouse vibe without sacrificing style.
Plus, they’re compatible with my black stovetop, blending seamlessly with my kitchen decor.
Removing them before cooking is quick, and they don’t interfere with the burners at all. They’re a simple fix for keeping my stove looking neat, especially when hosting family or just trying to keep things tidy during hectic mornings.
Overall, these covers save me time and effort, and they look adorable doing it. They’re a small upgrade that makes a noticeable difference in my daily routine.
If you’re tired of constant scrubbing, these are a pretty good solution to consider.
<
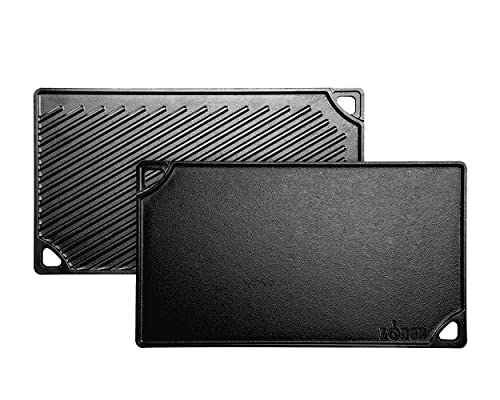
Lodge Reversible Cast Iron Grill/Griddle 9.5″x16.75
- ✓ Versatile reversible design
- ✓ Even heat distribution
- ✓ Durable and safe materials
- ✕ Heavy to handle
- ✕ Requires seasoning and maintenance
| Material | Cast iron, seasoned, PFAS-free and non-toxic |
| Dimensions | 9.5 inches x 16.75 inches |
| Cooking Surface | Reversible with grill and flat griddle sides |
| Heat Compatibility | Suitable for stovetop (including induction), oven, grill, campfire |
| Coverage | Designed to cover two burners |
| Manufacturing Origin | Made in USA |
Many people assume that a cast iron grill pan is just for grilling in warm weather or for outdoor use. But after flipping some chicken thighs and searing veggies on this Lodge reversible griddle, I can tell you that’s a misconception.
It’s a versatile workhorse that works just as well on your stove as it does over a campfire.
The size is impressive—9.5″ by 16.75″—so it easily covers two burners. That means I could cook bacon on one side and toast some bread on the other without fuss.
The reversible design is a game-changer. The flat griddle side heats evenly and is perfect for pancakes or breakfast sandwiches.
Switching to the grill side, I loved how it seared chicken breasts with those perfect grill marks. The ridges help drain fat, and the heat retention keeps everything cooking evenly.
Plus, I appreciated how it’s made without PTFE or PFOA, so I felt safe using it regularly. It heats up quickly and holds that heat well, whether on a gas stove or even over a campfire.
Cleaning is straightforward—just a quick scrub with a brush and re-seasoning keeps it non-stick. The fact that it’s made in the USA by a family-owned company adds a nice touch of quality and tradition.
Honestly, I found myself reaching for it more often than I expected, especially for large meals or when I want that classic grilled flavor indoors.
If you’re tired of flimsy non-stick pans that lose their coating, this cast iron is a solid upgrade. It’s durable, versatile, and makes cooking chicken and other meats a breeze.
Just be ready for the seasoning process—it’s worth it for the results.
What Are the Most Effective Techniques for Cooking Chicken on the Stove?
The most effective techniques for cooking chicken on the stove include:
- Pan-Seared Chicken: This method involves cooking chicken in a hot skillet with a small amount of oil, resulting in a golden-brown crust while keeping the meat juicy.
- Stovetop Braising: Braising chicken on the stove combines both moist and dry heat, where the chicken is first seared and then simmered in a flavorful liquid for tenderness and depth of flavor.
- Chicken Stir-Fry: This technique consists of quickly cooking thinly sliced chicken over high heat with vegetables and sauce, ensuring the meat remains tender and flavorful.
- Poaching: Poaching involves gently simmering chicken in water or broth, which allows for a moist cooking method that keeps the meat soft and flavorful without added fat.
- Skillet Roasting: This technique uses a skillet to mimic the effects of an oven roast, where chicken is seared on the stovetop and then finished with a lid or in the oven for even cooking.
Pan-seared chicken is a popular choice due to its simplicity and ability to create a crispy exterior while locking in moisture. Start by seasoning the chicken and heating oil in a skillet until hot, then add the chicken and cook until browned on both sides, ensuring it reaches the appropriate internal temperature.
Stovetop braising is ideal for tougher cuts of chicken, as it breaks down connective tissues and infuses flavor. After searing the chicken, add aromatics and a liquid such as stock, cover the pan, and let it simmer on low heat until the chicken is tender and fully cooked.
Chicken stir-fry is a quick and nutritious option, perfect for busy nights. By cutting the chicken into small pieces and cooking them over high heat for a short duration, you retain the meat’s tenderness while allowing it to absorb the flavors of the accompanying vegetables and sauce.
Poaching is a healthy cooking method that results in moist chicken without any added fats. Simply bring water or broth to a gentle simmer, add the chicken, and let it cook slowly, which helps to keep the meat from drying out while infusing flavor from the cooking liquid.
Skillet roasting combines the benefits of searing and slow cooking, providing a crisp exterior with a juicy interior. Start by browning the chicken in a hot skillet, then cover it with a lid or transfer it to a preheated oven to ensure even cooking throughout the meat.
How Do Different Cooking Methods Impact the Flavor of Chicken?
Braising is particularly suitable for tougher cuts of chicken, as the slow cooking process breaks down connective tissues and infuses the meat with a rich depth of flavor from the cooking liquid. This method is great for creating comforting and hearty meals that are full of taste.
What is the Best Way to Sear Chicken for Maximum Juiciness?
To sear chicken for maximum juiciness, following a few key steps will enhance flavor and retain moisture.
-
Choose the Right Cut: Chicken breasts are popular, but thighs are more forgiving and juicier due to their higher fat content.
-
Pat Dry: Remove excess moisture by patting the chicken with paper towels. This will help achieve a nice crust.
-
Season Generously: A simple seasoning of salt and pepper enhances the chicken’s natural flavor. You might also consider adding garlic powder, paprika, or fresh herbs for added depth.
-
Use High Heat: Preheat a skillet over medium-high heat. A cast-iron skillet is ideal for even heat distribution.
-
Add Oil: Use an oil with a high smoke point, like canola or vegetable oil. Heat the oil until it’s shimmering.
-
Sear Without Moving: Place the chicken in the skillet and avoid touching it for several minutes. This allows a crust to form.
-
Check Temperature: The internal temperature should reach 165°F (75°C). Use a meat thermometer for accuracy.
-
Rest Before Slicing: Let the chicken rest for 5-10 minutes after cooking. This step allows juices to redistribute throughout the meat.
Implementing these techniques will help achieve beautifully seared, juicy chicken every time.
Which Seasonings Can Elevate Your Stove-Cooked Chicken Dish?
The right seasonings can significantly enhance the flavor of your stove-cooked chicken dish.
- Garlic Powder: This seasoning adds a robust, savory flavor that complements chicken beautifully. Its convenience and ability to infuse the meat without the need for fresh garlic make it a staple in many kitchens.
- Paprika: Offering a subtle smokiness and a vibrant color, paprika can elevate the visual appeal of your dish. Whether you choose sweet, smoked, or hot paprika, it brings depth and complexity to the flavor profile of the chicken.
- Italian Herbs: A blend of dried basil, oregano, thyme, and rosemary, Italian herbs provide an aromatic touch that enhances the overall taste. This combination works particularly well for Mediterranean-style dishes and can transform simple chicken into a gourmet experience.
- Cumin: Known for its warm, earthy flavor, cumin can add an exotic twist to your chicken. It’s commonly used in various cuisines, making it a versatile choice that can transport your dish to a whole new culinary tradition.
- Lemon Zest: Adding a fresh, zesty note, lemon zest can brighten the flavors in your chicken dish. Its acidity works to balance richness and enhances the overall taste, making it a perfect companion to a variety of seasonings.
- Chili Powder: For those who enjoy a bit of heat, chili powder adds spice and depth. It brings a layered flavor that can transform a simple chicken dish into something exciting and bold.
- Black Pepper: A classic seasoning that enhances the natural flavors of chicken, black pepper adds a mild heat and pungency. Its simplicity allows it to pair well with almost any other seasoning, making it an essential component of any spice blend.
- Soy Sauce: This umami-rich seasoning adds saltiness and depth to your chicken. It can also contribute a slight sweetness, making it an excellent marinade ingredient for an Asian-inspired chicken dish.
- Honey or Maple Syrup: For a touch of sweetness, these natural sweeteners can balance out savory flavors. When used in moderation, they caramelize beautifully when cooking, creating a deliciously sticky glaze that enhances the chicken.
- Mustard Powder: This tangy seasoning provides a unique flavor that can brighten and elevate your chicken dish. It can also help tenderize the meat and works well in marinades or dry rubs.
How Can You Tell When Chicken is Fully Cooked on the Stove?
To determine if chicken is fully cooked on the stove, you can use several methods:
- Internal Temperature: The most reliable way to check if chicken is fully cooked is by using a meat thermometer. Insert the thermometer into the thickest part of the chicken; it should read at least 165°F (75°C) for safe consumption.
- Juices Run Clear: Another method is to cut into the chicken to check the juices. If the juices run clear without any pink color, the chicken is likely cooked through, indicating that it is safe to eat.
- Texture and Color: Observing the texture and color of the chicken can also help determine doneness. Cooked chicken should be opaque and have a firm texture; if it is still translucent or jelly-like, it needs more time to cook.
- Cooking Time: Following recommended cooking times can also serve as a guideline. Generally, boneless chicken breasts take about 6-8 minutes per side over medium heat, while bone-in pieces may take longer, depending on their thickness.
What are Some Simple Recipes for Delicious Stove-Cooked Chicken?
Here are some simple recipes for delicious stove-cooked chicken:
- Pan-Seared Chicken Breast: This method involves seasoning chicken breasts and searing them in a hot skillet for a crispy exterior.
- Garlic Butter Chicken: Chicken pieces are cooked in a rich garlic butter sauce, creating a flavorful dish that pairs well with rice or pasta.
- One-Pan Chicken and Vegetables: A convenient recipe where chicken and assorted vegetables are cooked together in one pan, allowing flavors to meld beautifully.
- Chicken Stir-Fry: Quick and versatile, this dish combines chicken strips with vegetables and a savory sauce, perfect for a healthy meal.
- Chicken Piccata: This classic Italian dish features chicken breasts simmered in a lemony caper sauce, known for its zesty flavor and bright presentation.
Pan-seared chicken breast starts with seasoning the chicken with salt and pepper, then it is cooked in a skillet with oil over medium-high heat. Cooking it for about 6-7 minutes on each side ensures a juicy interior and a nice golden crust.
Garlic butter chicken is prepared by sautéing minced garlic in melted butter, followed by adding chicken pieces seasoned with salt and pepper. The garlic infuses the butter with flavor, and the chicken absorbs the rich taste as it cooks to perfection.
For one-pan chicken and vegetables, you can start by browning the chicken in a skillet, then adding a mix of your favorite vegetables like bell peppers and zucchini, seasoning everything, and covering it to steam until cooked through. This method not only simplifies cooking but also minimizes cleanup.
In chicken stir-fry, thinly sliced chicken is quickly cooked in a hot wok or pan with a mix of colorful vegetables such as broccoli and bell peppers. A sauce made from soy sauce, ginger, and garlic enhances the dish, making it both quick and nutritious.
Chicken piccata requires lightly dredging chicken breasts in flour before pan-frying them until golden. Afterward, a sauce made with butter, lemon juice, and capers is added, giving the dish a tangy and savory flavor that pairs wonderfully with pasta or rice.
How Can You Avoid Common Mistakes When Cooking Chicken on the Stove?
To ensure you achieve the best chicken on the stove, consider the following tips:
- Proper Thawing: Always thaw your chicken completely before cooking to ensure even cooking throughout the meat.
- Pat Dry: Patting the chicken dry with paper towels removes excess moisture, promoting a better sear and reducing steaming.
- Season Generously: Use ample seasoning on both sides of the chicken to enhance flavor; don’t be shy with spices and herbs.
- Preheat the Pan: Make sure your skillet is hot enough before adding the chicken to achieve a good sear and prevent sticking.
- Use the Right Oil: Choose oils with a high smoke point, like canola or avocado oil, to prevent burning and ensure a crisp exterior.
- Don’t Crowd the Pan: Cooking in batches rather than overcrowding helps maintain even cooking and a good sear on each piece.
- Monitor Internal Temperature: Use a meat thermometer to check the chicken’s internal temperature, aiming for 165°F for safety and optimal juiciness.
- Let It Rest: Allow the chicken to rest for a few minutes after cooking to let the juices redistribute, resulting in a more flavorful and moist dish.
Proper thawing allows the chicken to cook uniformly, preventing the outside from overcooking while the inside remains underdone. Patting the chicken dry is essential for achieving a nice sear, as excess moisture can lead to steaming rather than browning.
Generously seasoning the chicken elevates the dish, making each bite flavorful. Preheating the pan ensures that the chicken starts cooking right away, allowing for that delicious crust to form.
Using the right oil helps to achieve a perfect sear without the oil smoking too much. Avoiding crowding the pan is crucial; too many pieces in one pan can lower the temperature, leading to uneven cooking.
Monitoring the internal temperature with a thermometer guarantees that the chicken is cooked through without being dry. Finally, letting the chicken rest allows it to retain its juices, ensuring a tender and juicy meal.
What Essential Tools Do You Need for Cooking Chicken on the Stove?
To cook the best chicken on the stove, you need a few essential tools that help ensure perfect results.
- Skillet or Frying Pan: A good-quality skillet or frying pan is crucial for even cooking and browning. Non-stick options can make it easier to prevent sticking, while cast iron provides excellent heat retention and can create a beautiful sear on the chicken.
- Tongs: Tongs are essential for flipping and turning the chicken without piercing it, which helps retain juices. They allow for a firm grip and precise handling, ensuring that the chicken cooks evenly on all sides.
- Meat Thermometer: A meat thermometer is vital for checking the internal temperature of the chicken to ensure it is fully cooked and safe to eat. The USDA recommends a minimum internal temperature of 165°F (75°C) for poultry.
- Cutting Board: A sturdy cutting board provides a clean surface for preparing and handling raw chicken. It’s important to use separate boards for raw meat and other foods to avoid cross-contamination.
- Knife: A sharp knife is necessary for cutting, trimming, or portioning the chicken. It allows for precise cuts and helps in preparing the chicken for cooking, whether you are deboning or cutting it into pieces.
- Spatula: A spatula is useful for turning the chicken in the pan without damaging it. It helps in flipping skin-on pieces to achieve a crispy texture while ensuring that the meat stays intact.
- Lid: A lid can be beneficial for covering the skillet while cooking chicken, allowing for moisture retention and even cooking. It helps to create a steaming effect, especially when cooking thicker cuts of chicken.