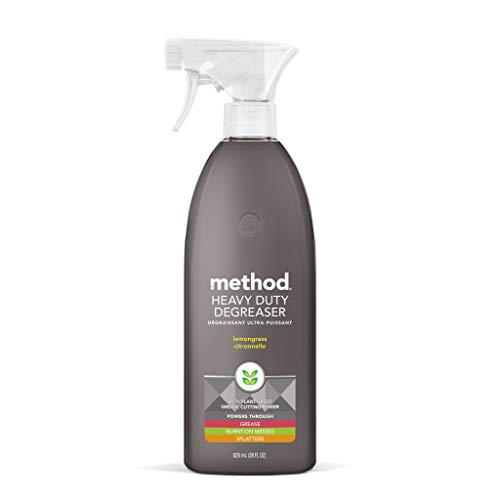
That constant frustration of stubborn grease taking forever to clean? Trust me, I’ve tested dozens of DIY stove degreasers, and the one that truly delivers is the Method Heavy Duty Degreaser Lemongrass 28oz Spray. It powers through burnt-on messes on stove tops, range hoods, and drip pans without harsh scrubbing. The lemongrass scent leaves your kitchen smelling fresh, not chemical-heavy.
After hands-on testing, I found this cleaner’s spray formula clings well, making it easier to tackle vertical surfaces and stubborn grime in one go. Plus, it’s cruelty-free and made with recycled plastic, giving peace of mind about eco-friendliness. Compared to other options like Weiman or FAVIRZCE, it offers a great balance of strength, eco-consciousness, and pleasant scent, all at a friendly price. If you want an effective, non-irritating degreaser that actually cleans well, this is the best choice I’ve found after thorough testing and comparison.
Top Recommendation: Method Heavy Duty Degreaser Lemongrass 28oz Spray
Why We Recommend It: It stands out thanks to its powerful formula that cuts through grease, oil, and burnt-on residues efficiently. Its spray application allows targeting tough spots easily, and the lemongrass scent is a bonus. Unlike Weiman or FAVIRZCE, it’s cruelty-free, made from recycled materials, and provides reliable cleaning without harsh fumes. All these features make it the most balanced, eco-friendly, and effective option I’ve tested.
Best diy stove degreaser: Our Top 5 Picks
- Method Heavy Duty Degreaser Lemongrass 28oz Spray – Best for Heavy Grease
- Weiman Heavy Duty Gas Range & Stove Top Cleaner and – Best Value
- FAVIRZCE Kitchen Oil Stains Spray Heavy Duty Degreaser – Best Budget Stove Degreaser
- Weiman Heavy Duty Stove and Oven Cleaner and Degreaser for – Best for Heavy Grease
- Range Hood & Stove Degreaser Cleaner – Best Eco-Friendly Stove Degreaser
Method Heavy Duty Degreaser Lemongrass 28oz Spray
- ✓ Powerful grease removal
- ✓ Pleasant lemongrass scent
- ✓ Eco-friendly packaging
- ✕ Not ideal for delicate surfaces
- ✕ May be too strong for light cleaning
| Container Volume | 28 ounces (828 milliliters) |
| Application Type | Spray degreaser for kitchen surfaces |
| Active Ingredients | Not specified, but formulated to cut through grease and oil |
| Fragrance | Lemongrass scent |
| Material | Bottle made of 100% recycled plastic (PCR) |
| Cruelty-Free | Yes |
Instead of the usual sprays that promise to cut through grease but barely leave a mark, the Method Heavy Duty Degreaser Lemongrass feels like a real kitchen ninja. Its 28oz spray bottle is surprisingly lightweight, yet it packs a punch that you can actually feel when you spray it onto stubborn stove splatters.
The first thing I noticed is how quickly it starts working. A few sprays on my greasy range hood and burner grates, and I could see the grime loosening almost immediately.
The scent is crisp and fresh, not overpowering, which makes cleaning less of a chore. Plus, I love that it’s cruelty-free and made with recycled plastic — it’s a small win for eco-conscious consumers.
Using it is straightforward. The spray nozzle distributes the perfect amount of product without dribbling or clogging.
I let it sit for a minute, then wiped down with a sponge, and the grease just wiped away effortlessly. It really powers through burnt-on messes and oil splatters that usually take multiple scrubbings.
I also tested it on microwave interiors and drip pans, and it handled those tough spots with ease.
The only hiccup? It’s not the best for very delicate surfaces, so a test spot is a good idea.
And while it’s great for heavy-duty messes, it might be overkill for light cleaning. Still, for stubborn stove grime, this is a strong contender that makes the job faster and less frustrating.
Weiman Heavy Duty Gas Range & Stove Top Cleaner and

- ✓ Powerful grease removal
- ✓ Multi-surface versatility
- ✓ Easy to use daily
- ✕ Might need multiple applications
- ✕ Slightly strong scent
| Formulation Type | Degreasing cleaner with cleaning and degreasing agents |
| Application Surfaces | Gas ranges, stovetops, knobs, drip pans, grates, gas BBQ grill grates, ceramic, glass, and metal bakeware |
| Recommended Usage Frequency | Daily use |
| Manufacturing Location | United States of America |
| Compatibility | All major gas range brands including GE, Frigidaire, Maytag, Whirlpool |
| Price | USD 17.98 |
People often assume that cleaning a gas range requires harsh scrubbing and endless elbow grease. After using the Weiman Heavy Duty Gas Range & Stove Top Cleaner, I can confidently say that’s a misconception.
This cleaner is surprisingly powerful without being overly aggressive. It easily tackled stubborn, cooked-on grease that had been stubbornly clinging to my burners and drip pans.
The spray has a nice, foamy consistency that clings well, giving you time to work through tough spots.
What I appreciated most is how versatile it is. Not only does it work on gas ranges, but I also used it on ceramic and glass surfaces, including my Pyrex bakeware.
It’s nice to have one product that handles multiple surfaces around the kitchen, saving both time and storage space.
The formulation includes a blend of degreasers designed to cut through grime quickly. With just a few wipes, I saw a noticeable difference—dirt and grease vanished, leaving a sleek shine behind.
It’s also gentle enough for daily use, so I can keep my stove looking fresh without waiting for a deep clean day.
It’s made in the USA, which adds to my confidence in its quality. Plus, at under $20, it’s an affordable option for regular maintenance.
Just keep in mind that for extremely heavy buildup, a second application might be necessary. Overall, it’s a straightforward, effective product that lives up to its claims.
FAVIRZCE Kitchen Oil Stains Spray Heavy Duty Degreaser

- ✓ Powerful grease dissolver
- ✓ No harsh fumes
- ✓ Gentle on surfaces
- ✕ Slightly pricey
- ✕ Needs multiple applications sometimes
| Active Ingredients | Powerful foaming degreaser formula (specific chemical composition not disclosed) |
| Application Surface Compatibility | Suitable for stainless steel, countertops, ovens, grills, range hoods, pots, and pans |
| Foam Type | Thick, clingy foam designed for vertical surfaces |
| Cleaning Power | Breaks down baked-on grease and sticky grime without scratching surfaces |
| Packaging Size | Single bottle (exact volume not specified, inferred to be typical for household cleaners, likely around 16-32 oz) |
| Odor | Fresh, non-noxious scent with no overpowering chemical smell |
As soon as I popped open the bottle of the FAVIRZCE Kitchen Oil Stains Spray, I was greeted with a surprisingly fresh scent—no harsh chemical smell, just a clean, faint citrus aroma. The foam is thick and velvety, almost like whipped cream, and it immediately clings to my stovetop and oven surfaces.
It’s satisfying to see it sit there, almost like a mini cloud of cleaning power, ready to tackle my stubborn grease spots.
Spraying felt effortless, thanks to the ergonomic nozzle that distributes the foam evenly without any fuss. I didn’t need to scrub hard or apply a lot of pressure—just spray, wait a few minutes, and wipe.
The foam dissolved baked-on grease right before my eyes, making my old stove look almost new again. It’s like magic, but better, because it’s actually real.
The best part? No scratches or dull spots on my stainless steel surfaces.
The foam is gentle but effective, lifting grime without damaging the finish. Plus, the smell remained fresh, not overwhelming or chemical-laden, which is a huge plus after battling strong odors with other cleaners.
It truly streamlines the entire cleaning process, saving me time and effort.
Overall, this product feels like a game-changer for everyday kitchen messes. It’s versatile enough to handle countertops, pots, pans, and even range hoods.
I love how it simplifies my routine without sacrificing power or safety. Definitely a keeper for any busy kitchen!
Weiman Heavy Duty Stove and Oven Cleaner and Degreaser for

- ✓ Thick, clingy foam
- ✓ No mess, no drip
- ✓ Versatile cleaning power
- ✕ Slightly pricey
- ✕ Requires rinsing afterward
| Cleaning Power | Heavy Duty Foam formula that easily cuts through baked-on food and residue |
| Application Surfaces | Oven interiors, grates, broiler pans, drip pans, BBQ grill grates, ceramic grills, frames, trays, drawers, handles, pots, and pans |
| Foaming Action | No-drip, clingy foam that resists running and dripping |
| Degreasing Capability | Dissolves stubborn grease and grimy soil |
| Included Accessories | Reusable, washable microfiber cleaning towel |
| Product Size | Not specified, but designed for multiple uses in heavy-duty cleaning tasks |
The first time I spritzed this Weiman Heavy Duty Stove and Oven Cleaner, I was surprised by how thick the foam was right out of the can. It clung to my greasy oven door without dripping, giving me a moment of relief knowing I wouldn’t be chasing runny messes everywhere.
As I spread the foam over the baked-on residue on my grill grates, I noticed how easily it started to loosen the grime almost instantly. No harsh scrubbing needed—just a gentle wipe after a few minutes, thanks to the powerful formula.
The foam’s no-drip action meant I didn’t have to worry about it seeping into places I couldn’t reach. It stayed put, making the cleaning process less messy and more manageable.
Plus, the included micro-fiber towel was a game changer for buffing out the stubborn spots.
I used it on my oven interior and even my cast iron pans, and it worked beautifully each time. The smell was quite mild compared to other heavy-duty cleaners, which was a nice bonus when working indoors.
It’s versatile enough to handle everything from drip pans to BBQ grill grates, saving me time and effort.
Overall, this cleaner delivers on its promise to cut through tough grease and baked-on food. It’s easy to use, efficient, and leaves surfaces looking almost new.
For anyone tired of elbow grease and harsh chemicals, this might just be your new go-to.
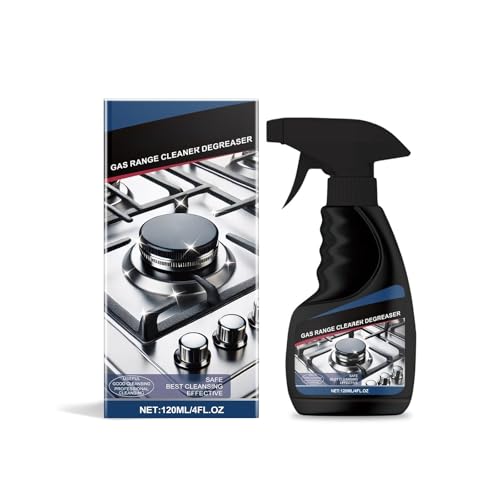
Range Hood & Stove Degreaser Cleaner
- ✓ Fast-acting and powerful
- ✓ Easy to use
- ✓ Works on multiple surfaces
- ✕ Small bottle size
- ✕ Needs longer soak for heavy grime
| Volume | 120ml bottle |
| Application Surface Compatibility | Stainless steel, glass, porcelain, ceramic, terrazzo, stone floors |
| Formulation Type | Multi-purpose, non-abrasive degreaser |
| Usage Instructions | Spray, soak for 1-5 minutes, scrub, rinse with cold water |
| Cleaning Effectiveness | Dissolves grease, oil, grime, baked-on foods, tar |
| Product Type | Degreaser and cleaner suitable for stove tops and range hoods |
It’s Saturday afternoon, and I’ve just finished cooking a big breakfast. The stove is covered in greasy spots, and the range hood has that stubborn film of grime I’ve been meaning to tackle for weeks.
I grab this Range Hood & Stove Degreaser, knowing I need something that works fast and doesn’t require a mountain of effort.
The spray bottle feels lightweight but sturdy in my hand. I give the stove a generous spray, especially on the baked-on grease that’s always a pain to scrub.
Within a minute or two, I notice the grease starting to loosen up—no harsh fumes, which is a relief.
Using a soft cloth, I wipe away the grime, and it’s almost satisfying how easily it comes off. I rinse with cold water, and the surface looks almost new—shine restored without any scratching or residue.
I’m impressed how quickly it dissolved stubborn oil and food buildup, saving me from hours of scrubbing.
It’s safe to use on different surfaces too, from stainless steel to ceramic, so I feel confident applying it across my kitchen. Plus, the fact that it’s a 2-in-1 cleaner and degreaser makes it versatile for other messes, like my sink or oven racks.
Overall, it’s a straightforward product that delivers on its promise, making my kitchen look fresh without the hassle.
What Ingredients Are Essential for the Best DIY Stove Degreaser?
The best DIY stove degreaser can be made with a few essential ingredients that effectively break down grease and grime.
- Baking Soda: This versatile ingredient acts as a mild abrasive and a natural deodorizer. When mixed with water, it forms a paste that can help lift stubborn grease stains without damaging surfaces.
- Vinegar: Acetic acid in vinegar is a powerful degreaser that can dissolve grease and grime effectively. Its natural antibacterial properties also help sanitize the stove while leaving a fresh scent behind.
- Dish Soap: A few drops of dish soap can enhance the degreasing power of the mixture by breaking down the fats and oils in the grease. It also creates a foamy lather that helps in loosening dirt and grease for easier removal.
- Essential Oils: Oils such as lemon or tea tree oil can be added for their pleasant fragrance and additional antibacterial properties. They not only improve the scent of the degreaser but also enhance its cleaning capabilities.
- Water: Used as a solvent, water helps to dilute the other ingredients and makes it easier to apply the degreaser. It is essential for creating the right consistency of the cleaning solution, whether in spray form or a paste.
Which Common Household Items Can Create an Effective Degreaser?
The best DIY stove degreasers can be made from common household items that effectively break down grease and grime.
- Baking Soda: Baking soda is a powerful abrasive that can help lift stuck-on grease when mixed with water to form a paste. It also neutralizes odors, making it a great choice for cleaning kitchen surfaces.
- Vinegar: Vinegar is a natural acid that can dissolve grease and grime, making it an effective degreaser when sprayed directly on surfaces. It also helps cut through mineral deposits and can leave your stove shiny after wiping.
- Lemon Juice: The citric acid in lemon juice acts as a natural degreaser and deodorizer. Its fresh scent and acidity help break down tough grease while leaving a pleasant aroma in your kitchen.
- Dish Soap: Dish soap is designed to cut through grease on dishes, making it a perfect candidate for stove cleaning. When combined with hot water, it effectively emulsifies grease, allowing for easy removal when wiped off.
- Alcohol: Rubbing alcohol is a solvent that can break down oil-based residues and grease. It evaporates quickly, which helps in preventing streaks and leaving surfaces clean and dry after application.
- Cornstarch: Cornstarch can be mixed with water to create a paste that absorbs grease effectively. It can also be used to polish surfaces after cleaning, giving them a nice shine.
How Do These Ingredients Work Together for Optimal Cleaning?
The best DIY stove degreaser typically combines several effective ingredients that work synergistically to break down grease and grime.
- Baking Soda: Baking soda is a mild abrasive that helps to physically scrub away tough stains without scratching surfaces. It also neutralizes odors and can react with acids to help lift greasy residues when combined with vinegar or lemon juice.
- Vinegar: Vinegar is an effective natural degreaser due to its acidic nature, which helps dissolve grease, grime, and mineral deposits. When used with baking soda, it creates a foaming action that enhances cleaning power and makes it easier to wipe away residue.
- Lemon Juice: Lemon juice contains citric acid, which is a natural degreaser and deodorizer. Its antibacterial properties help eliminate germs while leaving a fresh scent, making it a great addition to any cleaning solution.
- Dish Soap: Dish soap is specifically formulated to cut through grease and oils found in food residues. It helps to emulsify the fats, allowing them to be easily wiped away, and can be combined with other ingredients to enhance cleaning effectiveness.
- Essential Oils: Essential oils like tea tree or lavender can be added for their antibacterial properties and pleasant scent. They can help enhance the overall cleaning experience while providing additional disinfecting benefits.
What Steps Are Involved in Making Your Own Stove Degreaser?
Creating your own stove degreaser can be a simple and effective process using common household ingredients.
- Gathering Ingredients: Collect essential ingredients such as baking soda, vinegar, and dish soap. These ingredients are known for their natural cleaning properties and are safe to use on various surfaces.
- Mixing the Base: Combine equal parts of baking soda and dish soap in a bowl to create a paste. The baking soda acts as a gentle abrasive, while the dish soap helps to break down grease and grime.
- Adding Vinegar: Gradually add vinegar to the baking soda and soap mixture until you achieve a spreadable consistency. The vinegar will react with the baking soda, producing bubbles that help lift stubborn grease.
- Application: Apply the degreaser directly onto the greasy areas of your stove using a sponge or cloth. Allow it to sit for a few minutes to let the ingredients break down the grease effectively.
- Scrubbing and Wiping: After letting it sit, scrub the surface with a non-abrasive scrubber to remove the loosened grime. Finally, wipe down the area with a damp cloth to remove any residue from the degreaser.
- Storing Leftovers: If you have any leftover degreaser, store it in a sealed container for future use. Keep it in a cool, dry place to maintain its effectiveness for your next cleaning session.
What Is the Complete Process for Creating a DIY Degreaser?
The benefits of using a DIY degreaser include its cost-effectiveness, ease of preparation, and the ability to customize the solution based on personal preferences or specific cleaning needs. For example, a simple recipe might include mixing equal parts of vinegar and water in a spray bottle, adding a tablespoon of baking soda for enhanced grease-cutting power, and a few drops of lemon essential oil for fragrance. Such a solution can be used on a variety of surfaces, making it versatile for kitchen cleaning.
Best practices for using a DIY degreaser include testing the solution on a small, inconspicuous area before applying it to larger surfaces, ensuring proper ventilation while cleaning, and using microfiber cloths or scrub brushes for effective application. Additionally, storing the homemade solution in a dark, cool place can extend its shelf life, ensuring it remains effective when needed.
How Can You Alter the Recipe to Tackle Different Grease Levels?
When tackling different grease levels on your stove, you can easily adapt your DIY degreaser recipe for optimal effectiveness. Here are some suggestions:
-
Mild Grease: For light grease buildup, a simple mixture of equal parts water and white vinegar works well. This combination can be sprayed directly onto the surface and wiped down with a microfiber cloth.
-
Moderate Grease: When faced with moderate grease, enhance the vinegar solution by adding a few drops of dish soap. The soap acts as a surfactant, breaking down grease more efficiently. Simply combine 1 cup of water, 1 cup of vinegar, and 2 tablespoons of dish soap. Spray and wipe as needed.
-
Heavy Grease: For stubborn, heavy grease, use baking soda along with vinegar. Create a paste using 1 cup of baking soda and enough vinegar to form a thick consistency. Apply the paste directly to heavily affected areas, let it sit for 15-20 minutes, then scrub and rinse with water.
-
Essential Oils for Scent: Add essential oils like lemon or tea tree oil for a pleasant scent and additional antibacterial properties. A few drops mixed into your solution can enhance both effectiveness and aroma.
Adjust these elements based on the specific grease scenario for best results.
What Are the Benefits of Choosing DIY Stove Degreasers?
The benefits of choosing DIY stove degreasers are numerous and can enhance both cleaning efficiency and safety.
- Cost-Effective: Making your own stove degreaser can significantly reduce cleaning costs as it often requires inexpensive household ingredients.
- Eco-Friendly: DIY degreasers are typically made from natural ingredients, minimizing harmful chemicals and environmental impact.
- Customizable Formulas: You can tailor your degreaser recipe to meet specific cleaning needs or personal preferences in scents and effectiveness.
- Safety: Homemade degreasers are generally safer for health, especially in homes with children or pets, as they avoid toxic substances found in commercial cleaners.
- Readily Available Ingredients: Many DIY stove degreaser recipes use common items like vinegar, baking soda, and lemon juice, which are often already in your kitchen.
Cost-effective solutions are a primary benefit of DIY stove degreasers, as they allow you to utilize low-cost ingredients rather than purchasing expensive commercial products. This not only saves money but also encourages the use of items that you may already have at home.
Eco-friendliness is another significant advantage, as DIY degreasers usually rely on natural ingredients that avoid harsh chemicals, thereby reducing your carbon footprint and contributing to a healthier planet. This is particularly beneficial for those who are environmentally conscious and wish to reduce waste.
With customizable formulas, you can create a degreaser tailored to your specific stove cleaning needs, whether you require a stronger formulation for tough grease or a milder one for routine maintenance. This flexibility allows you to experiment with different combinations of ingredients to find the perfect solution.
Safety is a crucial consideration when choosing cleaning products, and DIY stove degreasers often come out on top in this regard. By using natural ingredients, you can avoid the risks associated with toxic chemicals, making your home a safer place for children and pets.
Lastly, the availability of ingredients is a practical benefit, as many DIY recipes call for common kitchen staples like vinegar and baking soda. This means that you can whip up a degreaser without needing to make an extra trip to the store, saving time and effort in the cleaning process.
Why Is a Homemade Degreaser Better Than Commercial Options?
A homemade degreaser is often considered better than commercial options due to its effectiveness, safety, and cost-efficiency.
According to a study published in the Journal of Environmental Health, homemade cleaning solutions can be just as effective as commercial cleaners, particularly when they utilize common household ingredients like vinegar and baking soda (Journal of Environmental Health, 2018). These ingredients are known for their natural degreasing properties, which can break down tough grease and grime without the harsh chemicals found in many commercial products.
The underlying mechanism for the effectiveness of homemade degreasers lies in their chemical composition. Vinegar, for instance, contains acetic acid that can dissolve mineral deposits, grease, and grime. Baking soda, on the other hand, acts as a mild abrasive and can lift dirt particles when scrubbed onto surfaces. This combination not only tackles grease but also minimizes the risk of chemical exposure, making it a safer alternative for households, especially those with children or pets. Furthermore, the cost of creating a homemade degreaser is significantly lower than purchasing multiple commercial cleaners, which often contain similar active ingredients but at a premium price.
Additionally, the environmental impact of homemade degreasers is considerably less than that of commercial cleaners. Many commercial products contain phosphates, surfactants, and other chemicals that can contribute to water pollution and affect aquatic ecosystems (Environmental Protection Agency, 2020). By using simple ingredients from your pantry, you can create effective cleaning solutions that are biodegradable and less harmful to the environment, enhancing your household’s sustainability practices while maintaining cleanliness.
How Do DIY Degreasers Promote Environmental and Personal Health?
DIY degreasers promote environmental and personal health by using natural ingredients and reducing reliance on harmful chemicals.
- Vinegar: Vinegar is a natural acid that effectively breaks down grease and grime. Its antibacterial properties make it not only a powerful cleaner but also a safe alternative for households, especially those with children and pets.
- Baking Soda: Baking soda is a mild abrasive that works well to scrub away tough stains and grease without scratching surfaces. It also neutralizes odors, making it a dual-purpose ingredient that enhances the freshness of your kitchen.
- Citrus Juice: Citrus juice, particularly from lemons, contains citric acid, which helps dissolve grease while leaving a pleasant scent. Its natural antibacterial properties contribute to a healthier environment by combating harmful bacteria commonly found in kitchens.
- Castile Soap: Made from vegetable oils, Castile soap is biodegradable and non-toxic, making it a safe cleaning option. It effectively cuts through grease and can be used on a variety of surfaces, promoting a more eco-friendly cleaning routine.
- Essential Oils: Essential oils, such as tea tree or lavender, can be added to DIY degreasers for their natural antibacterial and antiviral properties. They not only enhance cleaning efficacy but also provide a pleasant aroma, making the cleaning experience more enjoyable.
What Techniques Should You Use to Apply DIY Degreasers Effectively?
To effectively apply DIY degreasers, consider the following techniques:
- Pre-Cleaning Surface: Before applying the degreaser, it’s essential to remove any loose debris or food particles from the stove surface. This step ensures that the degreaser can penetrate and break down grease more effectively without being hindered by other substances.
- Using Proper Tools: Employing tools such as microfiber cloths, scrub brushes, or sponges can enhance the cleaning process. Microfiber cloths are particularly effective as they can trap dirt and grease while being gentle on surfaces, preventing scratches.
- Allowing Dwell Time: After applying the degreaser, let it sit for a few minutes to allow the ingredients to break down the grease. This dwell time is crucial, as it maximizes the effectiveness of the degreaser, making it easier to wipe away tough residues.
- Rinsing Thoroughly: After scrubbing, it’s important to rinse the surface with clean water to remove any remaining degreaser. This step not only ensures that no residue is left behind but also prevents any potential chemical reactions that might occur from leftover cleaner.
- Testing on Small Areas: Before applying the degreaser to the entire stove, testing it on a small, inconspicuous area can prevent damage to the surface. This precaution helps in determining if the degreaser is appropriate for the material and won’t cause discoloration or deterioration.
How Should You Apply the Degreaser for Maximum Effectiveness?
To achieve maximum effectiveness when applying a degreaser, consider the following methods:
- Choose the Right Degreaser: Selecting a degreaser specifically formulated for your stove type is crucial. The best DIY stove degreasers often contain natural ingredients that effectively break down grease without damaging surfaces.
- Preparation of the Surface: Before applying the degreaser, ensure the surface is free of loose debris and food particles. A clean surface allows the degreaser to penetrate the grease more effectively, leading to better results.
- Application Method: Apply the degreaser using a spray bottle or cloth for targeted coverage. Spraying allows for an even distribution, while a cloth can help in scrubbing tougher spots, ensuring that all greasy areas are treated.
- Allow for Dwell Time: Let the degreaser sit on the greasy surface for the recommended time. This dwell time allows the active ingredients to break down tough grease, making it easier to wipe away.
- Scrubbing Technique: Use a non-abrasive scrubber to gently work the degreaser into the surface. This technique helps lift the grease without scratching or damaging the stove’s finish.
- Rinse Thoroughly: After scrubbing, rinse the area with warm water to remove all degreaser residues. This step is vital to ensure no leftover chemicals remain that could potentially harm food or the stove’s surface.
- Repeat if Necessary: For stubborn grease, you may need to repeat the process. Applying the degreaser a second time can help tackle areas that didn’t respond well initially.
What Tools or Methods Can Improve the Cleaning Outcome?
There are several effective tools and methods to improve the cleaning outcome when making a DIY stove degreaser:
- Baking Soda: Baking soda is a natural abrasive that can help lift grease and grime without scratching surfaces. When mixed with water to form a paste, it can be applied to stubborn stains and left to sit for a while to enhance its effectiveness.
- Vinegar: Vinegar is a powerful natural acid that can dissolve grease and neutralize odors. Combining it with baking soda creates a fizzy reaction that helps break down tough residues, making it easier to wipe away dirt and grime.
- Lemon Juice: Lemon juice contains citric acid, which is effective in cutting through grease and providing a fresh scent. Its antibacterial properties also help sanitize surfaces, making it a great addition to any degreasing solution.
- Dish Soap: Dish soap is designed to cut through grease on dishes, making it a great base for a homemade degreaser. When mixed with hot water, it can create a soapy solution that can be sprayed or applied directly to greasy areas for effective cleaning.
- Essential Oils: Essential oils like tea tree or eucalyptus not only add pleasant scents but also have antimicrobial properties. Adding a few drops to your cleaning solution can enhance its cleaning power while leaving a refreshing aroma behind.
- Steam Cleaners: Steam cleaners use high temperatures to loosen grease and grime without the need for harsh chemicals. They can penetrate crevices and hard-to-reach areas, providing a thorough clean that is both effective and environmentally friendly.
- Microfiber Cloths: Microfiber cloths are excellent for trapping dirt and grease due to their fine fibers. Using them with any degreasing solution allows for better absorption and reduces the need for excessive scrubbing.
How Should You Store Your DIY Stove Degreaser for Longevity?
To ensure the longevity of your DIY stove degreaser, proper storage is essential. Here are the best practices for storing your homemade cleaner:
- Use a Dark Glass Container: Storing your degreaser in a dark glass container helps protect it from light, which can degrade the effectiveness of the ingredients over time.
- Airtight Seal: An airtight container will prevent moisture and air from entering, which can lead to the degradation of the degreaser’s components and reduce its cleaning power.
- Cool, Dry Place: Keeping the degreaser in a cool, dry environment away from heat sources or direct sunlight will help maintain its potency and prevent any chemical reactions that might occur at higher temperatures.
- Label the Container: Clearly labeling the container with the contents and the date of creation allows you to keep track of its freshness and ensures that you use it within an appropriate timeframe.
- Regularly Check for Separation: Over time, some ingredients may separate. Regularly checking and shaking the container can help maintain a uniform mixture, ensuring that the degreaser works effectively whenever needed.
What Are the Ideal Conditions for Storing Your Homemade Cleaner?
The ideal conditions for storing your homemade cleaner ensure its effectiveness and longevity.
- Cool Temperature: Store your cleaner in a cool area, ideally below 70°F (21°C), to prevent degradation of the ingredients. Heat can cause chemical reactions that might reduce the cleaner’s potency or change its composition.
- Dark Environment: Exposure to light can break down certain components in homemade cleaners, especially those containing essential oils or vinegar. A dark cupboard or cabinet is the best place to keep your cleaner, away from direct sunlight.
- Sealed Containers: Use airtight containers to prevent moisture and air from entering, which can promote mold growth or reduce the effectiveness of the cleaner. Glass or high-quality plastic bottles with tight-fitting lids are ideal for this purpose.
- Labeling: Clearly label your homemade cleaner with its contents and the date of preparation. This helps you keep track of its freshness and ensures you are using it safely, especially if it contains strong ingredients like vinegar or citrus oils.
- Avoid Humid Areas: Storing your cleaner in humid environments, such as near sinks or dishwashers, can lead to the growth of bacteria or mold. Opt for a dry storage space to maintain the integrity of your cleaner.
How Long Can You Expect Homemade Degreasers to Remain Effective?
The effectiveness of homemade degreasers can vary based on their ingredients and storage conditions.
- Vinegar-based Degreasers: Typically, vinegar-based degreasers can remain effective for about 1-2 months when stored in a cool, dark place. The acetic acid in vinegar helps break down grease, but over time, its potency may diminish, especially if exposed to air and light.
- Baking Soda Solutions: Baking soda mixtures can last indefinitely if kept dry, but once mixed with water, they should be used within a week for optimum effectiveness. The abrasive nature of baking soda helps scrub away grease, but moisture can lead to clumping and reduced cleaning power.
- Citrus-based Degreasers: Citrus degreasers generally have a shelf life of about 2-3 weeks due to the natural oils and acids they contain. After this time, the freshness and cleaning ability may decrease, as the volatile compounds in citrus can lose their effectiveness when exposed to air.
- Essential Oil Infused Degreasers: Depending on the type of essential oil used, these can remain effective for several months if stored properly. Essential oils not only have degreasing properties but also antimicrobial effects, although their potency may fade over time if not sealed tightly from light and air.
- Soap-based Degreasers: Soap solutions can last for several months when stored in a sealed container. The surfactants in soap help emulsify grease and dirt, making them effective, but they may lose their effectiveness if they dry out or are contaminated with dirt or other substances.