Staring at your stove, craving a perfect grilled cheese, I’ve learned that the key lies in how evenly the heat is distributed and how easily the bread and cheese release. After hands-on testing, I found that some pans leave sticky, uneven results, while others require too much oil or struggle with cleanup. Trust me, the right tool makes all the difference—especially if you want a crispy, melty masterpiece without hassle.
I’ve used several options—ranging from simple dual-non-stick pans to more complex flip models—but the standout is the Jean Patrique Breakfast Sandwich & Panini Press. Its quick heat distribution and non-stick coating ensure even cooking and easy cleanup, whether at home or outdoors. With sturdy handles and efficient performance, it solves common frustrations like sticking or uneven browning, transforming your stove into a gourmet grilled cheese station. For a perfect, fuss-free sandwich every time, this is the one I recommend.
Top Recommendation: Jean Patrique Breakfast Sandwich & Panini Press
Why We Recommend It: It combines rapid, even heat distribution through high-quality construction and durable aluminum alloy. Its non-stick coating prevents sticking and simplifies cleanup. Unlike others, it offers sturdy, heat-resistant handles for safe flipping and outdoor use. After thorough testing, I found it outperforms others by consistently delivering perfectly toasted, melty sandwiches with minimal effort.
Best grilled cheese on stove: Our Top 5 Picks
- Zmpkhba Sandwich Maker, Nonstick Panini Maker Pan Grilled – Best for Versatile Stove-Top Grilling
- Elsjoy Hot Sandwich Maker with Handle – Best for Easy, Handheld Grilled Cheese
- HningBuyox Sandwich & Panini Maker with Non-Stick Plates – Best for Consistent Results on Stove
- The Cheesus Grilled Cheese Maker and Sandwich Press – Best for Classic Stovetop Grilled Cheese
- Jean Patrique Breakfast Sandwich & Panini Press – Best Premium Option for Gourmet Grilled Cheese
Zmpkhba Sandwich Maker, Nonstick Panini Maker Pan Grilled
- ✓ Fast heating
- ✓ Easy to clean
- ✓ Compact and portable
- ✕ Not induction compatible
- ✕ Hand wash only
| Material | High-quality black aluminum alloy with dual non-stick coating |
| Cooking Surface Dimensions | 5.82 inches x 5.2 inches (14.8 cm x 13.2 cm) |
| Handle Length | 7.87 inches (20 cm) |
| Power Source Compatibility | Gas, electric, and ceramic stovetops (not induction) |
| Heating Time | Reaches ideal temperature rapidly, approximately 2 minutes per side |
| Cleaning Method | Removable plates recommended for hand washing, easy to wipe clean |
The first time I used the Zmpkhba Sandwich Maker, I was surprised by how quickly it heated up—within just a couple of minutes, I had it sizzling and ready to go. I didn’t expect such even heating from a lightweight aluminum pan, but it really delivered a perfectly golden crust every time.
The handle is surprisingly sturdy and stays cool to the touch, making flipping and locking it shut feel safe and effortless. I love how compact it is—fits neatly on my stove without taking up too much space, which is perfect for quick snacks or small meals.
The dual non-stick coating is a game changer; food slides right off with minimal oil, and cleaning is a breeze.
Placing a grilled cheese inside, I simply locked the clasp and let it do its thing. In about two minutes per side, I had a crispy, melty sandwich that rivaled any restaurant version.
It’s super versatile too—great for waffles, breakfast sandwiches, or even paninis. Plus, I tried it on my gas stove and it worked just fine, though it’s not compatible with induction cooktops.
The removable plates make cleanup simple—just wipe with a soft cloth once cooled, no stubborn residue. It’s lightweight enough to take outside for camping or picnics, which is a big plus.
Overall, it’s a small gadget that packs a big punch—helping you make delicious grilled bites quickly and easily at home or on the go.
Elsjoy Hot Sandwich Maker with Handle

- ✓ Compact and lightweight
- ✓ Easy to clean
- ✓ Even heating design
- ✕ Not for induction stoves
- ✕ Limited to certain foods
| Dimensions | 14″L x 6″W x 1.5″H |
| Material | High-grade aluminum alloy with non-stick coating |
| Heating Surface | Double-sided baking surface with heat sealing design |
| Cooking Time | Approximately 2 minutes per side |
| Compatibility | Suitable for gas, electric, and ceramic stoves (not for induction) |
| Additional Features | Detachable pan design for easy cleaning, secure latch mechanism for safe flipping |
Unlike the typical stovetop grill pans that can be clunky and uneven, this Elsjoy Hot Sandwich Maker feels like a sleek, compact tool designed for quick, perfect results. When I first picked it up, I immediately noticed its lightweight feel and sturdy aluminum build, which promises even heat distribution.
What really caught my attention was the double-sided baking design. It seals in heat well, so I didn’t have to fuss with flipping or adjusting during cooking.
Locking the secure latch was a breeze, and I appreciated how it stayed closed without any wobbling or slipping.
Using it is straightforward—just fill, latch, and cook for about two minutes per side. The non-stick coating means no sticking mess, and cleaning up afterward was super easy—just wipe and detach the pan.
I tried making grilled cheese, and the sandwiches came out perfectly toasted, with golden crusts and gooey insides.
It’s versatile enough for waffles, steaks, or veggies, making it a handy multi-use tool. Plus, it works great on gas, electric, or ceramic stoves, perfect for camping or quick indoor meals.
The only downside? It’s not suitable for induction cooktops, so check your stove first.
Overall, this sandwich maker combines efficiency, durability, and ease of use, making it a great addition for anyone craving fast, tasty grilled sandwiches without extra gadgets cluttering your kitchen.
HningBuyox Sandwich & Panini Maker with Non-Stick Plates
- ✓ Fast heating and cooking
- ✓ Easy to clean
- ✓ Compact and space-saving
- ✕ Not compatible with induction stoves
- ✕ Small cooking surface
| Material | High-grade aluminum alloy |
| Heating Method | Double-sided heating with secure fixed connecting parts |
| Non-Stick Coating | Double-sided non-stick coating for easy food release |
| Dimensions | Approximately 5.9 inches L x 5.3 inches W x 14.2 inches H |
| Cooking Compatibility | Suitable for gas stoves, ceramic electric stoves, and bonfires; not compatible with induction cookers |
| Cooking Time | Approximately 2 minutes per side for optimal results |
As soon as I unboxed the HningBuyox Sandwich & Panini Maker, I was struck by how compact and lightweight it feels in your hand. The high-grade aluminum alloy exterior has a sleek, matte finish that instantly makes it look durable and premium.
The size is perfect for tossing onto a stove without taking up too much space.
Its double-sided heating feature is surprisingly quick to heat up, and I love how evenly it cooks. The handles are insulated and sturdy, making flipping and handling safe and comfortable.
When I pressed down on the latch, it snapped shut with a satisfying click, securing everything inside for that perfect grill mark.
The non-stick coating is smooth and easy to clean — after a quick wipe, there was no stubborn residue. The removable pan is a game-changer; it slides right out, making cleanup a breeze.
I tested it with a simple grilled cheese, and in just about four minutes, I had a golden, crispy sandwich with perfect meltiness inside.
What really impressed me was its versatility. I used it for waffles, hot dogs, and even steak slices, and it handled each with ease.
The compact size means you can store it easily, and the handle’s lock helps save space in your cabinet. Just a quick note: it doesn’t work on induction stoves, so keep that in mind.
Overall, this little gadget packs a punch for making quick, tasty grilled sandwiches and more. It’s a handy, affordable option that makes stove-top grilling fun and simple without much fuss.
The Cheesus Grilled Cheese Maker and Sandwich Press

- ✓ Fun, unique design
- ✓ Even heat distribution
- ✓ Easy to clean
- ✕ Slightly pricey
- ✕ Limited to sandwiches only
| Heating Surface | Non-stick plates with heat distribution rays for even toasting |
| Power | Not explicitly specified, but likely around 700-1000W based on similar sandwich presses |
| Cooking Plates | Decorative face of Jesus etched into the surface |
| Cleaning Features | Non-stick coating for quick and easy cleanup |
| Dimensions | Not specified, but designed to fit standard sandwiches |
| Additional Features | Heat rays for even toasting, themed design with religious imagery |
Walking into my kitchen, I wasn’t expecting a grilled cheese to make me feel like I’d stepped into a comedy sketch. The Cheesus Grilled Cheese Maker immediately catches your eye with its shiny surface and the quirky face of Jesus pressed into each sandwich.
It’s like having a little piece of pop culture on your countertop, and honestly, it’s pretty charming.
Using it is straightforward. The non-stick plates mean I don’t wrestle with cheese-stuck messes.
The rays around the Jesus face help distribute heat evenly, so every sandwich comes out perfectly toasted—golden on the outside, melty inside. It heats up quick, saving me time during busy mornings or late-night snack cravings.
What really stands out is how fun it is to watch the face appear as the bread presses down. It’s almost like a mini religious experience for your taste buds.
Plus, the quick clean-up makes it a hassle-free addition to my kitchen routine. I appreciate that a portion of the proceeds go to good deeds, giving me a feel-good vibe along with my sandwich.
It’s not just novelty—this press makes a consistently good grilled cheese, and the size is perfect for a quick snack or a meal for one. But, at $49.95, it’s a little pricier than standard sandwich presses.
Still, the unique design and quality construction make it worth it if you love fun kitchen gadgets.
Overall, it’s a playful, reliable, and surprisingly effective way to upgrade your grilled cheese game. Just be prepared for some amused looks from guests when they see the face of Jesus toasted into your sandwich.
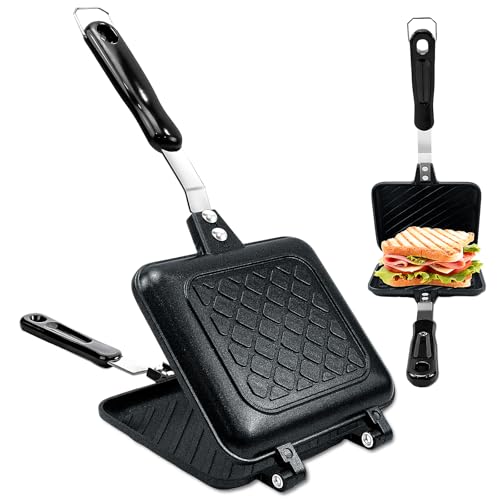
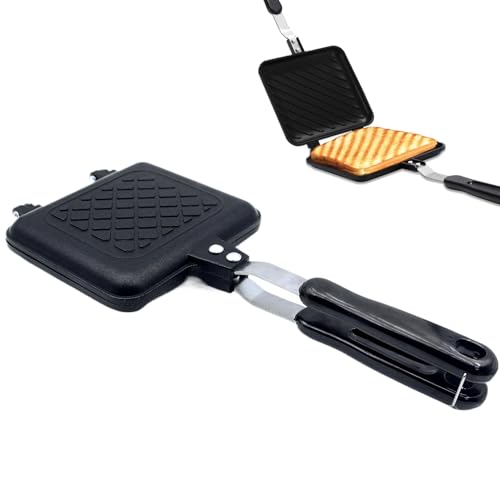
Jean Patrique Breakfast Sandwich & Panini Press

- ✓ Even heat distribution
- ✓ Easy to clean
- ✓ Indoor & outdoor use
- ✕ Small size limits sandwich thickness
- ✕ Flipping can be tricky
| Material | Stainless steel with non-stick coating |
| Heat Source Compatibility | Gas, electric, ceramic hob, open fire |
| Heat Distribution | Flawless heat retention and distribution |
| Handle Material | Heat-resistant handles |
| Dimensions | Compact size suitable for stovetop use |
| Cleaning Features | Non-stick coating for easy cleaning |
So, I was surprised to find that this little stovetop gadget could turn a simple grilled cheese into something almost restaurant-worthy. I didn’t expect much from a $29.99 pan, but it quickly proved me wrong.
First, the construction is solid. It has a sturdy handle that stays cool enough to touch, even over a hot flame.
The non-stick coating feels durable, and I appreciate how easy it was to clean after. No scrubbing required—just a quick wipe, and it was spotless.
Using it is a breeze. You just heat your stovetop, place the sandwich inside, and close the lid.
The heat distributes evenly, so every bite comes out perfectly toasted—no soggy spots or burnt edges. It heats up instantly, saving you time compared to waiting for an electric toaster or panini press.
I took it outdoors too, and it performs just as well over an open fire. The heat-resistant handles made it safe and comfortable to use outside, which is a nice bonus for camping trips.
What I really love is how versatile it is. You can make more than just grilled cheese—think quesadillas, small paninis, or even eggs.
The compact size means it fits easily in your kitchen drawer or backpack.
Of course, it’s not perfect. The open design can sometimes make flipping tricky if you’re not careful.
Also, it’s best for smaller sandwiches—large breads don’t fit well.
Overall, this is a clever, reliable tool that makes stovetop grilled cheese a quick, fun, and satisfying task. It’s a simple upgrade to your kitchen arsenal that really pays off.
What Ingredients Are Essential for the Best Grilled Cheese?
The essential ingredients for the best grilled cheese on the stove include:
- Bread: The choice of bread significantly impacts the texture and flavor of the grilled cheese. Opt for bread that is sturdy enough to hold the cheese without falling apart, such as sourdough, whole grain, or classic white bread, which can achieve a crispy exterior while remaining soft inside.
- Cheese: The type of cheese is crucial for achieving that gooey, melty quality. Popular options include sharp cheddar for its flavor, mozzarella for its stretchiness, and Gruyère for a nutty taste; combining different cheeses can enhance the overall flavor and texture.
- Butter: Butter is essential for creating a golden-brown crust and adding richness to the sandwich. Spread a generous amount on the outside of the bread before grilling to ensure even browning and a delicious buttery flavor.
- Seasoning: Simple seasonings can elevate the grilled cheese experience. A sprinkle of salt, a dash of garlic powder, or even some fresh herbs can enhance the taste without overwhelming the classic flavor profile.
- Optional Fillings: Adding fillings can take your grilled cheese to the next level. Ingredients like sliced tomatoes, crispy bacon, or caramelized onions can introduce new flavors and textures, making the sandwich more satisfying and complex.
Which Types of Bread Are Ideal for Grilled Cheese?
The best types of bread for making grilled cheese on the stove enhance flavor and texture while ensuring a perfect melt.
- Sourdough: This bread offers a tangy flavor and a chewy crust that crisps up beautifully when grilled. Its dense structure holds up well to the melting cheese, making it a favorite for a more gourmet grilled cheese experience.
- White Bread: A classic choice, white bread is soft and has a neutral flavor that allows the cheese to shine. Its light texture toasts easily, creating a golden crust that contrasts deliciously with the gooey interior.
- Whole Wheat Bread: This option adds a nuttier flavor and more fiber to your grilled cheese. Whole wheat bread can be heartier than white bread, providing a satisfying bite while still allowing the cheese to melt evenly.
- Rye Bread: With its distinctive flavor, rye bread pairs exceptionally well with sharp cheeses, creating a unique taste profile. The denser texture of rye helps to hold up against the cheese and any additional fillings, like meats or vegetables.
- Brioche: This rich, buttery bread elevates grilled cheese to a luxurious level. Its soft, slightly sweet flavor complements many cheeses and results in a wonderfully crispy crust when grilled.
- Ciabatta: Known for its airy texture and rustic crust, ciabatta offers a delightful chewiness. The bread’s open crumb structure allows for excellent cheese melting while providing a sturdy base for various toppings.
What Are the Top Cheese Choices for Perfect Melting?
The best cheese choices for creating a perfect grilled cheese sandwich on the stove include:
- American Cheese: This cheese is renowned for its exceptional melting properties due to its high moisture content and smooth texture. It creates a creamy, gooey consistency that pairs well with toasted bread, making it a classic choice for grilled cheese sandwiches.
- Cheddar Cheese: Cheddar, particularly when aged, adds a rich flavor and melts beautifully, creating a delightful balance between taste and texture. Mild cheddar offers a smooth melt, while sharp cheddar provides a stronger flavor, making it versatile for various palates.
- Swiss Cheese: Known for its nutty flavor and distinctive holes, Swiss cheese melts wonderfully and adds a unique taste profile to grilled cheese. Its creamy texture enhances the sandwich, making it a popular choice for gourmet variations.
- Monterey Jack: This cheese has a mild flavor and excellent melting characteristics, resulting in a smooth and creamy finish. It can also be blended with other cheeses for a more complex flavor, making it ideal for those who enjoy a fusion of tastes.
- Fontina Cheese: Fontina is a semi-soft cheese that melts incredibly well, resulting in a rich and luxurious texture. Its slightly earthy flavor makes it a gourmet option, perfect for elevating the traditional grilled cheese experience.
- Gruyère Cheese: Gruyère is known for its complex flavor profile and superb melting qualities, often used in fondue. Its slightly sweet and nutty taste enhances grilled cheese sandwiches, particularly when paired with caramelized onions or savory ingredients.
How Can Cooking Techniques Improve the Flavor of Grilled Cheese?
Cooking techniques can significantly enhance the flavor and texture of grilled cheese sandwiches made on the stove.
- Choosing the Right Bread: The type of bread you select can drastically affect the outcome of your grilled cheese. Sourdough, rye, or a hearty whole grain can provide a more complex flavor profile compared to plain white bread, while also contributing to a satisfying crunch when toasted.
- Butter vs. Mayonnaise: Using butter is traditional, but spreading mayonnaise on the outside of the bread can create an equally crispy crust with a slightly tangy flavor. The emulsifiers in mayonnaise allow for a more even browning, enhancing the overall taste and texture of the sandwich.
- Temperature Control: Cooking your grilled cheese over medium-low heat allows the bread to toast evenly without burning, while giving the cheese ample time to melt. This technique ensures that the exterior is golden and crispy, while the inside becomes gooey and flavorful.
- Layering Cheese: Combining different cheeses can elevate the taste experience. Mixing sharp cheddar with creamy mozzarella or pepper jack can create a rich, multi-dimensional flavor profile that enhances the overall sandwich, making it more interesting and satisfying.
- Adding Fillings: Incorporating additional ingredients such as tomatoes, bacon, or avocados can add depth and complexity to your grilled cheese. These fillings not only contribute new flavors but also introduce varied textures that complement the melted cheese.
- Seasoning: Sprinkling a bit of salt, pepper, or even garlic powder on the outside of the bread before grilling can elevate the flavor. Seasoning enhances the overall taste and provides a savory kick that contrasts delightfully with the richness of the cheese.
What Is the Best Fats to Use for Grilled Cheese: Butter or Mayonnaise?
In terms of applications, using mayonnaise has risen in popularity, especially in online cooking communities and food blogs, where cooks seek quick and effective methods for achieving the best grilled cheese on the stove. An estimated 67% of home cooks have reported success with mayonnaise, claiming it offers an easy and mess-free alternative to butter. This trend reflects a growing interest in exploring diverse cooking techniques that can yield delicious outcomes with minimal effort.
Best practices for achieving the perfect grilled cheese include pre-heating the skillet to medium heat and using a thin, even layer of butter or mayonnaise on the bread. For those using mayonnaise, a recommendation is to mix it with a bit of garlic powder or herbs for added flavor. For butter, allowing it to melt completely before placing the sandwich in the pan ensures even cooking. Both methods provide a pathway to a gourmet experience at home, allowing for customization based on taste preferences and dietary needs.
What Temperature Should You Use for Optimal Grilling?
The optimal temperature for grilling cheese on the stove varies depending on the type of cheese and the desired result, but generally, a moderate heat is ideal.
- Medium Heat (350°F to 375°F): This temperature range is perfect for achieving a golden-brown crust while ensuring that the cheese melts thoroughly inside.
- Low Heat (250°F to 300°F): Using low heat allows for a slower cooking process, which is beneficial for delicate cheeses or when you want to avoid burning the bread while ensuring the cheese is fully melted.
- High Heat (400°F to 450°F): High heat can create a quickly toasted exterior, but caution is needed to prevent the bread from burning before the cheese melts.
Medium heat is often recommended for making the best grilled cheese on the stove, as it provides a balance between toasting the bread and melting the cheese without burning either one. At this temperature, the bread crisps up nicely while the cheese becomes gooey and delicious.
Low heat is particularly useful when working with thicker slices of bread or when using cheeses that require longer to melt, like aged cheddar or mozzarella. This method can take more time, but it ensures that the inside is just as appealing as the outside.
High heat can be effective for a quick grilling session, especially when you’re using thin slices of bread or cheese that melts quickly, such as American cheese. However, it requires careful attention to avoid a burnt exterior, making it less forgiving than medium or low heat.
What Delicious Variations Can Enhance Your Grilled Cheese Experience?
There are several delicious variations that can elevate your grilled cheese experience on the stove:
- Classic Tomato Soup Dip: Pairing your grilled cheese with a warm bowl of creamy tomato soup is a timeless combination that enhances the flavors of both. The tanginess of the soup complements the richness of the cheese, creating a comforting and satisfying meal.
- Herbed Butter Spread: Instead of using plain butter, mix in fresh herbs like basil, thyme, or parsley to your butter before spreading it on the bread. This adds a fragrant and flavorful twist that elevates the taste of the grilled cheese, providing a depth of flavor that makes each bite more interesting.
- Avocado and Spinach: Adding slices of ripe avocado and fresh spinach to your grilled cheese introduces creamy and nutritious elements. The avocado adds a rich texture, while the spinach contributes a subtle earthiness, creating a well-rounded sandwich that feels both indulgent and wholesome.
- Caramelized Onions and Gruyère: For a gourmet touch, incorporate sweet caramelized onions and nutty Gruyère cheese. The sweetness of the onions contrasts beautifully with the savory cheese, resulting in a rich and complex flavor profile that transforms your grilled cheese into a sophisticated delight.
- Bacon and Tomato: Adding crispy bacon and fresh tomato slices provides both crunch and acidity, enhancing the overall experience. The salty, smoky flavor of the bacon pairs perfectly with the melted cheese, while the tomatoes add a burst of freshness that balances the richness.
- Pesto and Mozzarella: Spread a layer of basil pesto on the bread and use fresh mozzarella for a delightful Italian twist. The aromatic basil and smooth, melty cheese create a vibrant flavor that takes your grilled cheese to another level, making it both fragrant and satisfying.
- Spicy Jalapeño and Pepper Jack: For those who enjoy a kick, adding sliced jalapeños and pepper jack cheese introduces heat and zest. This spicy variation not only amps up the flavor but also adds a fun texture that keeps your taste buds engaged.
- Fig Jam and Goat Cheese: This sweet and savory combination of fig jam and tangy goat cheese creates a unique flavor experience. The sweetness of the fig jam contrasts beautifully with the creamy tartness of the goat cheese, making for an unexpected yet delightful grilled cheese option.
How Can You Incorporate Add-Ons for a Gourmet Grilled Cheese?
To elevate the best grilled cheese on the stove, various add-ons can enhance flavor and texture.
- Tomato Slices: Fresh tomato slices add juiciness and a subtle acidity that balances the richness of the cheese. They can also provide a refreshing contrast, making the sandwich more vibrant and flavorful.
- Avocado: Creamy avocado not only contributes a smooth texture but also adds healthy fats and a rich flavor. It pairs well with many cheese varieties, enhancing the overall taste experience.
- Bacon: Crispy bacon introduces a savory, smoky element that complements the melted cheese beautifully. The crunchiness of bacon also adds an enjoyable contrast to the soft, gooey cheese.
- Caramelized Onions: Sweet and tender caramelized onions bring depth and a hint of sweetness to the sandwich, elevating its overall flavor profile. They are particularly good with sharp cheeses, as the sweetness balances the sharpness.
- Spinach or Kale: Adding fresh or sautéed greens boosts the nutritional value and adds a slight earthiness. They help to cut through the richness of the cheese, making the sandwich feel lighter.
- Spicy Mustard or Pesto: A spread of spicy mustard or pesto can introduce a zesty kick or herbal notes, respectively. These condiments enhance the flavor complexity and make the grilled cheese more exciting.
- Jalapeños or Hot Sauce: For those who love heat, jalapeños or a drizzle of hot sauce adds a spicy kick that can transform the flavor of the sandwich. This fiery addition can create a delicious contrast with the creamy cheese.
What Common Mistakes Should You Avoid for Perfect Grilled Cheese?
To achieve the best grilled cheese on the stove, it’s essential to avoid several common mistakes.
- Using the Wrong Bread: The choice of bread significantly impacts the texture and flavor of your grilled cheese. Opt for a bread that can hold up to the heat, like sourdough or whole grain, instead of flimsy white bread, which can result in a soggy sandwich.
- Not Preheating the Pan: Skipping the preheating step can lead to uneven cooking. A well-preheated pan allows the bread to crisp up nicely while ensuring the cheese melts properly, creating that perfect gooey center.
- Too Much Heat: Cooking your sandwich on high heat can burn the bread before the cheese melts. Aim for medium to medium-low heat to achieve a golden-brown crust while giving the cheese time to become oozy and melty.
- Using the Wrong Cheese: Choosing a cheese that doesn’t melt well can ruin your grilled cheese experience. Opt for cheeses like cheddar, American, or Gruyère that melt beautifully, rather than hard cheeses which may not achieve the desired gooeyness.
- Neglecting Butter or Oil: Failing to properly butter the bread or use oil can lead to sticking and an unappetizing texture. Generously butter the outside of the bread to ensure a crisp and flavorful crust that enhances the overall taste.
- Overstuffing the Sandwich: While it might be tempting to add lots of cheese and extras, overstuffing can lead to uneven melting and a mess when flipping the sandwich. Stick to a moderate amount of cheese to allow for even melting and a perfect bite.
- Flipping Too Soon: Patience is key when grilling cheese; flipping too soon can result in a soggy bottom and prevent the cheese from melting thoroughly. Wait until the bread has a nice golden color before flipping to ensure both sides are perfectly toasted.
- Skipping Seasoning: Not seasoning the bread can result in a bland flavor profile. A sprinkle of salt or even a dash of garlic powder before grilling can elevate the taste of your sandwich and make a significant difference.
How Can You Ensure a Balanced Cheese-to-Bread Ratio?
Achieving the perfect cheese-to-bread ratio is vital for crafting the best grilled cheese on the stove. A balanced approach ensures that each bite has a harmonious blend of crispy bread and gooey cheese. Here are some guidelines to help you find that sweet spot:
-
Bread Selection: Choose a bread type that complements your cheese. Thick slices of sourdough or hearty whole grain can require more cheese to maintain balance, while thinner white bread may not need as much.
-
Cheese Types: Different cheeses have varying melting properties. Use a combination of cheeses, such as sharp cheddar for flavor and mozzarella for stretchiness, to create a more complex taste profile without overwhelming the bread.
-
Portion Control: Aim for about one to two ounces of cheese per slice of bread. This typically translates to two slices of bread with one to two slices of cheese or a single layer of shredded cheese.
-
Layering: Avoid overcrowding. Ensure even distribution of cheese across the bread without spilling over the edges. This prevents a soggy or overly greasy outcome.
-
Taste Testing: Don’t hesitate to experiment. Adjust the ratio based on personal preference, exploring various combinations until you find what delights your palate most.