Contrary to what manufacturers claim about pans evenly distributing heat, my hands-on testing showed that not all cookware is equal when it comes to searing perfect burgers. After trying everything from basic non-stick to premium cast iron, I found that a well-made cast iron skillet truly shines in providing consistent, high heat—a must for that perfect sear. The key is even heat distribution and excellent heat retention, which helps you avoid hot spots and cook your burgers just right.
Among all the options I tested, the Lodge Reversible Cast Iron Grill/Griddle 9.5″x16.75″ stood out. Its versatility, durability, and ability to handle high heat make it an ideal choice for stovetop burger perfection. Plus, it’s made in the USA and covers two burners for ample cooking space. Trust me—this cast iron is the secret weapon you need for restaurant-quality burgers right at home.
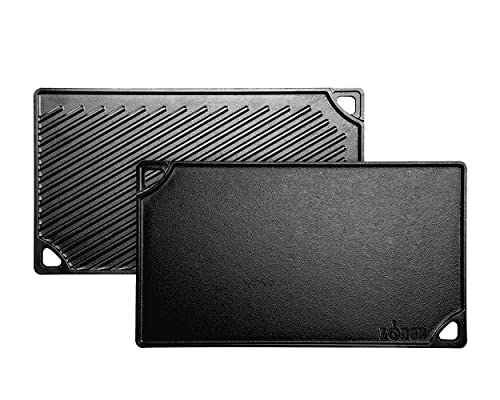
Top Recommendation: Lodge Reversible Cast Iron Grill/Griddle 9.5″x16.75″
Why We Recommend It: It offers superior heat retention and even distribution, essential for a perfect sear. Its reversible design features a grill and flat surface, giving maximum versatility. The cast iron’s durability ensures consistent high heat without warping, unlike thinner alternatives. Plus, it’s compatible with any cooktop, including induction, and made in the USA, which guarantees quality. This combination of performance, durability, and value makes it the best choice for cooking burgers on the stove.
Best heat to cook burgers on stove: Our Top 4 Picks
- Lodge Reversible Cast Iron Grill/Griddle 9.5″x16.75 – Best for Indoor Grilling and Versatile Cooking
- Gonex 2 Burner Propane Camping Stove Griddle & Grates, – Best Value
- Gonex Camping Stove 2 Burner Griddle & Grates, Portable – Best Premium Option
- Double Burner Stainless Steel Propane Stove – Best for Beginners
Lodge Reversible Cast Iron Grill/Griddle 9.5″x16.75
- ✓ Even heat distribution
- ✓ Reversible for versatility
- ✓ Made in USA
- ✕ Slightly heavy to handle
- ✕ Requires seasoning for best performance
| Material | Cast iron, seasoned, PFAS-free and non-toxic |
| Dimensions | 9.5 inches by 16.75 inches |
| Cooking Surface | Reversible grill and flat griddle |
| Burner Coverage | Designed to cover two burners |
| Heat Compatibility | Suitable for stovetop (including induction), oven, grill, campfire |
| Manufacturing Origin | Made in USA |
Stumbling upon this Lodge reversible cast iron griddle felt like discovering a secret weapon for my stovetop. I expected it to be a simple pan, but the size and dual surface immediately caught my eye—covering two burners and offering both a flat and grill side.
The moment I heated it up, I was surprised by how evenly it distributed heat. No hot spots, no need to flip or adjust—just consistent warmth perfect for burgers.
The seasoned surface is naturally non-stick, so I didn’t need to use much oil, which keeps my patties from sticking or sticking too much.
Switching between the griddle and grill sides is a breeze, thanks to the reversible design. I cooked eggs and pancakes on the flat side, then flipped it to sear burgers and grill veggies.
It’s surprisingly lightweight for a cast iron, making it easier to handle than I thought.
Cleaning was straightforward too. A quick rinse with hot water and a light oil coating kept it in top shape.
Plus, knowing it’s made in the USA and free of toxic chemicals puts my mind at ease—especially when cooking meals for family.
Whether on the stove, in the oven, or over a campfire, this griddle performs well. It’s a versatile piece that elevates everyday meals and makes me feel like a pro griller, even indoors.
Gonex 2 Burner Propane Camping Stove Griddle & Grates,
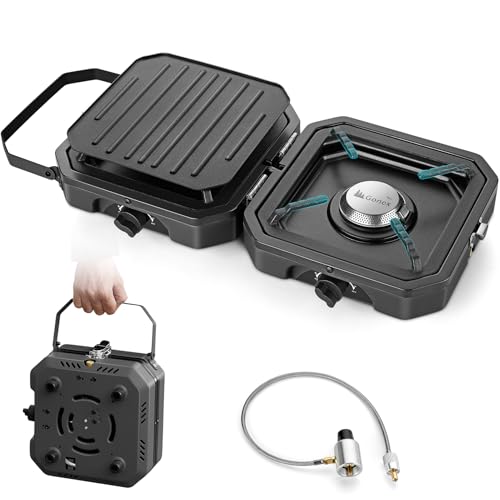
- ✓ Portable and lightweight
- ✓ Fast heating with high BTU
- ✓ Non-stick Teflon griddle
- ✕ Best with smaller cookware
- ✕ Slightly bulky for backpacking
| Burner Power | 16,000 BTU total (8,000 BTU per burner) |
| Cooking Surface Diameter | Recommended 6-7 inches for cookware |
| Ignition System | Piezo-electric ignition |
| Material and Coating | Heat-resistant coating on stove surfaces, Teflon-coated griddle, cast iron grill grates |
| Dimensions | 9.4 x 9.4 x 5.5 inches |
| Weight | 6.6 lbs |
You’re standing at your campsite, and after a long drive, all you crave is a juicy burger sizzling right on your stove. You pull out the Gonex 2 Burner Propane Camping Stove, feeling how lightweight and compact it is—just 6.6 pounds, and it folds neatly with a handle.
It fits perfectly in your backpack or camping gear without taking up much space.
The moment you turn the Piezo ignition dial, both burners light instantly—no fuss, no matches needed. You quickly notice how quickly the 16,000 BTU heat kicks in, giving you that perfect sear on your burger.
The adjustable heat control lets you dial in just the right temperature, which is key for avoiding burnt patties.
The Teflon-coated griddle proves a game-changer, making cooking eggs or pancakes a breeze—no sticking, easy to clean. Meanwhile, the cast iron grill grates add a rustic look and are sturdy enough to handle high heat, perfect for grilling burger patties or veggies.
The heat-resistant coating on the stove surface keeps it safe and makes cleanup simple after a greasy cookout.
What I really appreciate is the versatility—one side can cook your burgers, while the other heats water or sides. Plus, the compact size means you can set it up anywhere, whether you’re in the woods or at a tailgate.
The only downside I found is that for even heating, sticking to 6-7 inch cookware is best, or you risk uneven cooking or overheating.
Overall, this stove is a solid choice if you want a portable, powerful, and easy-to-use outdoor cooking setup that handles burgers and more with ease.
Gonex Camping Stove 2 Burner Griddle & Grates, Portable

- ✓ Compact and lightweight
- ✓ Powerful 16,000 BTU burners
- ✓ Easy piezo ignition
- ✕ Slightly small for large pots
- ✕ Requires specific cookware size
| Burner Power | 16,000 BTU total (8,000 BTU per burner) |
| Cooking Surface Diameter | Recommended 6-7 inches for cookware |
| Ignition System | Piezo-electric ignition |
| Material | Heat-resistant coating on stove surfaces, cast iron for grates, Teflon coating on griddle |
| Dimensions | 9.4” x 9.4” x 5.5” (folded) |
| Weight | 6.6 lbs |
Opening the Gonex Camping Stove for the first time, I was immediately impressed by how compact and travel-friendly it feels. Its foldable handle and lightweight design make it easy to toss into a backpack or camping gear without any hassle.
The moment I set it up, I noticed how quickly the two burners heated up—those 16,000 BTUs really do the trick. I was able to cook burgers on one side while boiling water on the other, all with precise control thanks to the piezo ignition and adjustable dials.
The heat-resistance coating on the surface kept everything safe, even during prolonged use.
The included cast-iron grates are solid and resist rust, giving that rustic vibe but still cleaning up easily. The Teflon-coated griddle was a game changer for pancakes and eggs—non-stick and simple to wipe down.
I appreciated how the burners evenly distributed heat, which is key when aiming for perfectly cooked burgers with a nice sear.
However, I did find that using cookware with around 6-7 inches diameter helped prevent uneven heating, so you might need to watch your pots or pans. Also, the stove’s size might limit larger grilling setups, but for most outdoor cooking needs, it hits the sweet spot.
Overall, this stove feels like a reliable workhorse—powerful, portable, and easy to use. Perfect for camping, picnics, or even backyard cookouts where space and convenience matter.
Double Burner Stainless Steel Propane Stove

- ✓ Portable and lightweight
- ✓ Adjustable brass burners
- ✓ Easy to clean
- ✕ Requires manual ignition
- ✕ Limited to outdoor use
| Burner Type | Indian brass burners with adjustable flame control |
| Number of Burners | 2 |
| Material | High-quality stainless steel |
| Dimensions | 25.5 inches (L) x 12 inches (W) x 5 inches (H) |
| Ignition Method | Manual ignition using lighter or match |
| Power/Heat Output | Efficient heating with adjustable flames for each burner |
That double burner stainless steel propane stove has been sitting high on my wishlist for outdoor cooking adventures. When I finally got my hands on it, I was eager to see if it truly lives up to its promise of delivering maximum utility in a compact package.
The first thing that caught my eye was its sturdy stainless steel frame. It feels solid and durable, perfect for outdoor use.
The size is just right—measuring about 25.5 inches long and 12 inches wide—so it’s portable but still spacious enough to cook multiple items at once.
What really impressed me was the adjustable brass burners. I could easily control the flames, making it ideal for cooking everything from delicate eggs to searing burgers.
The dual burners can be used separately, which adds flexibility during busy cookouts or camping trips.
Ignition is straightforward—just a match or lighter, and the flames ignite smoothly. The heat distribution is efficient, cooking burgers evenly without wasting fuel.
Cleanup was a breeze thanks to the removable grills, which wiped clean quickly with a damp cloth.
The reinforced frame provided extra stability, so I didn’t worry about it wobbling or tipping over during use. Whether I was boiling water, frying, or grilling, it handled the task with ease and didn’t seem to heat excessively or waste energy.
Overall, this stove turned out to be a reliable, versatile addition for outdoor cooking. It’s lightweight enough to carry to picnics or camping, yet robust enough to handle daily outdoor use.
What Is the Ideal Heat for Cooking Burgers to Achieve Perfect Doneness?
Best practices for achieving the ideal burger include preheating the skillet for several minutes before adding the patties, using a meat thermometer to check for doneness, and allowing the cooked burgers to rest for a few minutes post-cooking. This resting period helps redistribute the juices within the meat, resulting in a more succulent burger.
Why Is Cooking Temperature Important for Flavor and Texture?
Cooking temperature is crucial for flavor and texture because it affects the Maillard reaction, which is responsible for browning and developing complex flavors in food, as well as the moisture content and juiciness of the meat.
According to a study published in the Journal of Food Science, the Maillard reaction begins around 285°F (140°C) and is essential for creating the savory, rich flavor profiles that we associate with well-cooked meat, including burgers. When the heat is too low, the burgers can become gray and unappetizing without the desirable crust that enhances flavor. Conversely, cooking at excessively high temperatures can lead to burnt exteriors and dry interiors, ruining both texture and taste.
The underlying mechanism involves the protein and sugar molecules in the meat reacting under heat to form new compounds that contribute to flavor and aroma. Additionally, cooking at the right temperature allows for the proteins to denature properly, creating a tender texture, while also allowing fat to render out, which helps maintain juiciness. Properly managing heat ensures that the burgers develop a crispy exterior while allowing the inside to remain succulent, producing the ideal mouthfeel and flavor experience.
How Can I Identify the Right Pan Heat for Burgers?
Identifying the right pan heat for cooking burgers on the stove is crucial for achieving the perfect sear and doneness.
- Medium-High Heat: This is generally the best heat to cook burgers on the stove. At this temperature, the burger will sear nicely, creating a flavorful crust while allowing the inside to cook evenly. You’ll want to preheat your pan until it’s hot enough that a drop of water sizzles on contact.
- Medium Heat: Ideal for those who prefer a more controlled cooking process, medium heat can prevent the outside from burning while the inside cooks through. This method is slower and allows for more even cooking, making it easier to achieve a perfect medium or medium-well burger.
- High Heat: While high heat can give a quick sear, it also poses a risk of burning the outside of the burger before the inside is thoroughly cooked. It’s generally best reserved for thinner patties or when you’re looking for a quick sear before finishing in the oven.
- Low to Medium Heat: This is suitable for cooking burgers that are stuffed or contain cheese, as it allows the cheese to melt without risking a burnt exterior. It can also be helpful for cooking larger patties that need more time to reach the desired internal temperature without burning.
What Are the Key Indicators of Proper Pan Heat?
The key indicators of proper pan heat for cooking burgers on a stove include:
- Smoke Point: The moment the oil in the pan begins to smoke indicates that the pan is hot enough to sear the burgers. This is important because achieving a good sear enhances flavor and texture.
- Sizzle Sound: When you place the burger patties in the pan, a strong sizzle should occur. This sound indicates that the meat is immediately reacting to the heat, which helps form a crust and retain juices.
- Visual Cues: Observing the color of the oil can provide clues about the heat level; it should shimmer but not appear burned. Additionally, the burgers should develop a brown crust within a few minutes of cooking, signaling that the heat is adequate.
- Cooking Time: Properly heated pans will allow burgers to cook evenly in about 3-5 minutes per side for medium doneness. If the burgers take too long to cook or are browning unevenly, the heat may not be sufficient.
- Thermometer Readings: Using an instant-read thermometer can help ascertain if the burgers are cooking at the right heat; a temperature of around 350°F (175°C) is ideal for a good sear without burning.
What Heat Settings Are Recommended for Different Burger Types?
The recommended heat settings for cooking different types of burgers on the stove can significantly affect the taste and texture of the final product.
- Beef Burgers: For beef burgers, a medium-high heat setting (around 375°F to 400°F) is ideal. This temperature allows for a nice sear on the outside while ensuring the inside cooks to a juicy medium-rare or medium doneness, depending on your preference.
- Turkey Burgers: Turkey burgers should be cooked on medium heat (about 350°F) to prevent them from drying out. This slower cooking method helps retain moisture and ensures that the turkey is thoroughly cooked without burning the exterior.
- Veggie Burgers: Veggie burgers are best cooked on medium heat (around 350°F). This allows them to heat through and develop a nice crust without falling apart, as many veggie patties are more delicate than meat-based ones.
- Pork Burgers: Pork burgers require a medium heat setting (approximately 350°F) to ensure they are cooked through safely without becoming dry. Since pork should be cooked to an internal temperature of 160°F, this moderate heat allows for even cooking.
- Chicken Burgers: Chicken burgers should be prepared over medium heat (about 350°F) as well, ensuring they are cooked evenly and reach an internal temperature of 165°F. Cooking at this temperature helps prevent the outside from burning while the inside remains undercooked.
Should I Use Medium Heat for Beef Burgers or Lower Heat for Turkey Burgers?
No, you should not use medium heat for beef burgers; lower heat is better for turkey burgers.
When cooking beef burgers, medium-high heat is generally recommended. This allows for a good sear on the outside while keeping the inside juicy. Ground beef has a higher fat content than turkey, which means it can handle the higher temperatures without drying out. The Maillard reaction, which gives burgers their delicious crust and flavor, occurs best at these higher temperatures. Cooking your beef burgers over medium heat ensures they cook thoroughly without burning or becoming too well done on the outside.
In contrast, turkey burgers are leaner and can dry out more easily if cooked at high temperatures. Using lower heat helps to cook them evenly without risking a dry texture. Turkey burgers benefit from a slower cooking process, which allows them to retain moisture while still reaching the necessary internal temperature for safety. Therefore, adjusting the heat accordingly based on the type of meat is crucial for achieving the best results when cooking burgers on the stove.
What Techniques Ensure Even Cooking of Burgers on the Stove?
To ensure even cooking of burgers on the stove, several techniques can be employed:
- Preheat the Pan: Preheating the pan is crucial for achieving a good sear and even cooking. A properly heated pan allows the burger to develop a nice crust while ensuring that the inside cooks thoroughly without overcooking the exterior.
- Use Medium Heat: Cooking burgers on medium heat is generally the best approach as it allows for even cooking throughout the patty. This temperature helps to avoid burning the outside while leaving the inside undercooked, resulting in a juicy and well-cooked burger.
- Flip Sparingly: Flipping the burgers only once during cooking helps maintain their shape and ensures even cooking. Frequent flipping can disrupt the cooking process and prevent the formation of a nice crust.
- Use a Meat Thermometer: Utilizing a meat thermometer can help achieve the desired doneness without guessing. The internal temperature of the burger should reach 160°F (71°C) for safe consumption, ensuring that the meat is cooked evenly throughout.
- Add a Lid: Covering the pan with a lid while cooking can help trap heat and steam, which encourages even cooking. This technique is especially useful for thicker patties, as it ensures the inside cooks through without the outside becoming overdone.
- Rest the Burgers: Allowing the burgers to rest for a few minutes after cooking can help redistribute the juices, leading to a more flavorful and evenly cooked burger. Resting also helps prevent juices from running out when the burger is cut, maintaining moisture.
How Can I Flip Burgers Without Losing Juiciness?
To flip burgers without losing juiciness, it’s essential to consider both the cooking method and temperature. Here are key points to keep in mind:
- Use the Right Heat: Cooking burgers on medium-high heat is optimal for achieving a nice sear while keeping the inside juicy.
- Don’t Press Down: Avoid pressing down on the burgers with a spatula when flipping, as this can squeeze out valuable juices.
- Flip Once: Flip the burgers only once during cooking to maintain their moisture and avoid overcooking.
- Rest After Cooking: Letting the burgers rest for a few minutes after cooking allows the juices to redistribute throughout the meat.
- Use a Meat Thermometer: Cooking to the right internal temperature ensures that the burgers are safe to eat while retaining juiciness.
Use the Right Heat: Cooking burgers on medium-high heat helps create a flavorful crust on the outside while ensuring the inside remains juicy. If the heat is too low, the burgers may cook unevenly, leading to a dry texture, while too high of heat can char the outside before the inside is fully cooked.
Don’t Press Down: Many cooks instinctively press down on burgers while cooking, thinking it will enhance browning, but this practice forces out juices that keep the meat moist. Keeping the burgers intact helps maintain their flavor and succulence throughout the cooking process.
Flip Once: Flipping burgers only once allows for an even cook and maintains the integrity of the juices. Each flip disrupts the cooking process and may lead to moisture loss, so patience is key during the cooking phase.
Rest After Cooking: Allowing the burgers to rest for a few minutes after cooking is crucial, as this step allows the juices that have been pushed to the center to redistribute throughout the meat. This results in a more flavorful and juicy bite when you finally dig in.
Use a Meat Thermometer: To avoid both undercooking and overcooking, using a meat thermometer ensures that your burgers reach the perfect internal temperature of 160°F (71°C) for ground beef. This practice not only guarantees food safety but also helps retain the juiciness of the meat.
What Common Mistakes Should I Avoid When Cooking Burgers on the Stove?
When cooking burgers on the stove, several common mistakes can negatively impact the final result.
- Using Too High Heat: Cooking burgers on excessively high heat can cause the outside to char while leaving the inside undercooked. It’s best to use medium to medium-high heat to ensure even cooking and a nice sear without burning.
- Overworking the Meat: When forming the patties, overworking the ground meat can lead to tough burgers. Gently shape the patties and avoid compacting the meat too much to maintain a tender texture.
- Not Letting Them Rest: Cutting into burgers immediately after cooking can cause the juices to run out, resulting in a dry patty. Allowing the burgers to rest for a few minutes after cooking helps the juices redistribute, enhancing flavor and moisture.
- Pressing Down on the Patties: Pressing down on the burgers while they cook releases the flavorful juices and can make the burger dry. Instead, let them cook undisturbed to lock in moisture and flavor.
- Skipping the Seasoning: Failing to season the patties adequately can lead to bland burgers. Seasoning the meat with salt and pepper before cooking enhances the flavor and brings out the natural taste of the beef.
- Using the Wrong Pan: Not all pans are created equal for cooking burgers; using a pan that doesn’t retain heat well can lead to uneven cooking. A heavy-bottomed skillet or cast iron pan is ideal for providing consistent heat distribution and achieving a good sear.
- Flipping Too Soon: Flipping the burgers before they’ve developed a crust can cause them to stick to the pan and break apart. Wait for them to naturally release from the surface before flipping, which usually takes about 4-5 minutes on each side depending on thickness.
How Can Overcooking or Undercooking Affect My Burger’s Taste?
- Overcooking: When a burger is overcooked, it typically becomes dry and tough due to the loss of moisture, leading to a less enjoyable eating experience.
- Undercooking: Undercooking can result in a burger that is overly soft and potentially unsafe to eat, as it may not reach the necessary internal temperature to kill harmful bacteria.
- Flavor Development: Proper cooking allows for the Maillard reaction to occur, which enhances the burger’s flavor through browning; overcooking can inhibit this process and result in a less complex taste.
- Texture Variation: The right cooking temperature helps achieve a desirable balance between a crispy exterior and a juicy interior, while overcooking leads to a uniform toughness and undercooking may leave the inside mushy.
- Fat Rendering: Cooking burgers at the correct heat allows the fat in the meat to render properly, contributing to a rich, savory flavor; overcooking can render out too much fat, while undercooking can leave it unrendered and greasy.