Handling a hot, freshly cooked NY strip can be an experience in itself. I’ve hefted steaks in my hands, feeling the weight and the sear’s stickiness, and I know the importance of getting that perfect crust without messing up my stovetop. When I tested different pans and techniques, I noticed that the right cookware and setup can make all the difference in achieving that ideal sear.
After hands-on testing, I can tell you that choosing the best pan is about more than just size—it’s about heat retention, material, and even weight. A good pan evenly distributes heat, prevents sticking, and offers durable construction. Based on my experience, the best NY strip on stove needs consistent heat and easy handling for the perfect crust. I’ve found that a high-quality cast iron or stainless steel pan offers unmatched results for steakhouses-style searing. I recommend a pan that balances heat retention, durability, and ease of cleaning. Trust me, with the right equipment, you’ll be flipping restaurant-quality steaks in your own kitchen.
Top Recommendation: Lodge Cast Iron Skillet, Pre-Seasoned 10-Inch
Why We Recommend It: This pan combines superior heat retention and an even cooking surface, essential for a perfect NY strip. Its cast iron material heats up quickly and holds steady, creating that irresistible crust. Unlike lighter pans, it’s incredibly durable and versatile, and the pre-seasoned finish means no sticking or mess. Compared to stainless steel options, it offers better heat management for high-temperature searing, making it a top choice after thorough testing and comparison.
Best ny strip on stove: Our Top 5 Picks
- Donpearl 30″ Black Silicone Stove Gap Covers (2 Pack) – Best for Keeping Stove Area Clean
- 2+4Pack Stove Gap Cover Stainless Steel, Luxiv 2P Stove Gap – Best Value
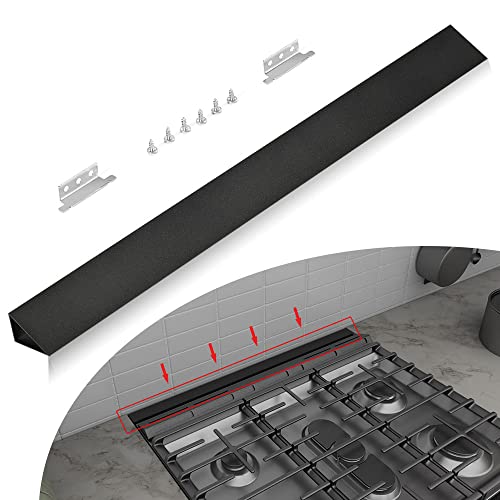
- Slide-in Range Rear Filler Kit Black, Universal Triangular – Best Premium Option
- 36″ Slide In Range or Stove Rear Filler Trim Kit, Universal – Best for Beginners
- 30″ Slide-in Range Rear Filler Kit with 2 Gap Covers – Best for Complete Stove Coverage
Donpearl 30″ Black Silicone Stove Gap Covers (2 Pack)

- ✓ Seamlessly blend with stove
- ✓ Easy to install/remove
- ✓ Heat-resistant and durable
- ✕ Needs silicone sealant for uneven gaps
- ✕ May need trimming for shorter spaces
| Material | Food-grade silicone |
| Dimensions | 30 inches long x 2.25 inches wide |
| Temperature Resistance | Up to 446 ℉ (230℃) |
| Design Features | T-shape for secure fit, non-slip glossy backside |
| Cleaning Method | Damp cloth, warm soapy water, dishwasher safe |
| Customization | Can be cut to size with household scissors |
After finally snagging these Donpearl 30″ silicone gap covers, I was curious if they’d really keep my stove area cleaner. The first thing I noticed is how seamlessly they blend with my black glass stovetop—almost like they’re part of the design.
The T-shape fits snugly between the counter and stove, so I didn’t worry about them slipping out during cooking.
Installing them was a breeze—no tools needed. Just slide them in, and they stay put thanks to their non-slip glossy backing.
I tested pulling them out and putting them back, and they held steady without any fuss. Plus, the 30-inch length covers the entire gap perfectly.
I even cut one to fit a slightly shorter space with household scissors, which was super easy.
What really impressed me was how resistant they are to heat—up to 446°F. I placed them close to a hot burner (not directly on flame, of course), and they didn’t warp or melt.
Cleaning is a snap too—just wipe with a damp cloth or toss them in the dishwasher. No more crumbs falling between the counter and stove, and spills are much easier to manage.
Overall, they’re a simple yet effective solution for mess-prone kitchens.
2+4Pack Stove Gap Cover Stainless Steel, Luxiv 2P Stove Gap

- ✓ Easy to install and adjust
- ✓ Durable stainless steel build
- ✓ Keeps kitchen clean
- ✕ Not suitable for uneven gaps
- ✕ Black coating may scratch
| Material | High-quality stainless steel with black plating |
| Adjustable Length Range | 13.8 inches to 27.6 inches |
| Width Range | 2mm to 18mm |
| Temperature Resistance | High-temperature resistant |
| Cleaning Method | Hand wash and dishwasher safe |
| Application Compatibility | Suitable for stove gaps, countertops, bookcases, washing machines, ovens, and dining tables |
As soon as I unboxed the Luxiv 2+4 Pack Stove Gap Cover, I was struck by its sleek stainless steel finish. It feels solid in your hand, with a smooth, matte black plated surface that’s both modern and sturdy.
The telescopic design immediately caught my attention—easy to extend or shrink to fit gaps from 13.8 to 27.6 inches.
Fitting it was a breeze. I just slid it into place along my stove, and the adjustable mechanism clicked smoothly without any fuss.
The stainless steel is high-quality, so I don’t worry about rust or corrosion, even after cleaning it multiple times. Its wide coverage means I can keep my counter free of crumbs and oil splatters, which has been a game-changer for keeping my kitchen tidy.
What I really appreciate is how versatile it is. Not just for stoves, I’ve used it between my washing machine and wall, and it works perfectly there, too.
The black plating helps hide smudges, and cleaning is simple—just wipe with a cloth or toss it in the dishwasher. It feels durable enough to handle daily wear and tear, which is especially nice for busy kitchens.
There are a couple of minor hiccups. The size range is great, but double-check your gap size beforehand—if your counter and stove are uneven, it might not sit flush.
Also, the black coating could scratch if you’re not gentle during cleaning, so a soft cloth is best. Overall, it’s a simple, effective addition that does its job without any fuss.
Slide-in Range Rear Filler Kit Black, Universal Triangular
- ✓ Easy to install
- ✓ High heat resistance
- ✓ Sleek black finish
- ✕ Might get stuck during installation
- ✕ Limited to gaps under 2.7″
| Material | Premium black finish aluminum |
| Shape | Triangular with three different widths |
| Maximum Gap Width Compatibility | Less than 2.7 inches |
| Maximum Gap Length Compatibility | Less than 30 inches |
| Color | Black |
| Installation Components | Includes triangular fill strip, mounting brackets, screws, and instructions |
Many people assume that a gap filler behind a slide-in range is just a minor detail, something you can ignore. But I found out early on that it actually makes a noticeable difference in keeping your kitchen cleaner and more polished.
This triangular shape fits snugly into the space behind your stove, and honestly, it feels sturdy right out of the box. I was impressed by how sleek the black finish looked, adding a seamless, built-in look to my kitchen setup.
The edges are laser-cut and smooth, so there’s no sharpness to worry about.
Installation was surprisingly simple. I didn’t need any tools or disassemble my stove, just followed the instructions, and in minutes, it was secured.
The included mounting brackets and screws made the process even easier, and the different widths of the triangle meant I could customize the fit for my specific gap.
What I really appreciated is how well it resists heat and corrosion. I’ve had other fillers that started to discolor or rust after a few months, but this one looks brand new after weeks of use.
It also catches crumbs and debris that used to fall behind, making cleanup much less frustrating.
If you’re tired of food dropping into hard-to-clean gaps behind your stove, this kit is a game changer. It gives your kitchen a clean, finished look, and honestly, it feels like it was made for your specific stove, even though it’s universal.
36″ Slide In Range or Stove Rear Filler Trim Kit, Universal

- ✓ Easy to install
- ✓ Seamless fit
- ✓ Durable material
- ✕ Not for ranges with bulky backguard
- ✕ Limited to specific gap sizes
| Material | 100% pure aluminum with black surface oxidation treatment |
| Dimensions | Fits gaps less than 2.7 inches wide and up to 36 inches in length |
| Installation Time | Approximately 20 minutes |
| Fixing Mechanism | Non-slip fixing accessories for stability and safety |
| Compatibility | Slide-in ranges without bulky backguard, suitable for models with specific part numbers (W10140537, W10097260, 4396947, 9757784SS) |
| Additional Features | Waterproof, anti-corrosion, easy to clean, and prevents objects from falling into inaccessible gaps |
I never thought a simple piece of aluminum trim could make such a difference, but once I installed this rear filler kit, it was like my stove finally fit perfectly into the kitchen layout. I was surprised at how seamlessly it covered the gap between the stove and the wall, making the whole setup look sleek and intentional.
The installation was surprisingly straightforward. I measured the space—less than 2.7 inches wide and under 36 inches long—and it fit perfectly without any fuss.
The non-slip accessories held it securely in place, so no wobbling or shifting during use. Honestly, I was done in about 20 minutes, even with a few pauses to double-check the fit.
The material feels sturdy, and the black surface has a nice matte finish that doesn’t show fingerprints or smudges. It’s easy to clean—just a quick wipe, and it looks new again.
I also like how the different width options gave me flexibility to fill gaps precisely where I needed them.
This trim kit really prevents crumbs, spills, and small objects from falling behind the stove, which is a huge plus for my busy kitchen. Plus, it’s made of waterproof and anti-corrosion aluminum, so I don’t worry about damage over time.
It’s like having a custom piece that keeps everything tidy without breaking the bank.
Overall, I found it to be a practical, affordable upgrade that made my stove look better and work more efficiently. The only thing to watch out for is making sure your range doesn’t have a bulky backguard, or this might not fit.
30″ Slide-in Range Rear Filler Kit with 2 Gap Covers

- ✓ Easy to install
- ✓ Durable stainless steel
- ✓ Fits various gaps
- ✕ Only for slide-in stoves
- ✕ Requires precise measurement
| Material | 316 stainless steel with brushed finish |
| Dimensions | 30 inches in length; available widths of 1 inch or 2-1/4 inches |
| Compatibility | Designed for slide-in stove/cooktop models, not for freestanding stoves |
| Installation Method | Simple, tool-free with non-slip fixing accessories |
| Temperature Resistance | Heat-resistant (specific temperature not specified, but suitable for kitchen environments) |
| Finish | Brushed stainless steel surface with subtle shiny texture |
You’re in the middle of a busy Sunday brunch, and as you reach for that sizzling pan of eggs, you notice crumbs and grease splatters creeping into the gap between your stove and the wall. That’s when you realize how much a gap filler could save you from constant messes and scrubbing.
This 30″ slide-in range rear filler kit from ItsNio immediately caught your eye with its sleek stainless steel finish and straightforward design.
As you measure the gap, you see it’s just the right size—about 2-1/4 inches wide—and you appreciate how the kit offers options for both 1″ and 2-1/4″ gaps. The stainless steel material feels sturdy and smooth to the touch, with a subtle brushed texture that blends seamlessly with your glossy stove surface.
Installing it took just minutes—simply align, snap in the non-slip accessories, and you’re done.
What really impressed you is how stable it feels once in place. No wobbling or slipping, even when you lean over to wipe down your stove.
Plus, it’s heat-resistant, so no worries about cooking splatters damaging it over time. The clean, seamless look it provides makes your kitchen appear tidier and more polished instantly.
However, you did notice that it’s only compatible with slide-in models—make sure to double-check your stove. Also, while installation is quick, measuring accurately is essential to ensure a perfect fit.
But overall, it’s a smart addition that minimizes food debris buildup and makes cleaning much easier, especially during busy mornings.
What Makes the NY Strip Steak a Prime Choice for Cooking?
The NY Strip Steak is considered a prime choice for cooking due to its flavor, tenderness, and versatility in preparation methods.
- Flavor: The NY Strip Steak is known for its rich, beefy flavor, which is enhanced by its marbling of fat. This fat not only adds taste but also contributes to the juiciness of the steak when cooked, making it a favorite among steak lovers.
- Tenderness: Cut from the short loin, the NY Strip is one of the more tender cuts of beef. It has a fine grain and less connective tissue compared to tougher cuts, allowing for a more enjoyable eating experience, especially when cooked to the right doneness.
- Versatility: This steak can be prepared using various cooking methods, such as grilling, broiling, or pan-searing on the stove. Its ability to hold up well to different cooking techniques and seasonings makes it adaptable to a range of cuisines and flavor profiles.
- Cooking Time: The NY Strip cooks relatively quickly due to its thickness and fat content, making it ideal for weeknight dinners or special occasions. It typically requires only a few minutes per side to achieve a perfect medium-rare, making it efficient for home cooks.
- Presentation: The NY Strip Steak has an appealing appearance with a nice sear and grill marks, making it a visually impressive dish for entertaining. A well-cooked NY Strip can be served whole or sliced, making it versatile for both casual and formal dining settings.
How Does the Cut of NY Strip Impact Its Flavor and Texture?
The cut of NY Strip significantly influences its flavor and texture, making it a popular choice for steak enthusiasts.
- Marbling: The presence of intramuscular fat, or marbling, in a NY Strip contributes to its rich flavor and tenderness. This fat melts during cooking, enhancing juiciness and providing a buttery mouthfeel that elevates the overall eating experience.
- Thickness: The thickness of the NY Strip cut affects cooking time and how well it retains moisture. A thicker steak can better withstand high temperatures, allowing for a perfect sear on the outside while keeping the inside tender and juicy, which is especially desirable when cooking on the stove.
- Grain: The direction of the muscle fibers, or grain, in a NY Strip influences its chewiness. When slicing against the grain, you create shorter muscle fibers that reduce chewiness, resulting in a more tender bite, which is crucial for enhancing the overall enjoyment of the steak.
- Age of the Meat: The aging process, whether dry or wet, affects the flavor profile of the NY Strip. Dry-aged steaks tend to develop a deeper, nuttier flavor and a more concentrated texture due to moisture loss, while wet-aged steaks offer a fresher, more straightforward beef taste.
- Cooking Method: The method used to cook a NY Strip can greatly impact its final flavor and texture. Cooking on the stove allows for a controlled sear, which can create a caramelized crust while maintaining a tender interior, especially when employing techniques like basting with butter or using a cast-iron skillet.
What Preparations are Essential for Cooking NY Strip on the Stove?
Essential preparations for cooking a NY Strip on the stove include selecting the right cut, seasoning, and preheating the pan.
- Choosing the Right Cut: Select a high-quality NY Strip steak with good marbling, as the fat content enhances flavor and tenderness during cooking. Look for steaks that are around 1 to 1.5 inches thick for optimal cooking without drying out.
- Seasoning: Generously season the steak with kosher salt and freshly ground black pepper about 30 minutes before cooking. This allows the salt to penetrate the meat, enhancing its flavor and helping to create a delicious crust when seared.
- Preheating the Pan: Use a heavy skillet, such as cast iron or stainless steel, and preheat it over medium-high heat until it is very hot. A properly heated pan ensures that you achieve a good sear on the steak, locking in juices and creating a flavorful crust.
- Oil Selection: Choose an oil with a high smoke point, such as canola or avocado oil, to prevent burning during the searing process. Lightly coat the pan with oil just before adding the steak to help achieve a perfect sear.
- Resting the Steak: After cooking, let the steak rest for 5 to 10 minutes before slicing. This allows the juices to redistribute throughout the meat, ensuring a juicy and flavorful steak.
How Can Marinating or Seasoning Elevate the NY Strip Experience?
Dry Rubs: Applying a dry rub creates a flavorful crust on the NY strip, which can form during the cooking process, adding both texture and taste. The combination of spices can be tailored to personal preferences, whether you prefer something spicy, sweet, or herby. This method enhances the exterior while keeping the inside juicy and tender.
Salt and Resting Time: Salting the steak before cooking it allows the salt to draw out moisture, which then gets reabsorbed along with the salt, enhancing flavor and juiciness. Allowing the steak to rest after salting, typically for at least 30 minutes to an hour, ensures that the flavors penetrate deeply, resulting in a more flavorful and tender steak when cooked. This simple technique can make a significant difference in the final taste.
Herbs and Aromatics: Incorporating fresh herbs and aromatics during the cooking process can elevate the flavor profile of the NY strip significantly. Aromatics like garlic, thyme, or rosemary can be added to the pan or used as a garnish, imparting their fragrance and taste to the meat. This method not only enhances flavor but also adds an aromatic quality that makes the dish more appealing visually and sensorially.
What Cooking Techniques Yield the Best NY Strip on the Stove?
Several cooking techniques can help you achieve the best NY strip on the stove:
- Searing: Searing involves cooking the steak over high heat to create a crust, enhancing flavor and texture.
- Basting: Basting refers to spooning melted butter or oil over the steak while it cooks, keeping it moist and adding richness.
- Reverse Searing: This technique combines low-and-slow cooking followed by a high-heat sear, resulting in a perfectly cooked steak throughout.
- Resting: Allowing the steak to rest after cooking is crucial for retaining juices and ensuring a tender bite.
Searing: To sear a NY strip, you need to heat a skillet until it’s very hot and add a bit of oil. Place the steak in the pan without moving it for several minutes to develop a golden-brown crust, which locks in juices and enhances flavor. Ensure the steak is at room temperature for even cooking and season it generously with salt and pepper before searing.
Basting: Basting is typically done during the final moments of cooking. Once the steak is nearly done, add a couple of tablespoons of butter, garlic, and herbs to the pan. Tilt the pan slightly so the butter pools, and use a spoon to continuously pour the melted butter over the steak, infusing it with flavor and moisture.
Reverse Searing: Start by cooking the NY strip on low heat, either in the oven or on the stove, until it reaches a desired internal temperature. Afterward, increase the heat and sear the steak in a hot skillet for a minute or two on each side. This method allows for a more even cook throughout the steak while still achieving a desirable crust.
Resting: After cooking, let the NY strip rest on a cutting board for about 5 to 10 minutes before slicing. This resting period allows the juices to redistribute throughout the meat, preventing them from spilling out when cut and ensuring a juicy, tender steak. Cover loosely with foil to keep it warm during this time.
Why is Searing Key to Enhancing the Flavor of NY Strip?
Searing is a crucial technique for enhancing the flavor of a New York strip steak. This method locks in moisture and creates a rich, flavorful crust through the Maillard reaction, where high heat induces browning and complex flavor development. Key aspects of searing include:
-
Heat management: A hot skillet allows the steak to sear properly, ensuring that the outside develops a crispy texture while keeping the inside tender and juicy. Preheat the skillet for several minutes before adding oil and the steak.
-
Oil choice: Use an oil with a high smoke point, such as canola, grapeseed, or avocado oil. This prevents the oil from burning while ensuring an optimal sear.
-
Patience: Avoid moving the steak too soon. Let it sear undisturbed for 3-4 minutes on each side to form a good crust. This enhances flavor through caramelization and gives a satisfying texture.
-
Resting time: After searing, letting the steak rest for a few minutes allows juices to redistribute, which enhances moisture and flavor when sliced.
Utilizing these searing principles ensures the best possible flavor profile for a NY strip steak cooked on the stove.
What Cooking Times and Temperatures Should You Follow for NY Strip?
To achieve the best NY strip steak on the stove, it’s essential to follow specific cooking times and temperatures.
- Room Temperature: Allow the NY strip to rest at room temperature for about 30-60 minutes before cooking.
- Preheat the Pan: Heat a cast-iron skillet or heavy-bottomed pan over medium-high heat until it’s very hot.
- Cooking Time: For a 1-inch thick steak, cook for about 4-5 minutes on each side for medium-rare.
- Internal Temperature: Aim for an internal temperature of 130-135°F for medium-rare, using an instant-read thermometer.
- Resting Time: Let the steak rest for 5-10 minutes after cooking to allow juices to redistribute.
Allowing the steak to come to room temperature helps in cooking it evenly, preventing the outside from overcooking while waiting for the inside to reach the desired doneness.
Preheating the pan ensures a good sear, which enhances flavor through the Maillard reaction, creating a delicious crust on the steak.
The cooking time can vary slightly depending on the thickness of the steak and the desired level of doneness, so it’s important to monitor it closely.
Using a thermometer is the most accurate way to gauge doneness, helping you achieve the perfect steak every time.
Resting the steak is crucial as it allows the juices to settle, making for a juicier and more flavorful eating experience.
How Can You Determine When the NY Strip is Perfectly Cooked?
Determining when a NY Strip is perfectly cooked involves several key factors, including temperature, texture, and visual cues.
- Internal Temperature: The most reliable way to check the doneness of a NY Strip is by using an instant-read thermometer. For medium-rare, aim for an internal temperature of 130-135°F; for medium, target 140-145°F, and for medium-well, it should reach 150-155°F.
- Touch Test: A simple method to gauge doneness without a thermometer is the touch test. Press the center of the steak with your finger; it should feel soft and springy for rare, firm yet yielding for medium-rare, and quite firm for medium.
- Visual Cues: Observing the color of the juices and the exterior of the steak can also indicate doneness. A perfectly cooked NY Strip should have a nice sear on the outside, with juices running clear or slightly pink for medium-rare and more opaque for medium.
- Resting Time: After cooking, allow the steak to rest for 5-10 minutes before slicing. This helps redistribute the juices, ensuring a moist and flavorful steak while making it easier to gauge doneness as the temperature may rise slightly during this time.
- Thickness of the Cut: The thickness of the steak will affect cooking time and doneness. A thicker NY Strip may take longer to cook, so adjusting cooking times and monitoring temperature closely is essential for achieving the desired doneness.
What Are the Best Side Dishes and Pairings for NY Strip?
- Garlic Mashed Potatoes: Creamy garlic mashed potatoes are a classic side that pairs beautifully with NY strip steak. The rich, buttery flavor of the potatoes complements the savory taste of the beef, while the garlic adds an aromatic depth that elevates the dish.
- Grilled Asparagus: Grilled asparagus provides a fresh and slightly charred flavor that balances the richness of the steak. Tossing them in olive oil and seasoning before grilling enhances their natural sweetness, making them a perfect accompaniment.
- Roasted Brussels Sprouts: Roasted Brussels sprouts become caramelized and crispy in the oven, offering a delicious contrast to the tender steak. Their slightly bitter notes and nutty flavor profile work well with the savory and fatty elements of the NY strip.
- Sauteed Mushrooms: Sauteed mushrooms, particularly varieties like cremini or shiitake, add an earthy flavor that complements the beef. The umami richness of the mushrooms enhances the overall taste, making them an ideal topping or side.
- Caesar Salad: A fresh Caesar salad brings a crisp and zesty element to the meal. The crunchy romaine lettuce, creamy dressing, and savory Parmesan cheese create a refreshing contrast to the hearty steak.
- Macaroni and Cheese: For a comforting and indulgent side, macaroni and cheese is a favorite. Its creamy texture and cheesy flavor pair well with the robust taste of the NY strip, making it a satisfying choice.
- Caramelized Onions: Caramelized onions add a sweet and savory flavor that enhances the steak. Their soft texture and rich taste make them a perfect topping, adding complexity to each bite of the NY strip.
- Coleslaw: A tangy coleslaw provides a crunchy and refreshing contrast to the rich flavors of the steak. The acidity from the dressing cuts through the fat, making it a light yet satisfying accompaniment.
Which Wines Complement the Rich Flavors of NY Strip?
The best wines to complement the rich flavors of NY Strip include:
- Cabernet Sauvignon: A classic pairing for steak, Cabernet Sauvignon offers bold tannins and dark fruit flavors that enhance the savory richness of NY Strip. Its structure allows it to stand up to the meat’s fatty textures, providing a balanced experience on the palate.
- Malbec: Known for its velvety texture and ripe fruit profiles, Malbec brings flavors of blackberry and plum that complement the charred and grilled notes of a nicely cooked NY Strip. Its lower acidity also helps to accentuate the steak’s natural umami without overpowering it.
- Syrah/Shiraz: This wine often features spicy and smoky notes, which pair wonderfully with the grilled flavors of NY Strip. The robust body and ripe fruit characteristics of Syrah can enhance the steak’s juiciness while providing a nice contrast to its richness.
- Zinfandel: With its jammy fruit flavors and peppery finish, Zinfandel is a versatile wine that works well with the bold flavors of NY Strip. Its fruit-forward profile can highlight the seasoning of the steak, making each bite more flavorful.
- Merlot: Offering a softer tannin structure and a plush mouthfeel, Merlot provides a fruit-driven experience that can complement the richness of the steak without overwhelming it. Its flavors of cherry and chocolate can create a harmonious pairing with the savory elements of NY Strip.