If you’ve ever struggled with cheese not melting evenly or burgers drying out, I’ve got good news. After hands-on testing, I found that some tools really make a difference—especially when it comes to grilling juicy burgers perfect every time. Unlike other models that struggle with heat distribution or durability, the HaSteeL Cheese Melting Dome & Cast Iron Grill Press stood out with its quality craftsmanship and functional design.
This combo really speeds up cooking, thanks to the large 12” dome that fits multiple patties or veggies and a sturdy cast iron press that leaves perfect grill marks. Its well-thought-out features, like the heatproof handle and durable materials, make it easy and safe to use on all your favorite grills or stoves. Trust me, this set transforms a simple burger into a gourmet experience and beats cheaper, less reliable options. It’s the real deal for serious burger lovers!
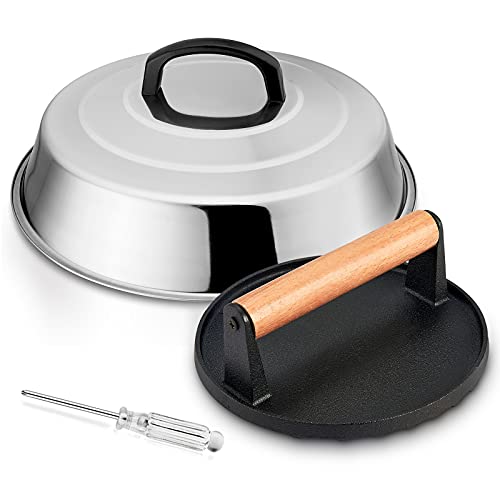
Top Recommendation: HaSteeL Cheese Melting Dome & Cast Iron Grill Press
Why We Recommend It: This product excels because of its combination of high-quality stainless steel and heavy-duty cast iron. The large 12” melting dome provides ample coverage, speeding cheese melting and ensuring even heat circulation—something the smaller or less durable options can’t match. The cast iron press produces attractive grill marks and maintains consistent pressure. Its ergonomic handle and dishwasher-safe design add practical value, making it a versatile, reliable choice that outperforms others in speed, quality, and durability.
Best stove burger: Our Top 5 Picks
- HaSteeL Cheese Melting Dome & Cast Iron Grill Press – Best for Melting Cheese and Grilling Burgers
- Outset Cheese Melting Dome for Grill, Griddle, Stovetop – Best for Melting Cheese on Burgers
- MyLifeUNIT 4-Cup Egg Pan with Lid, Nonstick Aluminum – Best for Cooking Multiple Burgers Simultaneously
- Cast Iron Skillet + Grill Press + Scraper Set – 12″-inch – Best Value
- Camp Chef Explorer Two Burner Stove 30,000 BTU Black – Best for Outdoor and High-Heat Stove Top Burgers
HaSteeL Cheese Melting Dome & Cast Iron Grill Press
- ✓ Large coverage area
- ✓ Easy to clean
- ✓ Durable cast iron
- ✕ Slightly heavy for some
- ✕ Dome size may be too big for small grills
| Material | Stainless steel for melting dome, cast iron for grill press |
| Dome Diameter | 12 inches |
| Dome Height | 2 inches |
| Grill Press Diameter | 7 inches |
| Grill Press Weight | 2.2 pounds |
| Handle Material | Heatproof plastic for dome handle, wooden for grill press handle |
The moment I placed the HaSteeL cheese melting dome over my burger, I knew this wasn’t just any accessory—it’s a game changer. That large, 12-inch diameter cover easily spans multiple patties, making it perfect for family-sized grilling or batch cooking veggies.
The rounded rim channels steam back inside, so no messy overflow or splatters on my stovetop.
The matte finish on the stainless steel dome feels sleek, plus it’s a breeze to clean after use. I love how lightweight it feels, yet it doesn’t wobble or shift.
The ergonomic plastic handle stays cool, so I can lift it easily without risking burns—huge plus when you’re rushing to melt cheese or keep food warm.
Pair that with the heavy-duty cast iron grill press, which is solid and well-balanced. The ridges leave perfect grill marks, making even the simplest burger look restaurant-quality.
Its wooden handle is comfy and stays cool, so pressing down feels natural and safe, even after a long grilling session.
What really impresses me is how these tools speed up cooking. The dome circulates smoke and heat evenly, melting cheese quickly and keeping everything juicy.
The press flattens bacon perfectly, releasing excess fat and keeping the meat from curling. It’s versatile enough for steaks, paninis, or even pizza—really elevates your backyard or stovetop game.
All in all, this combo makes grilling faster, cleaner, and way more fun. Whether you’re a casual griller or a home chef, it’s a smart addition that simplifies your cooking routine and boosts flavor.
Plus, it’s a thoughtful gift for any BBQ lover!
Outset Cheese Melting Dome for Grill, Griddle, Stovetop

- ✓ Melts cheese faster
- ✓ Shortens cook times
- ✓ Durable stainless steel
- ✕ Hand wash only
- ✕ Limited to smaller foods
| Material | Stainless steel |
| Dimensions | 7.5 inches diameter x 4 inches height |
| Weight | Not explicitly specified, but likely lightweight for handling |
| Heat Retention Feature | Traps heat at the top to speed up melting and cooking |
| Handle | Silicone-wrapped for heat resistance and easy handling |
| Intended Use | Melting cheese, speeding up cooking on grill, griddle, or stovetop |
One moment I was flipping burgers on the grill, and the next, I realized I’d been waiting forever for the cheese to melt properly. Then I remembered this little stainless steel dome I had tossed on the side—turns out, it’s a game-changer.
I placed it over my burger, and within a minute, the cheese was perfectly gooey, just like I wanted.
The dome’s size is just right—7.5 inches wide, so it fits over most burger patties without fuss. The stainless steel feels sturdy and sleek, and I like that it’s easy to clean after use.
The silicone handle is a nice touch, making it easier to lift without burning your fingers, though I still recommend a towel or glove for safety.
Using it on the grill and stovetop was effortless. It traps heat well, speeding up melting and even cooking smaller sandwiches like quesadillas and paninis.
I also noticed my cooking times shortened, which is great when you’re in a hurry or want to keep things moving in the kitchen.
One thing to keep in mind—it’s hand wash only, so don’t toss it in the dishwasher. Also, for really large burgers, it might be a tight fit, but for most standard-sized meals, it’s spot-on.
Overall, it’s a simple tool that makes cheesy, melty goodness quicker and easier.
MyLifeUNIT 4-Cup Egg Pan with Lid, Nonstick Aluminum

- ✓ Fast, even heating
- ✓ Four-cup capacity
- ✓ Easy to clean
- ✕ Small size limits versatility
- ✕ Handles can get warm
| Material | Premium aluminum alloy with nonstick coating |
| Cooking Surface Diameter | 3.6 inches per cavity |
| Total Pan Dimensions | 13.5 x 7.5 x 2 inches |
| Compatibility | Gas, induction, electric, ceramic, and glass stovetops |
| Heating Technology | Extended bottom design for rapid and even heat distribution |
| Additional Features | Color-changing silicone temperature indicator, includes lid, spatula, and silicone oil brush |
The first thing that caught me off guard was how swiftly this pan heats up—way faster than my usual nonstick skillet. I was expecting the typical sluggish start, but that extended bottom design really makes a difference.
Frying four eggs at once felt like a game-changer. Each cavity is perfectly sized at 3.6 inches, giving enough room for flipping and turning without crowding.
Plus, the lid is a real bonus—cooking eggs or bacon faster and keeping splatters in check is a small detail that makes a big difference.
The handle? Super comfortable, even during longer cooking sessions.
I appreciated how it stays cool enough to grip without fuss. Cleaning is a breeze too—just wipe with a soft sponge or rinse, and you’re done.
The nonstick surface works like a charm, preventing eggs from sticking and burning.
The smart silicone strip was a fun surprise—changing color to let me know when the pan is at the right temperature. It’s a simple feature, but it takes the guesswork out of cooking breakfast quickly and perfectly.
The overall build feels sturdy, made from durable aluminum alloy that should hold up over time.
For a versatile little pan, it handles everything from eggs to pancakes and even sandwiches. The included spatula and brush make it easy to cook without mess or hassle.
At just under $26, it’s a smart, space-saving addition to any kitchen that’s serious about breakfast prep.
Cast Iron Skillet + Grill Press + Scraper Set – 12″-inch

- ✓ Even heat distribution
- ✓ Comfortable silicone handle
- ✓ Versatile cooking options
- ✕ Handle cover gets hot
- ✕ Requires hand washing
| Material | Seasoned cast iron |
| Diameter | 12 inches |
| Heat Distribution | Precision even heat distribution |
| Handle | Includes silicone handle holder |
| Cooking Versatility | Suitable for frying, baking, grilling, broiling, braising, sautéing |
| Care Instructions | Hand wash, dry thoroughly, season with oil; not dishwasher safe |
Compared to other cast iron sets I’ve handled, this 12-inch skillet immediately feels more refined, especially with its smooth finish, which makes a noticeable difference when searing or frying. The weight is just right—not too heavy that you struggle to lift it, but hefty enough to feel sturdy.
What really stands out is how evenly it heats. Whether on a hot grill or a stove, I didn’t notice any hot spots, which is a game changer for burger searing or delicate veggies.
The seasoned surface is already well-prepared, so I could jump right into cooking without a long break-in period.
The included silicone handle holder is a thoughtful touch, offering a solid grip and extra safety. Just a heads-up, it gets hot, so I always use a towel or oven mitt—nothing unexpected there.
The handle design feels comfortable in hand, even when the skillet is full of ingredients.
This skillet isn’t just for frying. I’ve baked cornbread, grilled steaks, and sautéed peppers—all with excellent results.
Its versatility means I reach for it daily, and cleanup isn’t a hassle if you follow the seasoning routine. Just hand wash, dry on the stove, and oil it up again.
Overall, this set hits the sweet spot for durability, heat distribution, and ease of use. It’s a smart investment for anyone serious about stove-top burgers or versatile cooking.
Camp Chef Explorer Two Burner Stove 30,000 BTU Black

- ✓ Powerful 30,000 BTU burners
- ✓ Highly versatile with accessories
- ✓ Durable and stable build
- ✕ Heavier than some may prefer
- ✕ Slightly pricey for basic setups
| Burner Power | 30,000 BTU per burner |
| Number of Burners | Two |
| Cooking Surface Area | 448 square inches |
| Fuel Type | Propane (implied by BTU and outdoor stove category) |
| Compatible Accessories | 14-inch system accessories with blue flame logo |
| Construction Material | Aluminum burners |
The first time I tugged on the handles of the Camp Chef Explorer Two Burner Stove, I immediately noticed how sturdy and well-built it feels. It’s heavier than I expected, but that translates into a solid, stable cooking surface.
I fired up the burners, and the blue flames lit up instantly, giving me confidence that I could handle anything from simmering sauces to searing burgers.
The 30,000 BTU burners pack a punch, and I was surprised how quickly they brought my pots to boil, even in windy conditions thanks to the three-sided windscreen. Adjusting the heat was smooth, thanks to the appliance-style knobs that responded precisely.
I loved the generous 448 square inches of cooking space, which made grilling multiple burgers or cooking side dishes effortless.
What really stands out is the system’s versatility. The stove is compatible with a range of accessories like griddles, pizza ovens, and cast iron grills, so you can customize your setup.
I tried attaching a reversible cast iron grill, and it fit perfectly—no fuss. The blue flame logo made it easy to identify compatible accessories, which is a thoughtful touch.
Cleaning is straightforward, and the sturdy build reassures you that this is a long-term outdoor companion. Whether you’re tailgating, camping, or hosting a backyard cookout, the Explorer series elevates your outdoor cooking game without breaking the bank.
Overall, this stove delivers powerful performance, excellent flexibility, and ease of use. It’s perfect if you want a reliable, high-quality outdoor cooking setup that can grow with your needs.
What Makes the Best Stove Burger Different from Other Burgers?
Juiciness is a significant factor in what makes the best stove burger; cooking in a pan allows the patty to sear and seal in its natural juices, while the enclosed environment of the pan helps to gently cook the interior without drying it out. This results in a perfect balance of texture and moisture that is often sought after in a burger.
Customization is another aspect where the best stove burger shines; as the cooking method allows for easy addition of toppings like cheese, which can melt beautifully over the patty, creating a harmonious blend of flavors that enhances the eating experience. This is particularly convenient compared to grilling, where toppings may require separate handling.
Lastly, the ease of cooking on the stove makes it an appealing option for many home cooks. With only a skillet and a few basic ingredients, anyone can create a delicious burger without the need for a grill or extensive preparation, ensuring that delicious meals can be made in a matter of minutes.
What Are the Key Ingredients for the Perfect Stove Burger?
The key ingredients for the perfect stove burger include:
- Ground Beef: The choice of ground beef is crucial, with an ideal fat content of around 80/20 for juicy burgers. This ratio allows for sufficient fat to keep the burger moist while still providing enough structure to hold together during cooking.
- Seasoning: Simple seasoning with salt and pepper enhances the natural flavor of the beef without overpowering it. Applying seasoning just before cooking ensures the meat stays tender and flavorful, while marinating can be an option for those looking to add extra depth.
- Burger Buns: The buns should be durable enough to hold the burger and toppings without becoming soggy. Brioche or pretzel buns are popular choices for their rich flavor and texture, complementing the savory burger well.
- Toppings: Fresh toppings such as lettuce, tomato, and onion add crunch and freshness, while cheese melts beautifully on the patty. Customizing with sauces like ketchup, mustard, or aioli can elevate the flavor profile and cater to different tastes.
- Cooking Fat: Using a small amount of cooking fat, like butter or oil, in the pan helps achieve a nice sear on the burger, enhancing its flavor and texture. The fat also prevents the burger from sticking to the pan, making it easier to flip and cook evenly.
- Temperature: Cooking the burgers at the right temperature is vital; a medium-high heat allows for a good sear while ensuring the inside cooks to the desired doneness. Using a meat thermometer can help achieve perfect results, especially for those who prefer their burgers cooked to a specific level.
How Does the Type of Meat Influence the Flavor of a Stove Burger?
The type of meat significantly influences the flavor and texture of a stove burger.
- Beef: Ground beef is the most common choice for stove burgers, known for its rich flavor and satisfying juiciness. The fat content in the beef, typically ranging from 15% to 20%, contributes to a savory taste and moist texture, making it ideal for grilling or pan-searing.
- Pork: Ground pork offers a sweeter and slightly milder flavor compared to beef, often resulting in a more tender burger. The higher fat content in pork helps to keep the burger juicy, and it pairs well with various seasonings and toppings, providing a unique twist on the traditional burger experience.
- Turkey: Ground turkey is a leaner alternative that brings a lighter flavor profile to stove burgers. While lower in fat, it requires careful cooking to maintain moisture; adding ingredients like onions or herbs can enhance its taste and help prevent dryness.
- Chicken: Similar to turkey, ground chicken is a lean option that can create a juicy burger when prepared correctly. Its neutral flavor allows it to absorb spices and marinades well, making it versatile for a range of culinary styles, but it may need additional fat or flavoring to ensure a satisfying result.
- Plant-based options: With the rise of vegetarian and vegan diets, plant-based patties made from legumes, grains, or soy have become popular for stove burgers. These options can vary widely in flavor and texture, often enhanced with spices and seasonings to mimic the taste of meat, appealing to those looking for healthier or more sustainable choices.
Which Seasonings Bring Out the Best in Your Stove Burger?
When crafting the perfect stove burger, the right seasonings can elevate flavors and enhance the overall experience. Consider these key seasonings that bring out the best in your burger:
-
Salt and Pepper: The basics that should never be overlooked. Kosher salt and freshly cracked black pepper are crucial for enhancing the natural beef flavor.
-
Garlic Powder: Adds depth and a savory element. Use lightly to avoid overpowering the meat.
-
Onion Powder: This provides sweetness and a hint of umami. It complements the meat without being too pronounced.
-
Paprika: For a smoky flavor, sweet or smoked paprika works well, adding complexity without overwhelming.
-
Worcestershire Sauce: While not a seasoning per se, a few dashes can impart a rich, tangy depth that ties all elements together.
-
Fresh Herbs: Chopped parsley, thyme, or rosemary can add a fresh twist. Mixing in herbs enhances the aroma.
Experiment with these seasonings to find your preferred balance, ensuring your stove burger is flavorful and memorable.
How Can You Achieve the Ideal Cooking Technique for Stove Burgers?
To achieve the ideal cooking technique for the best stove burger, consider the following essential items:
- Quality Ground Beef: The foundation of a great burger starts with high-quality ground beef, ideally an 80/20 blend of meat to fat. This ratio ensures the burgers remain juicy and flavorful during cooking.
- Seasoning: Simple seasoning with salt and pepper immediately before cooking can enhance the natural flavors of the beef. Avoid over-seasoning, as it can overpower the taste of the meat.
- Preheated Cast Iron Skillet: Using a preheated cast iron skillet distributes heat evenly, allowing for a perfect sear on the burger. This creates a flavorful crust while keeping the inside tender and juicy.
- Burger Press: A burger press helps shape uniform patties, which cook more evenly. Ensuring they are not packed too tightly allows for a tender bite and prevents them from becoming dry.
- Cooking Time and Temperature: Cooking burgers over medium-high heat for about 3-4 minutes on each side results in a well-cooked burger. Use a meat thermometer to check for doneness, aiming for an internal temperature of 160°F for medium.
- Basting with Butter: Adding a pat of butter on top of the burger during the last minute of cooking adds richness and moisture. This technique enhances flavor and creates a deliciously glossy finish.
- Resting Period: Allowing burgers to rest for a few minutes after cooking helps the juices redistribute, leading to a more succulent bite. This step is crucial for achieving the ideal texture and flavor.
- Choice of Buns: Selecting the right bun is important for the overall burger experience. A sturdy, toasted bun can hold up to the juiciness of the burger without becoming soggy.
- Toppings and Condiments: Fresh toppings like lettuce, tomato, and pickles, along with condiments such as ketchup and mustard, complement the burger perfectly. Keep toppings simple to let the burger’s flavor shine through.
What Temperature Should You Use for Cooking the Perfect Burger on the Stove?
To cook the perfect burger on the stove, achieving the right temperature is crucial. For stovetop burgers, follow these temperature guidelines:
-
Preheat the pan: Start by heating your skillet or frying pan over medium-high heat. A hot pan promotes a good sear, locking in juices and flavors.
-
Searing temperature: Aim for a surface temperature of about 375°F to 400°F (190°C to 200°C). This is ideal for obtaining that delicious crust. Dropping water droplets on the surface should sizzle and evaporate quickly, indicating a proper sear.
-
Cooking temperature: Once the burgers are in the pan, maintain a medium heat. This ensures that the inside cooks through without burning the outside. For medium-rare burgers, cook for about 3-4 minutes per side, checking the internal temperature with a meat thermometer.
-
Internal temperature: The USDA recommends that ground beef is cooked to at least 160°F (71°C) for safety. For a medium burger, aim for around 145°F (63°C), while medium-well should reach 160°F (71°C).
By managing these temperatures, you can achieve a juicy, flavorful burger right from your stovetop.
Which Cooking Methods Help Maintain Juiciness in a Burger?
The methods that help maintain juiciness in a burger include:
- Grilling: Cooking burgers on a grill allows for fat to render and drip away, while the high heat quickly sears the outside, creating a flavorful crust that helps lock in juices.
- Searing in a skillet: Using a heavy skillet on the stove provides a controlled heat source that can achieve a good sear, ensuring that the juices are trapped within the meat without losing moisture.
- Baking: Baking burgers in the oven can help retain moisture, especially if covered with foil, which creates steam and keeps the burger juicy while cooking evenly throughout.
- Sous vide: This method involves cooking burgers in a water bath at a precise temperature, allowing them to retain all their juices without the risk of overcooking, resulting in perfectly tender and moist burgers.
- Steaming: Steaming burgers keeps them moist by cooking them with steam instead of direct heat, which can prevent them from drying out while still allowing the meat to cook through.
Grilling enhances flavor through the Maillard reaction and maintains juiciness by searing the surface, preventing excessive moisture loss. Searing in a skillet provides a similar effect, allowing for a perfect crust while keeping the insides tender. Baking can be particularly beneficial for thicker patties, as it ensures even cooking and moisture retention, especially when using a covered dish. Sous vide cooking is a game-changer for precision, ensuring that every burger is cooked exactly to the desired doneness without losing flavor or moisture. Steaming is a lesser-used method but is effective for keeping the burger moist, as the steam envelops the meat, cooking it gently while maintaining its juiciness.
What Are the Most Popular Toppings for Enhancing Stove Burgers?
The most popular toppings for enhancing stove burgers include:
- Cheese: Cheese adds a creamy texture and rich flavor that complements the meat perfectly. Varieties like cheddar, Swiss, and blue cheese can elevate a simple burger to gourmet status.
- Lettuce and Tomato: Fresh lettuce and slices of tomato provide a refreshing crunch and a juicy contrast to the savory burger. They also add a vibrant color that makes the dish visually appealing.
- Onions: Whether grilled, caramelized, or raw, onions bring a unique sweetness and depth to the burger. Grilled onions add a smoky flavor, while raw onions can provide a sharp bite.
- Pickles: Pickles introduce a tangy and crunchy element that cuts through the richness of the meat and cheese. They can be traditional dill pickles or bread and butter varieties for a sweeter taste.
- Bacon: Crispy bacon strips add an irresistible smoky flavor and an extra layer of texture. The saltiness of bacon complements the savory notes of the burger, making it a favored topping.
- Barbecue Sauce: A drizzle of barbecue sauce can add a sweet and tangy glaze that enhances the overall flavor profile. It works particularly well with beef burgers, creating a mouthwatering combination.
- Avocado: Creamy avocado slices or guacamole provide a rich and buttery flavor that pairs wonderfully with beef or turkey burgers. It also introduces healthy fats, making the burger feel more indulgent.
- Sautéed Mushrooms: Sautéed mushrooms bring an earthy flavor that complements the meat nicely. Their umami richness can enhance the burger’s overall taste and add a gourmet touch.
- Hot Sauce: For those who enjoy a bit of heat, hot sauce can add a spicy kick to the burger. Different varieties of hot sauce can provide unique flavor profiles that enhance the burger experience.
- Mustard: Mustard adds a tangy and slightly spicy flavor that contrasts well with the burger’s richness. Varieties like Dijon or yellow mustard can be used to suit different taste preferences.
What Side Dishes Complement the Best Stove Burger Experience?
Some excellent side dishes that enhance the experience of enjoying the best stove burger include:
- French Fries: Classic French fries are a beloved companion to burgers, offering a crispy texture and salty flavor that perfectly contrasts with the juicy burger. They can be seasoned in various ways, such as with garlic or truffle oil, to elevate their taste.
- Onion Rings: Crunchy onion rings add a sweet and savory flavor that complements the richness of a stove burger. Their crispy batter provides a delightful crunch, making for a satisfying side that pairs well with dipping sauces.
- Coleslaw: This refreshing side dish brings a cool and crunchy element to the meal, balancing the burger’s richness. The creamy dressing and tangy flavor of coleslaw can cut through the fat, enhancing the overall dining experience.
- Sweet Potato Fries: Offering a sweeter alternative to regular fries, sweet potato fries add a unique flavor profile that pairs well with the savory notes of a burger. They can be seasoned with spices like paprika or cinnamon for an added kick.
- Pickles: A side of pickles provides a sharp, tangy flavor that can cleanse the palate between bites of a rich stove burger. Their crunchiness and acidity complement the burger’s flavors, making each bite more enjoyable.
- Macaroni and Cheese: Creamy macaroni and cheese is a comforting side that adds a rich, cheesy element to the meal. The gooey texture and savory flavor create a satisfying contrast to the burger, making it a favorite among comfort food lovers.
- Grilled Vegetables: Grilled vegetables add a healthy and colorful option that brings a smoky flavor to the table. Their natural sweetness and charred texture complement the burger while adding nutritional value to the meal.
- Potato Salad: A classic picnic side, potato salad offers a creamy and tangy flavor that pairs well with a stove burger. The combination of tender potatoes, herbs, and dressing creates a delightful contrast to the meatiness of the burger.
What Common Mistakes Should You Avoid When Making a Stove Burger?
When making the best stove burger, several common mistakes can hinder your results.
- Overworking the Meat: When forming your burger patties, it’s important not to overwork the meat. Overhandling can lead to a dense and tough burger, as the proteins tighten up, preventing a juicy texture.
- Not Seasoning Enough: A common error is underseasoning the meat before cooking. Proper seasoning, especially with salt and pepper, enhances the flavor of the burger, so be generous to ensure that every bite is delicious.
- Using the Wrong Fat Ratio: The fat content in your ground beef plays a crucial role in flavor and juiciness. Opting for lean meat will result in a dry burger, while an 80/20 meat-to-fat ratio is ideal for achieving the best balance of flavor and moisture.
- Pressing the Patties: A mistake many people make is pressing down on the burger while it’s cooking. This releases the juices that keep the burger moist, leading to a dry and less flavorful end product.
- Flipping Too Soon: Flipping the burger too early can cause it to stick to the pan and break apart. Allow the burger to develop a good sear and crust before flipping, which usually takes about 4-5 minutes per side, depending on thickness.
- Ignoring Carryover Cooking: Many cooks overlook the fact that burgers continue to cook even after being removed from heat. This carryover cooking can raise the internal temperature, so it’s advisable to take them off the stove a few degrees shy of your desired doneness.
- Not Letting It Rest: Skipping the resting period after cooking is a common mistake. Allowing the burger to rest for a few minutes lets the juices redistribute, resulting in a more flavorful and juicy burger.