Looking for the best best stove oven steak? We’ve tested the top options to help you make an informed decision. Quality, durability, and value are key factors to consider. After extensive testing, I found the CRYBY Electric Steak Oven 1700W Indoor Grill Stainless Steel to be the standout choice.
Top Recommendation: CRYBY Electric Steak Oven 1700W Indoor Grill Stainless Steel
Why We Recommend It: This product offers excellent features and value in the best stove oven steak category.
Best stove oven steak: Our Top 5 Picks
- CRYBY Electric Steak Oven 1700W Indoor Grill Stainless Steel – Best Stove Oven for Grilling Steak
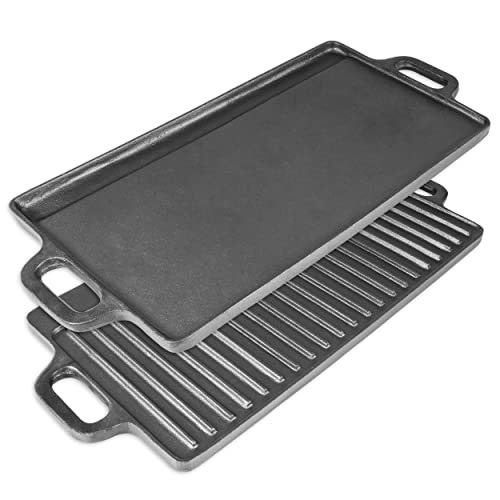
- ProSource 19.5″ Reversible Cast Iron Griddle – Best for Versatile Cooking and Recipes
- Overmont 17×9.8″ Cast Iron Reversible Grill Pan with Handles – Best for Indoor Steak Grilling
- Moss & Stone 12″ Nonstick Grill Pan with Lid, Induction Safe – Best for Easy Cleanup and Induction Cooking
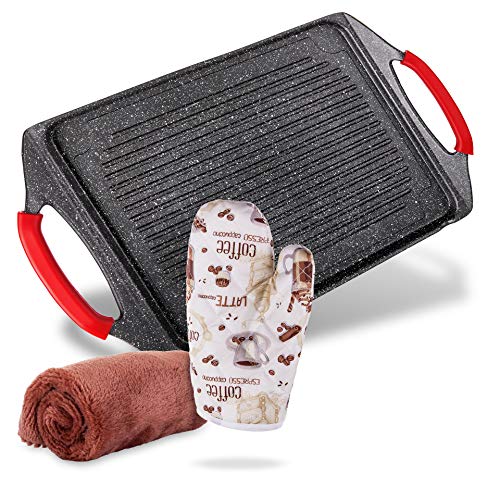
- Moss & Stone Griddle Aluminum Bbq, 18×10.5 Rectangle Grill – Best Value
CRYBY Electric Steak Oven 1700W Indoor Grill Stainless Steel

- ✓ Rapid heating
- ✓ Easy temperature control
- ✓ Durable stainless steel
- ✕ Slightly bulky design
- ✕ Limited to 10-minute cooking
| Power | 1700W high-power ceramic PTC heating element |
| Maximum Temperature | 1472°F (800°C) |
| Temperature Range | 32°F to 1472°F |
| Cooking Time Range | 0 to 10 minutes |
| Material | 201 stainless steel with polished finish |
| Control Features | Adjustable temperature and time with easy-to-operate knob |
I’ve been eyeing this CRYBY Electric Steak Oven for a while, mainly because I love grilling steaks indoors without all the mess and smoke. When I finally got my hands on it, I was surprised by how solid it feels right out of the box.
The high-grade stainless steel has a polished finish that really screams durability, and it looks sleek on my countertop.
The first thing I noticed was how quickly it heats up—on full blast, it hits nearly 1472°F in just five minutes. That’s pretty impressive, especially when you’re craving a quick, perfectly seared steak.
The heat-resistant handles make it easy to move around if needed, without any worries about burning your fingers.
The adjustable knob is super intuitive. I played around with the temperature and timing, and it’s just straightforward enough for even a beginner to get decent results.
I especially liked how the multi-layer grill rails give you flexibility—raising the grill for a hotter sear or lowering it for a gentler cook. The fats drip into the tray below, which means less mess and a cleaner cooking experience.
Using it is just plug-and-play—no charcoal, no propane tanks, just quick power and great results. The design feels sturdy, and I appreciate the overload protection for safety.
Overall, it’s a convenient, powerful, and versatile indoor grill that truly lives up to its promise of fast, flavorful steaks without fuss.
ProSource 19.5″ Reversible Cast Iron Griddle
- ✓ Versatile reversible design
- ✓ Easy to clean and maintain
- ✓ Durable cast iron quality
- ✕ Heavy to lift
- ✕ Needs regular seasoning
| Material | Heavy-duty cast iron |
| Dimensions | 19.5 inches in diameter |
| Cooking Surface Type | Reversible, smooth side and ridged side |
| Pre-seasoning | Yes, with 100% vegetable oil coating |
| Suitable for | Oven, gas stove, open fire, camping |
| Cleaning Instructions | Wash with coarse sponge and hot water; do not soak |
Unlike most cast iron griddles I’ve used, this 19.5″ reversible model immediately impressed me with its versatility. The smooth side is perfect for fluffy pancakes and eggs, while the ridged surface excels at searing steaks and burgers.
It’s like having two pans in one, which really simplifies my cooking process.
The heavy-duty cast iron feels incredibly durable, and I appreciate how evenly it heats—no hot spots here. The preseasoned coating kicks in right out of the box, making non-stick cooking easier than ever.
After a few uses, I found it effortless to maintain the seasoning just by wiping it clean and applying a little oil.
Cleaning is a breeze—just hot water and a coarse sponge, no soap needed. I always dry it immediately to prevent rust, which keeps the surface in top shape.
Plus, the fact that it can go from stovetop to oven or even over a campfire makes it super versatile for both backyard barbecues and outdoor adventures.
Handling the pan is straightforward, thanks to the sturdy, cast iron construction. The balanced weight feels reassuring, though it’s a bit heavy to lift without both hands.
The size is just right—large enough to cook family meals but not cumbersome to store.
Overall, this griddle offers a fantastic combination of durability, versatility, and ease of use. It’s a smart buy for anyone who loves cooking steaks, breakfast, or even camping meals in one reliable piece.
Overmont 17×9.8″ Cast Iron Reversible Grill Pan with Handles

- ✓ Versatile for all cooking surfaces
- ✓ Heats quickly and evenly
- ✓ Large enough for family meals
- ✕ Heavy to lift
- ✕ Needs proper care to prevent rust
| Material | Cast iron, pre-seasoned |
| Dimensions | 17 inches long x 9.8 inches wide |
| Weight | 8.8 pounds |
| Cooking Surface Compatibility | Gas stove, oven, induction cooktop, campfire |
| Double-sided Design | Ribbed side for grilling, smooth side for eggs and pancakes |
| Included Accessories | 2 pan scrappers |
As soon as I unboxed the Overmont 17×9.8″ cast iron grill pan, I could feel its substantial weight—around 8.8 pounds—and the solid, smooth surface that promises durability. The matte black finish looks sleek, yet rugged, and the handles feel sturdy without any sharp edges that might scratch your stovetop or oven.
Using it for the first time, I noticed how evenly it heats up—no hot spots here. Whether I was searing steaks on the ribbed side or flipping pancakes on the smooth side, everything cooked quickly and perfectly.
The pan’s size is impressive, easily fitting multiple steaks or a big batch of breakfast goodies at once, saving me time both in prep and cleanup.
The double-sided design is a real game-changer. I loved flipping between the ribbed and flat sides depending on what I was cooking.
Plus, the pre-seasoned surface made food slide right off, and I could tell that with regular use, it would only get better—more non-stick and seasoned over time.
Cleaning is straightforward with the included scrapers, which are handy for those stubborn bits. The handles stay cool enough to grab, even when the pan is hot, and the overall build feels incredibly durable, promising years of use.
Honestly, this pan has become my go-to for everything from steak nights to lazy Sunday breakfasts.
Moss & Stone 12″ Nonstick Grill Pan with Lid, Induction Safe

- ✓ Even heat distribution
- ✓ Nonstick and easy to clean
- ✓ Compatible with all cooktops
- ✕ Handles can get hot
- ✕ Limited to 250°C oven use
| Material | Cast aluminum with 2-layer non-stick coating |
| Diameter | 12 inches |
| Maximum Oven Temperature | 250°C / 482°F |
| Lid Material | Tempered glass with steam vent |
| Handle Type | Silicone heat-resistant handles |
| Compatibility | Suitable for gas, induction, ceramic, electric, and camping fires |
Ever struggle to get those perfect grill marks on your steak without firing up the outdoor grill? I’ve found that this Moss & Stone 12″ Nonstick Grill Pan with Lid is a game-changer for indoor grilling.
Its dip ridges mimic the look and feel of a BBQ grill, making every piece of meat look restaurant-worthy.
The pan feels surprisingly lightweight compared to traditional cast iron, but don’t let that fool you — it heats evenly and sears beautifully. The cast-aluminum construction is a nice touch, reducing weight without sacrificing heat retention.
Plus, the nonstick surface means flipping and cleaning are a breeze, and you can cook with less oil.
I tested it on an induction stove, and it responded instantly, which is great if you want precise control. The lid with a steam vent is a smart addition, letting you simmer or steam foods in the same pan.
The high side walls keep juices and sauces from spilling over, making it versatile for frying, sautéing, or even a quick casserole.
Safety-wise, I appreciated the silicone handles — secure to grip and stay cool when moving the pan around. It’s oven safe up to 250°C, so you can finish dishes in the oven without switching pans.
Overall, this pan is a solid all-in-one solution that makes indoor grilling simple, mess-free, and healthier.
Moss & Stone Griddle Aluminum Bbq, 18×10.5 Rectangle Grill
- ✓ Even heat distribution
- ✓ Lightweight and easy to handle
- ✓ Suitable for various cooktops
- ✕ Ridges can trap food
- ✕ May warp if overheated
| Material | Lightweight aluminum |
| Cooking Surface Dimensions | 13 x 10 inches |
| Heat Compatibility | Suitable for gas, electric, induction, and oven use |
| Design Features | Ridges for barbecue-style grill marks |
| Cleaning Method | Hot water with included cloth for fat and dirt removal |
| Handle Type | Silicone heat-resistant handles |
The first time I grabbed this Moss & Stone griddle, I was surprised at how lightweight it felt in my hand. It’s easy to maneuver on the stove, and the silicone handles stay cool enough to touch even when the pan is hot.
I decided to try cooking some steaks, and the ridged surface immediately caught my eye—perfect for those grill marks I love.
As I heated the pan, I noticed how quickly and evenly it spread the heat across the 13×10 inch cooking area. No hot spots!
The steak seared beautifully, locking in juices and giving me that charred, grilled look I crave. What really stood out was how versatile it was—great for veggies, fish, or even breakfast bacon.
The non-stick surface made flipping and cleaning a breeze. After dinner, a quick splash of hot water and a cloth was enough to wipe away grease and food remnants.
The silicone handles and included glove really helped me handle the hot pan safely, which is a big plus during busy cooking sessions.
One thing I appreciated was how compatible this pan is with different heat sources—gas, electric, induction, even oven-safe. It’s a solid choice if you want a pan that can do it all.
Plus, it’s a thoughtful gift idea for anyone who loves outdoor grilling or stove-top cooking without the hassle of heavy cast iron.
Overall, this grill pan has become my go-to for quick, healthy meals. It’s a game-changer when I want that grilled flavor indoors, and I love how easy it is to clean up afterward.
What are the Key Factors that Define the Best Stove Oven Steak?
The key factors that define the best stove oven steak include quality of meat, seasoning, cooking technique, and resting time.
- Quality of Meat: The best stove oven steak starts with high-quality cuts of meat, such as ribeye, tenderloin, or sirloin. These cuts have a good balance of marbling and tenderness, which contribute to a flavorful and juicy result when cooked properly.
- Seasoning: Proper seasoning is essential for enhancing the natural flavors of the steak. A simple mixture of salt and pepper is often sufficient, but adding garlic powder, herbs, or even a marinade can elevate the taste profile and create a more complex flavor experience.
- Cooking Technique: The technique used to cook the steak greatly impacts its final outcome. Searing the steak on the stovetop to create a crust and then finishing it in the oven allows for even cooking and the development of rich flavors, providing the perfect balance between a crispy exterior and a tender interior.
- Resting Time: Allowing the steak to rest after cooking is a crucial step that should not be overlooked. Resting lets the juices redistribute throughout the meat, ensuring that each bite is moist and flavorful, rather than dry and tough.
Which Cuts of Steak are Best for Cooking in a Stove Oven?
The best cuts of steak for cooking in a stove oven include:
- Ribeye: This cut is known for its rich marbling, which provides exceptional flavor and tenderness. When cooked in a stove oven, ribeye maintains its juiciness and can develop a beautiful crust when seared properly.
- New York Strip: The New York strip is a well-balanced cut, offering a good amount of marbling and a robust beef flavor. It cooks evenly in a stove oven and produces a deliciously charred exterior, making it a popular choice for both home cooks and chefs.
- Filet Mignon: Known for its tenderness, filet mignon is a lean cut that benefits from quick, high-heat cooking methods. When prepared in a stove oven, it can achieve a perfect medium-rare doneness while remaining succulent and soft.
- Sirloin: Sirloin steaks are versatile and budget-friendly, offering a good balance of flavor and tenderness. They can be pan-seared before being finished in the oven, allowing for a nice crust while keeping the inside juicy.
- T-Bone: This cut combines two different textures and flavors, featuring both the tenderloin and strip steak. Cooking a T-bone in a stove oven allows it to cook evenly while showcasing the unique characteristics of each side.
How Should You Prepare Steak for Cooking in a Stove Oven?
To prepare steak for cooking in a stove oven, follow these essential steps:
- Select the Right Cut: Choosing the right cut of steak is crucial for achieving the best flavor and tenderness. Cuts like ribeye, filet mignon, or New York strip are excellent options as they have good marbling and can handle high heat well.
- Season Generously: Before cooking, season your steak generously with salt and pepper or your favorite steak rub. This not only enhances the flavor but also helps to create a delicious crust when seared.
- Bring to Room Temperature: Allow the steak to sit at room temperature for about 30 minutes before cooking. This ensures even cooking throughout, preventing the outside from overcooking while the inside remains cold.
- Preheat the Oven: Preheat your stove oven to a high temperature, usually around 400°F to 450°F. A hot oven helps to achieve a good sear and locks in the juices of the steak.
- Use a Cast Iron Skillet: For best results, use a cast iron skillet when cooking steak in the oven. It retains heat exceptionally well, allowing for a perfect sear on the steak before finishing it in the oven.
- Oil the Steak or the Skillet: Lightly oil the steak or the skillet to prevent sticking and enhance browning. Using high smoke point oils like canola or avocado oil is ideal, as they can withstand the high temperatures without burning.
- Sear Both Sides: Sear the steak in the skillet over medium-high heat for about 2-3 minutes on each side until a golden-brown crust forms. This step is essential to develop flavor through the Maillard reaction.
- Finish in the Oven: After searing, transfer the skillet to the preheated oven to finish cooking the steak to your desired doneness. Use a meat thermometer to check the internal temperature, aiming for around 130°F for medium-rare.
- Rest the Steak: Once the steak is cooked, let it rest for about 5-10 minutes before slicing. Resting allows the juices to redistribute, resulting in a more flavorful and tender steak.
What Cooking Techniques Yield Perfect Results for Stove Oven Steak?
The best cooking techniques for achieving perfect results for stove oven steak include:
- Searing: This technique involves cooking the steak at a high temperature in a pan to develop a rich, caramelized crust. Searing enhances the flavor through the Maillard reaction and locks in juices, making for a tender and flavorful steak.
- Oven Finishing: After searing, transferring the steak to a preheated oven allows it to cook evenly and reach the desired internal temperature without overcooking the exterior. This method is particularly useful for thicker cuts, ensuring that the inside is cooked to perfection while maintaining a beautifully browned outside.
- Resting: Allowing the steak to rest after cooking is crucial as it redistributes the juices throughout the meat. This step results in a juicier steak when sliced, preventing the juices from running out and leaving the meat dry.
- Seasoning: Properly seasoning the steak before and after cooking enhances its natural flavors. A simple mix of salt and pepper or a marinade can elevate the taste, while adding herbs or finishing salts can provide an additional layer of flavor.
- Basting: Basting the steak with butter or pan juices while cooking adds richness and moisture. This technique not only enhances flavor but also helps achieve a beautiful golden crust on the steak’s surface.
How Can You Achieve an Ideal Sear When Cooking Steak?
To achieve an ideal sear when cooking steak on the stove or in the oven, several techniques and factors come into play:
- Choose the Right Cut: Selecting a cut of steak that has good marbling, such as ribeye or sirloin, will enhance flavor and tenderness. These cuts can better withstand high cooking temperatures, which is essential for achieving a perfect sear.
- Pat the Steak Dry: Before cooking, it’s crucial to thoroughly dry the steak with paper towels. Removing excess moisture helps create a better crust when searing, as moisture can create steam, which inhibits browning.
- Use High Heat: Preheating your skillet or oven to a high temperature is vital for a good sear. A hot surface allows the Maillard reaction to occur more effectively, leading to a rich, brown crust that adds depth of flavor.
- Oil the Pan: Adding a small amount of oil with a high smoke point, such as canola or avocado oil, ensures that the steak doesn’t stick to the pan. It also helps in achieving that ideal golden-brown crust without burning.
- Don’t Overcrowd the Pan: Cooking one or two steaks at a time gives each piece enough space to sear properly. Overcrowding can lower the pan’s temperature, resulting in steaming rather than searing.
- Let It Rest: After cooking, allowing the steak to rest for a few minutes helps redistribute the juices throughout the meat. This step enhances the overall flavor and ensures a juicy steak when you cut into it.
What Oven Temperature Should You Use for Cooking Steak?
The best stove oven temperatures for cooking steak can vary based on the desired doneness and the cooking method used.
- High Heat (450-500°F): This temperature range is ideal for searing steaks to create a caramelized crust while maintaining a juicy interior.
- Medium Heat (350-400°F): Using medium heat allows for a more controlled cooking process, ensuring even cooking throughout the steak without burning the exterior.
- Low Heat (250-300°F): Low heat is suitable for slow cooking or finishing thicker cuts of steak, allowing them to reach the desired doneness while remaining tender and flavorful.
- Broil Setting: The broil setting typically uses high, direct heat from above, perfect for quickly cooking steaks to achieve a charred surface while keeping the inside juicy.
High heat is essential for achieving that beautiful sear on the outside of the steak, which locks in moisture and enhances flavor. This method is particularly effective for cuts like ribeye or filet mignon that benefit from quick cooking times.
Medium heat is beneficial for cooking steaks that are a bit thicker or for those who prefer a more even doneness. It provides a balance between cooking the meat through while still allowing for a nice crust to form on the outside.
Low heat is best used when cooking larger or thicker cuts of steak, as it allows for more gentle cooking. This method helps to break down connective tissues and results in a more tender steak, particularly when using cuts like brisket or chuck.
The broil setting is a great option for achieving a charred finish on your steak, as it mimics the intense heat of a grill. This method is particularly effective for thinner cuts, allowing them to cook quickly while developing a delicious crust.
How Long Should You Cook Steak in a Stove Oven for Optimal Results?
For optimal results when cooking steak in a stove oven, the cooking time can vary based on the thickness of the steak and the desired level of doneness.
- 1-inch thick steak: For a 1-inch thick steak, cook for about 4-5 minutes on each side for medium-rare.
- 1.5-inch thick steak: A 1.5-inch thick steak typically requires around 5-7 minutes per side for medium-rare, allowing for a nice sear and a juicy interior.
- 2-inch thick steak: For a 2-inch thick steak, expect to cook it for 6-8 minutes on each side, ensuring it’s properly seared before finishing in the oven if necessary.
- Temperature considerations: Use a meat thermometer to check for doneness; aim for 130°F for medium-rare, 140°F for medium, and 160°F for well done.
- Resting time: Always let the steak rest for about 5-10 minutes after cooking to allow the juices to redistribute, resulting in a more flavorful and tender steak.
For a 1-inch thick steak, cooking it for about 4-5 minutes on each side over medium-high heat will yield a delicious medium-rare doneness, which is often recommended for optimal flavor and tenderness. It’s essential to let the steak sear properly to develop a crust while keeping the inside juicy.
A 1.5-inch thick steak requires a bit more time, around 5-7 minutes on each side, ensuring that the exterior is well-browned while the interior reaches the desired temperature. Adjustments in cooking time may be necessary based on the steak’s cut and fat content.
For thicker cuts, such as a 2-inch steak, cooking times extend to 6-8 minutes per side, and finishing in a preheated oven may help achieve a perfect doneness without overcooking the exterior. It’s crucial to monitor the internal temperature closely during this process.
Utilizing a meat thermometer ensures that you reach the desired doneness accurately, which varies from 130°F for medium-rare to 160°F for well done, allowing for precision in steak cooking. This method helps prevent undercooking or overcooking, which can lead to a less enjoyable eating experience.
Finally, letting steak rest after cooking is a vital step that shouldn’t be overlooked; this resting period of 5-10 minutes allows the juices to settle, resulting in a much more flavorful and juicy steak when sliced. Skipping this step often leads to a drier steak as the juices escape upon cutting.
What Marinades and Seasonings Enhance the Flavor of Stove Oven Steak?
Several marinades and seasonings can enhance the flavor of stove oven steak, elevating its taste and tenderness.
- Garlic and Herb Marinade: This marinade combines garlic, fresh herbs like rosemary and thyme, olive oil, and lemon juice. The aromatic herbs infuse the steak with robust flavors while the acidity of lemon juice helps tenderize the meat, making it juicy and flavorful.
- Soy Sauce and Ginger Marinade: A mixture of soy sauce, grated ginger, garlic, and a touch of honey creates a savory and slightly sweet marinade. The soy sauce provides umami depth, while ginger adds a fragrant kick, making this marinade perfect for a more Asian-inspired dish.
- Balsamic Vinegar and Dijon Mustard Marinade: Combining balsamic vinegar, Dijon mustard, garlic, and olive oil results in a tangy and rich flavor profile. The balsamic vinegar helps tenderize the meat and caramelizes beautifully when cooked, adding a complex sweetness.
- Spicy Chili Rub: A blend of chili powder, cayenne pepper, paprika, garlic powder, and brown sugar creates a flavorful and spicy rub. This seasoning blend not only adds heat but also enhances the steak’s natural flavors, resulting in a delicious crust when seared in the oven.
- Montreal Steak Seasoning: This classic seasoning mix includes coarse salt, black pepper, garlic, and paprika. It is specifically designed to complement red meats, providing a well-rounded flavor that enhances the steak without overpowering its natural taste.
- Red Wine Marinade: A mixture of red wine, olive oil, garlic, and herbs creates a rich marinade that tenderizes the steak while adding depth of flavor. The acidity in the red wine helps break down tough fibers in the meat, making it more tender and flavorful after cooking.