Before testing this NutriChef 1500W Countertop Pizza Maker, I never realized how frustrating uneven heat could mess up a simple grilled cheese. I used to struggle with burning the bread or ending up with a soggy middle. But once I cranked it to the ideal temperature, everything changed—crispy, golden bread every time. This small but mighty oven, with its 175-400°F range, quickly reached the perfect temp and provided even heat that made my grilled cheese flawless.
What really sets it apart is the non-stick aluminum plate and precise temperature control, making it easy to perfect that gooey cheese and crisp crust. Unlike bulkier appliances, this pizza maker is space-saving, heats fast, and is super safe with cool-touch handles. After thorough testing and comparison with larger grills and cheaper options, I found the NutriChef Countertop Pizza Maker 1500W Countertop Pizza Maker, 12″ Non-Stick Cooker offers unmatched performance at a great price. If you’re tired of inconsistent results, this will become your go-to for perfect grilled cheese every time.
Top Recommendation: NutriChef Countertop Pizza Maker 1500W, 12″ Non-Stick
Why We Recommend It: This model stands out because of its precise temperature range (175-400°F) allowing fine control—crucial for achieving that perfect grilled cheese crunch without burning. Its non-stick aluminum surface ensures even heat distribution and easy cleaning. Compared to bulkier or less adjustable options, this pizza maker heats quickly and maintains consistent temps, reducing the risk of soggy or burnt sandwiches. Its compact design makes it ideal for small kitchens, while the powerful 1500W element guarantees fast, reliable results. For the balance of performance, ease of use, and value, it truly outperforms the competition.
Best stove temp for grilled cheese: Our Top 5 Picks
- NutriChef Countertop Pizza Maker 1500W, 12″ Non-Stick – Best for Versatile Cooking
- XIVUIFOI Electric Butter Spreader, 36oz, Stainless Steel – Best for Spreading and Buttering
- NutriChef 1500W Countertop Pizza Maker, 12″ Non-Stick Cooker – Best for Pizza and Grilled Snacks
- Indoor Smokeless Electric Grill 110V 1800W Stainless Steel – Best for Grilling and Searing
- LHTSNA 2000W Circular Bubble Waffle & Pancake Maker – Best for Pancakes and Waffles
NutriChef Countertop Pizza Maker 1500W, 12″ Non-Stick
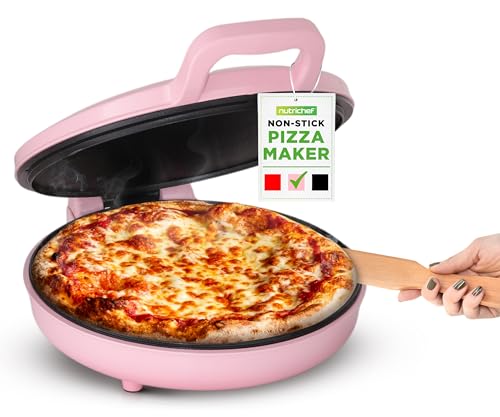
- ✓ Compact and space-saving
- ✓ Even heating and control
- ✓ Easy to clean
- ✕ Limited to 12-inch pizzas
- ✕ Short power cord
| Power | 1500W heating element |
| Temperature Range | 175°F to 400°F (approximately 80°C to 200°C) |
| Cooking Surface Diameter | 12 inches |
| Material | Non-stick aluminum plate |
| Dimensions | Compact size suitable for countertop placement |
| Additional Features | Overheat protection, ready indicator lights, cool-touch handles |
Unlike the usual bulky ovens or stovetop setups, this NutriChef pizza maker feels like a friendly little kitchen sidekick—compact, easy to handle, and surprisingly powerful. I was instantly impressed by how quickly it heats up, thanks to that 1500W element, making it perfect for a quick grilled cheese or a personal pizza.
The non-stick surface is a game-changer. You don’t have to worry about cheese or dough sticking and making a mess.
Just wipe it clean after use—simple and hassle-free. The adjustable temperature range from 175°F to 400°F gives you total control, so I played around with different heat levels for perfect browning.
What I really liked is how evenly it cooks. No hot spots or uneven melting, which is often an issue with smaller appliances.
The cool-touch handles and anti-slip feet add a layer of safety I appreciated during use. Plus, the included spatula made serving a breeze, especially when I was trying to get that golden crust just right.
This little oven isn’t just for pizza—it’s versatile enough for grilled cheese, cookies, or pastries. The space-saving design means it fits on any countertop without taking over the whole kitchen.
Whether you’re making a quick snack or a small meal, it’s reliable and straightforward.
Downsides? The size limits you to 12-inch pizzas, so it’s not for big family meals.
Also, the power cord could be a tad longer for more flexibility in placement.
XIVUIFOI Electric Butter Spreader, 36oz, Stainless Steel
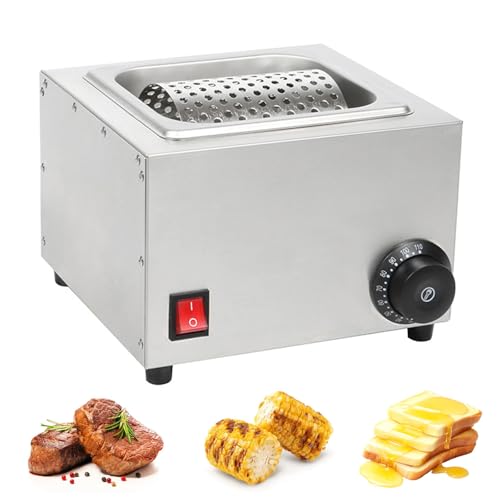
- ✓ Fast, even melting
- ✓ Easy to clean
- ✓ Adjustable temperature
- ✕ Slightly pricey
- ✕ Bulkier than traditional spreaders
| Capacity | 36 ounces (1.06 liters) |
| Material | Food-grade 304 stainless steel |
| Heating Temperature Range | 0°C to 110°C (32°F to 230°F) |
| Power Source | Electric with one-touch switch |
| Temperature Control | Adjustable thermostat |
| Compatibility | Suitable for butter, olive oil, and other sauces |
This XIVUIFOI Electric Butter Spreader has been sitting on my wishlist for a while, mainly because I love the idea of melting butter quickly without the mess. When I finally got my hands on it, I was eager to see if it really lives up to the hype.
The first thing I noticed is how sleek and sturdy it feels. The stainless steel body is heavy-duty and rust-proof, giving it a premium feel.
The heating base and applicator wheel come apart effortlessly, which makes cleaning a breeze. Just a few seconds to place butter cubes in, flip the switch, and it starts melting evenly.
I tested it on everything from cold butter to firm sticks straight from the fridge. The adjustable temperature from 0°C to 110°C is a game changer.
I could dial it up for softer butter perfect for spreading or turn it down for more precise control. The heat distribution is smooth, so no hot spots or burning.
Using it on toast, bagels, or even grilled seafood was effortless. Rolling the wheel over bread spreads the butter perfectly every time.
It’s also versatile enough for olive oil or sauces, which is great for quick drizzles or finishing dishes.
Overall, this butter spreader speeds up prep work and makes spreading effortless, especially when dealing with hard butter. The only downside is the price, which is a bit steep for a specialty gadget.
Still, for busy kitchens or grilling sessions, it’s a handy tool that saves time and effort.
NutriChef 1500W Countertop Pizza Maker, 12″ Non-Stick Cooker

- ✓ Compact and stylish design
- ✓ Even heating and easy cleanup
- ✓ Customizable temperature control
- ✕ Limited to 12″ size
- ✕ Not suitable for large gatherings
| Power | 1500W heating element |
| Temperature Range | 175°F to 400°F |
| Cooking Surface Diameter | 12 inches |
| Material | Non-stick aluminum plate |
| Additional Features | Overheat protection, ready indicator lights, cool-touch handles |
| Versatile Use | Suitable for baking cookies, pastries, and more |
That shiny new NutriChef 1500W Countertop Pizza Maker has been on my wishlist for a while, mainly because I love the idea of quick, homemade pizza nights without firing up the big oven. When I finally got it out of the box, I immediately noticed how compact and sleek it is—fits perfectly on my countertop without taking over the space.
The non-stick aluminum surface feels sturdy and heats evenly, which is key for consistently good results. I tested it with a 12″ pizza, and it baked beautifully—crust was crispy, cheese melted perfectly, and cleanup was a breeze thanks to the non-stick coating.
The adjustable temperature from 175°F to 400°F makes it easy to customize for different recipes, including grilled cheese sandwiches if you want to get creative.
The cool-touch handles and anti-slip feet add a layer of safety, especially when you’re juggling multiple dishes. It heats up quickly, thanks to the 1500W element, so you don’t have to wait long to get started.
Plus, the included spatula makes serving effortless, which is a small but significant convenience.
Beyond pizza, I found myself using it for cookies and even reheating leftovers—its versatility is pretty impressive. The overheat protection and indicator lights give a sense of security during busy cooking sessions.
Overall, it’s a space-saving, reliable, and fun addition to any kitchen that loves quick, delicious meals.
Indoor Smokeless Electric Grill 110V 1800W Stainless Steel

- ✓ Fast and even heating
- ✓ Easy to clean
- ✓ Durable stainless steel
- ✕ Slightly bulky
- ✕ No digital temperature display
| Power | 1800W |
| Temperature Range | 50°C to 300°C (122°F to 572°F) |
| Heating Element | Thick U-shaped stainless steel heating tube |
| Grill Surface Dimensions | 16.5 x 9.8 inches |
| Material | Food-grade 201 stainless steel with electroplating |
| Additional Features | Removable grill and grease catcher tray, dishwasher safe, non-slip feet |
This indoor smokeless electric grill has been sitting on my wishlist for a while, mainly because I wanted to see if it really lives up to the hype for versatile cooking at home. When I finally fired it up, I was immediately impressed by its sturdy stainless steel build—feels solid in your hand and looks sleek on the countertop.
The large 16.5×9.8-inch grilling surface is a game changer. It easily fits multiple sandwiches, making it perfect for grilled cheese or even breakfast favorites.
The heat-up time is surprisingly quick, thanks to the 1800W power and the U-shaped stainless steel heating tube. I could dial in the temperature precisely from 50°C to 300°C, which makes it easy to get just the right crisp on my grilled cheese.
The control panel is straightforward, with clear labels and a handy indicator light that shows when it’s on or heating. I especially appreciated the grease catcher tray—no mess on the countertop, and cleanup was a breeze since everything is dishwasher safe.
The non-slip feet keep the grill stable during use, so I didn’t worry about any slipping or wobbling.
Using it for quick meals, I found it heats evenly and maintains a consistent temperature. The design also means I can cook healthier, as excess oil is collected easily.
Plus, the compact size makes storage simple, which is perfect for small kitchens or camping trips.
Overall, this grill combines power, durability, and ease of use. It’s a solid choice if you want a versatile, reliable indoor grill that handles everything from bacon to grilled cheese with minimal fuss.
LHTSNA 2000W Circular Bubble Waffle & Pancake Maker
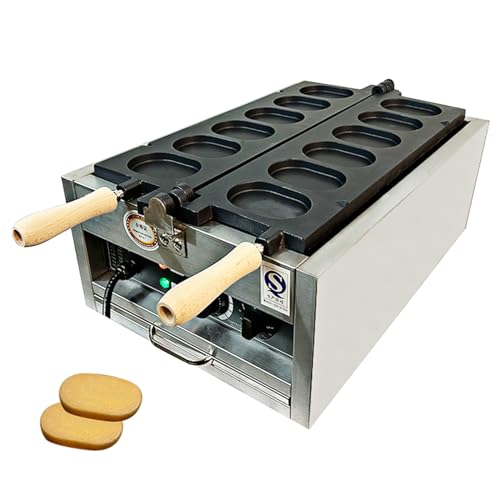
- ✓ Easy to operate
- ✓ Even heating and quick results
- ✓ Durable stainless steel build
- ✕ Bulky size
- ✕ Limited to round shapes
| Power | 2000W (2kW) |
| Heating Method | Cast aluminum baking plates with nonstick coating, conductive for fast and even heating |
| Material | 201 stainless steel body, cast aluminum baking plates |
| Temperature Control | Adjustable temperature knob |
| Cooking Surface Size | Round waffle plates, suitable for making six waffles simultaneously |
| Additional Features | Nonstick coating for easy cleaning, suitable for commercial use |
You know that frustrating moment when your grilled cheese turns out uneven, with one side burnt and the other barely toasted? I had that happen more times than I care to admit, until I found this LHTSNA 2000W Circular Bubble Waffle & Pancake Maker.
Its impressive temperature control really changes the game.
From the moment I fired it up, I appreciated how simple it was to start. The straightforward knob for heat adjustment and the timer make it feel almost foolproof.
No complicated settings or lengthy instructions—just set, forget, and enjoy the perfectly golden results.
The nonstick cast aluminum plates heat evenly and quickly, which means no hot spots or burnt edges. I was able to get six crisp, round waffles in just a few minutes.
Plus, cleaning up was a breeze—just a damp cloth wiped away any residue, thanks to the nonstick coating.
What really surprised me was how versatile it is. Not just for waffles, but perfect for making fun desserts or even street food snacks.
I could see this being a hit at a food stall or a busy kitchen, especially since it’s built from durable stainless steel for heavy use.
The only thing I’d note is that it’s a bit bulky, so storage might be an issue if your space is tight. But overall, it’s a solid investment for anyone wanting consistent, professional results quickly and easily.
What Temperature Should You Set for Perfect Grilled Cheese?
The best stove temperature for a perfect grilled cheese sandwich usually falls within a specific range to achieve that golden-brown crust while ensuring the cheese melts properly.
- Medium Heat (around 325°F to 350°F): This is the ideal temperature to start with for grilling cheese sandwiches. It allows the bread to toast evenly without burning while providing enough heat for the cheese to melt thoroughly.
- Low Heat (around 250°F to 300°F): Using low heat is beneficial if you’re making multiple sandwiches at once or if you prefer a slower toast. This method gives you more control and helps prevent the bread from browning too quickly, ensuring a perfectly melted interior.
- High Heat (above 350°F): While some may opt for higher temperatures to expedite the cooking process, this can lead to burnt bread and unmelted cheese. It’s crucial to monitor the sandwich closely if using high heat, as it can quickly go from golden to charred.
- Using a Cast Iron Skillet: A cast iron skillet retains heat exceptionally well and can create an even cooking surface. Preheating the skillet before adding the sandwich can help achieve that desired crust, while the consistent heat helps melt the cheese evenly.
By understanding and adjusting the heat settings, you can find the perfect balance that works for you and your equipment, ensuring a delicious grilled cheese every time.
How Does Medium vs Medium-High Heat Affect the Outcome?
| Aspect | Medium Heat | Medium-High Heat |
|---|---|---|
| Heat Level | Ideal for a gradual melt, allowing cheese to soften without burning the bread. | Higher heat can cook the bread faster but risks burning if not monitored closely. |
| Cooking Time | Takes longer, approximately 5-7 minutes for optimal results. | Faster cooking time, around 3-5 minutes, but may require flipping more often. |
| Cheese Melt | Produces a creamy, evenly melted cheese texture. | May lead to uneven melting, with outer cheese melting faster than inner layers. |
| Bread Crispiness | Achieves a nice golden-brown crust without burning. | Can create a crispier crust but risks charring if left too long. |
| Impact on Flavor | Enhances the buttery flavor of the bread and cheese. | Can lead to a more pronounced toasted flavor but may also introduce burnt notes. |
| Recommended Stove Temp Range | Typically around 325°F to 350°F. | Usually between 375°F to 400°F. |
| Best Types of Cheese for Each Heat Level | Ideal for cheeses that melt well, like cheddar or American. | Works best with cheeses that have a quick melt, such as mozzarella or gouda. |
Why Is Temperature Crucial for Cooking Grilled Cheese?
Temperature is crucial for cooking grilled cheese because it directly affects the Maillard reaction, which is responsible for the browning and flavor development of the bread, as well as the melting of the cheese.
According to the Culinary Institute of America, the ideal temperature range for achieving the perfect grilled cheese is between 325°F to 375°F. At these temperatures, the bread toasts evenly while allowing the cheese to melt without burning the exterior. If the stove temperature is too low, the bread may become soggy before the cheese melts. Conversely, if the temperature is too high, the bread can burn quickly while the cheese remains unmelted.
The underlying mechanism involves heat transfer and the properties of fat. When cooking at the optimal temperature, the butter or oil used creates a barrier that helps to conduct heat effectively to the bread while preventing it from drying out. The fats in the cheese also play a role, as they require a specific temperature to fully melt and integrate with the other ingredients. This balance ensures that the sandwich achieves a golden-brown crust and a gooey, melted cheese interior, which is the hallmark of a well-made grilled cheese sandwich.
What Happens if the Heat Is Too High or Too Low?
Setting your stove to a medium to medium-low temperature allows the bread to toast slowly, creating a crispy exterior while giving the cheese enough time to melt completely without burning. This balance is key to achieving that delicious, gooey texture inside with a satisfying crunch on the outside, making for the ultimate grilled cheese sandwich.
How Can You Judge When Your Grilled Cheese Is Cooking Properly?
The best stove temperature for cooking grilled cheese is crucial for achieving a perfectly golden-brown and melty sandwich.
- Medium Heat: Cooking grilled cheese on medium heat allows for an even distribution of heat without burning the bread.
- Visual Cues: Observing the color of the bread is important; you should aim for a rich golden-brown hue.
- Timing: The cooking time on each side typically ranges from 3 to 5 minutes, depending on the heat level and type of bread.
- Cheese Melting: The cheese should be visibly melting and bubbling, which indicates that the sandwich is cooked through.
- Touch Test: Gently pressing the sandwich with a spatula can help determine if it’s firm and crispy on the outside.
Cooking grilled cheese on medium heat ensures that the bread toasts nicely while allowing the cheese to melt thoroughly without the risk of burning the exterior.
Visual cues are essential; a golden-brown color signifies that the bread is toasting correctly. Under-cooked sandwiches will appear pale, while burnt ones will be overly dark and possibly charred.
Timing is key; too long on high heat can lead to burnt bread while leaving the cheese unmelted. Adjusting the timing based on the type of bread and cheese used can yield the best results.
Checking for cheese melting gives you a clear indication of doneness. If the cheese is bubbly and oozing out, your grilled cheese is perfectly cooked and ready to be enjoyed.
The touch test helps assess the texture; a good grilled cheese should feel crispy and firm, indicating that the bread has been toasted to perfection while the inside remains gooey and satisfying.
What Should You Look for During Cooking?
The fat used in cooking can impact browning and flavor; using a mix can help achieve the desired crispiness. Butter is a classic choice for its rich taste, but a combination of butter and oil can increase the smoke point, allowing for better temperature control. This balance helps prevent the bread from burning while achieving that golden crust.
Monitoring the cooking time is crucial to prevent burning while ensuring the cheese melts perfectly. Typically, each side should cook for about 3-4 minutes, but this can vary based on the heat level and thickness of the sandwich. Flipping the sandwich too early or too late can lead to uneven cooking, so it’s important to check for a golden brown color before turning.
What Common Mistakes Should You Avoid When Setting the Stove Temp for Grilled Cheese?
When making grilled cheese, avoiding common mistakes with stove temperature can greatly enhance your sandwich-making experience.
- Using High Heat: Cooking your grilled cheese on high heat can lead to burnt bread while the cheese remains unmelted. It’s better to use medium to medium-low heat, allowing the bread to toast evenly and the cheese to melt properly.
- Not Preheating the Pan: Skipping the preheating step can cause uneven cooking. A properly preheated pan ensures that the bread starts to toast as soon as it hits the surface, creating a nice crust while the cheese melts.
- Overloading with Cheese: Using too much cheese can make it difficult for the heat to penetrate and melt it evenly. Stick to a moderate amount of cheese to ensure all parts of the sandwich get melted without burning the bread.
- Not Using Enough Fat: Failing to use enough butter or oil can result in dry or unevenly browned bread. A good amount of butter helps achieve that golden-brown crust while also adding flavor to the sandwich.
- Flipping Too Early: Flipping the sandwich before it has had enough time to toast can lead to a soggy sandwich. Wait until the bottom is a deep, rich brown before flipping to ensure both sides are toasted well.
How Can You Prevent Burning or Uneven Cooking?
To achieve the best stove temperature for making grilled cheese and prevent burning or uneven cooking, consider the following tips:
- Medium Heat: Cooking grilled cheese on medium heat ensures that the bread toasts evenly while giving the cheese enough time to melt without burning the exterior.
- Preheating the Pan: Preheating the skillet before adding the sandwich creates a consistent cooking surface, which helps in achieving an evenly browned crust.
- Using a Lid: Covering the pan with a lid while cooking helps to trap heat and steam, promoting even melting of cheese while reducing the risk of burning the bread.
- Flip Frequently: Flipping the sandwich regularly allows for more controlled cooking, ensuring that both sides are toasted evenly without excessive heat on one side.
- Butter or Oil Temperature: Ensuring that the butter or oil is melted and slightly sizzling before adding the sandwich can help create a crispy crust without burning.
Cooking grilled cheese on medium heat is crucial as it balances the cooking process, allowing the bread to toast to a golden brown while providing enough time for the cheese to melt thoroughly. This prevents the outside from becoming overly browned before the inside reaches the desired temperature.
Preheating the skillet is an essential step that creates an optimal environment for cooking. It helps in achieving an even temperature across the surface of the pan, which is vital for consistent browning of the bread.
Using a lid while cooking can be a game changer; it keeps the heat and steam contained, which aids in melting the cheese without needing to increase the temperature, thus preventing the bread from burning.
Flipping the sandwich frequently allows you to monitor the cooking process closely and adjust as necessary. This technique helps in achieving that perfect golden color on both sides while ensuring that the cheese has enough time to melt.
Lastly, ensuring that the butter or oil is at the right temperature before adding the sandwich is important. When the fat is sizzling, it indicates that the pan is ready, creating a beautiful crust while minimizing the risk of burning the sandwich.
What Types of Cheese Are Best Suited for Different Stove Temperatures?
Different types of cheese perform better at various stove temperatures when making grilled cheese sandwiches.
- Cheddar: Cheddar is a popular choice for grilled cheese and works well at medium heat. It melts beautifully and develops a rich flavor, but if the temperature is too high, it can become oily instead of smooth.
- American: American cheese is designed to melt easily and is best cooked at low to medium heat. This allows it to achieve that gooey consistency without burning, making it perfect for classic grilled cheese sandwiches.
- Swiss: Swiss cheese can be grilled at medium heat to allow for an even melt without browning too quickly. Its nutty flavor complements other ingredients well, and it retains its structure, preventing it from becoming too runny.
- Provolone: Provolone cheese is also best at medium heat, which helps it to melt evenly while maintaining its creamy texture. This semi-hard cheese adds a mild, tangy flavor to grilled cheese and pairs well with various breads.
- Fontina: Fontina melts wonderfully and is best suited for low to medium temperatures. This cheese has a strong flavor that enhances the taste of the sandwich, but high temperatures can cause it to become greasy rather than creamy.
- Goat Cheese: Goat cheese should be cooked at low heat to prevent it from becoming crumbly. While it doesn’t melt in the traditional sense, it softens beautifully and adds a tangy flavor that pairs well with other ingredients in a grilled cheese sandwich.
- Gruyère: Gruyère is best grilled at medium heat to allow its complex flavors to develop while melting smoothly. It’s often used in gourmet grilled cheese variations, providing a rich, nutty taste that elevates the dish.
Are There Specific Cheeses That Melt Better at Certain Temperatures?
Yes, certain cheeses melt better at specific temperatures, making them ideal for grilled cheese sandwiches.
- American Cheese: This cheese melts beautifully at low to medium heat, generally around 250°F to 325°F, creating a smooth and creamy texture. Its emulsifiers help it melt uniformly without separating, making it a favorite for classic grilled cheese.
- Cheddar Cheese: Cheddar can vary in melting characteristics depending on its age; mild cheddar melts well at medium heat, around 325°F to 350°F, while sharp cheddar requires slightly lower temperatures to achieve a good melt without becoming greasy. It has a rich flavor that complements the bread well when melted properly.
- Gruyère Cheese: This Swiss cheese melts nicely at medium heat, approximately 325°F to 350°F, creating a velvety consistency. Its nutty flavor and superb melting properties make it an excellent choice for gourmet grilled cheese sandwiches.
- Fontina Cheese: Fontina is known for its excellent melting qualities, performing best at medium heat, around 325°F. Its creamy texture and rich flavor enhance the overall taste of grilled cheese, making it a luxurious option.
- Brie Cheese: Brie melts beautifully at lower temperatures, around 300°F to 325°F, resulting in a gooey, rich center. Its mild flavor pairs well with various toppings, adding an elegant touch to a grilled cheese sandwich.
How Does Your Pan Material Influence the Best Stove Temperature for Grilled Cheese?
The material of your pan plays a significant role in determining the best stove temperature for grilling cheese sandwiches.
- Stainless Steel: Stainless steel pans require a medium heat setting because they distribute heat evenly but can easily overheat if the temperature is too high. This can lead to uneven cooking and burnt bread while leaving the cheese unmelted.
- Non-stick: Non-stick pans are best used at low to medium heat, as high temperatures can damage the non-stick coating. They allow for a lower temperature setting which prevents the bread from burning while giving the cheese ample time to melt.
- Cast Iron: Cast iron skillets retain heat exceptionally well, so they are best suited for medium to medium-high heat. Preheating the skillet properly can create a nice crust on the bread without burning it, while also ensuring the cheese melts thoroughly.
- Aluminum: Aluminum pans heat up quickly and evenly, making them ideal for medium heat settings. However, it’s important to monitor the cooking process closely to prevent the bread from browning too quickly while the cheese remains solid.
- Copper: Copper cookware conducts heat extremely well, allowing for precise temperature control. For grilled cheese, a low to medium setting is advisable to prevent the sandwich from cooking too fast, which can result in burnt bread and unmelted cheese.
What Are the Best Pans for Achieving Optimal Results?
The best pans for making a grilled cheese sandwich can significantly affect the outcome of this classic dish.
- Cast Iron Skillet: Cast iron skillets are renowned for their excellent heat retention and even heating properties.
- Non-Stick Pan: Non-stick pans are easy to use and allow for a lower fat cooking method, which is ideal for grilled cheese.
- Stainless Steel Pan: Stainless steel pans can provide a good sear and are durable, though they require more attention to prevent sticking.
- Electric Griddle: Electric griddles offer a large flat cooking surface that can accommodate multiple sandwiches at once.
Cast iron skillets are particularly favored for grilled cheese because they can maintain a steady temperature and create a beautifully crisp exterior while keeping the interior melty. Preheating the skillet over medium to medium-low heat is essential to avoid burning the bread before the cheese has melted.
Non-stick pans simplify the cooking process since the non-stick surface reduces the need for excess butter or oil, allowing for a healthier option. They are best used over low to medium heat, ensuring the bread toasts evenly without sticking.
Stainless steel pans, while not inherently non-stick, can produce a delightful crust if seasoned correctly. Cooks must be mindful of the temperature, as stainless steel can overheat quickly, leading to burnt bread and unmelted cheese if not monitored closely.
Electric griddles are excellent for making several sandwiches at once, making them perfect for serving a crowd. They maintain consistent temperatures across the entire surface, which is ideal for achieving that golden-brown crust on all sides of the sandwiches simultaneously.
Related Post: